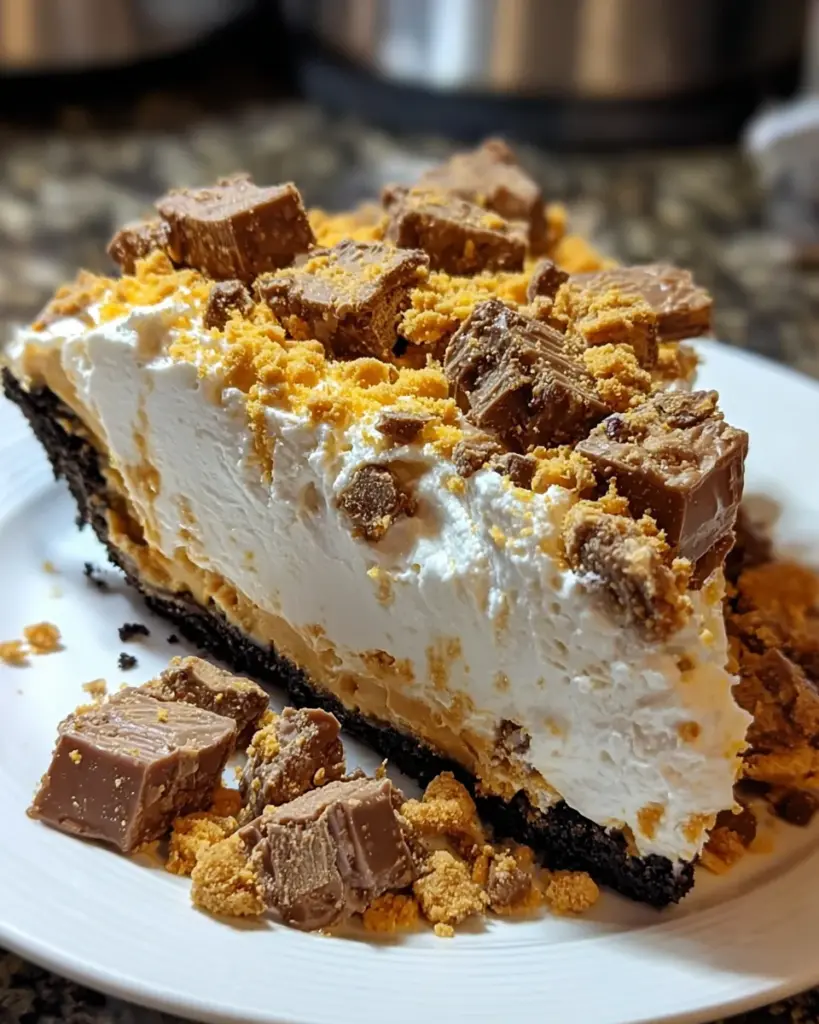
Introduction to Butterfinger Pie
As a busy mom, I know how precious our time can be. That’s why I absolutely adore this Butterfinger Pie recipe! It’s a rich, creamy delight that comes together in just 15 minutes. This no-bake pie is the perfect solution for those hectic weeknights or surprise guests. The combination of cream cheese, peanut butter, and those delightful crunchy Butterfinger bars creates a dessert that not only impresses but also satisfies every sweet tooth. Trust me, once you serve this pie, your family and friends will be begging for the recipe!
Why You’ll Love This Butterfinger Pie
This Butterfinger Pie is a game-changer for busy moms like us. It’s ridiculously easy to make—no baking required! In just 15 minutes, you can whip up a dessert that steals the show at any gathering. Plus, the blend of creamy peanut butter and chocolatey Butterfinger takes your taste buds on a delicious adventure. It’s a true crowd-pleaser that brings smiles without exhausting your energy!
Ingredients for Butterfinger Pie
Creating this delicious Butterfinger Pie is a breeze, thanks to a few simple ingredients that pack a punch. Here’s what you’ll need:
- Cream Cheese: Use an 8-ounce package, softened to room temperature. This gives your pie its rich and creamy base.
- Creamy Peanut Butter: Just half a cup provides that irresistible nutty flavor that complements the chocolate perfectly.
- Vanilla Extract: Only a couple of teaspoons of pure vanilla extract elevate the flavor, adding a sweet and aromatic touch.
- Powdered Sugar: This sweetener is crucial. It sweetens the filling while ensuring a smooth texture, creating that fluffy pie experience.
- Fun-Sized Butterfinger Bars: You’ll need a bag of these chocolatey, crunchy delights, crushed to provide both flavor and texture. Save a couple for sprinkling on top!
- Cool Whip: One 8-ounce container of thawed Cool Whip keeps the filling light and airy, making each bite melt in your mouth.
- Oreo or Chocolate Graham Cracker Crust: Grab a store-bought crust for convenience. You can choose between a classic Oreo crust or a chocolate graham cracker base for extra flavor.
All ingredients with exact quantities are available at the end of the article for easy printing. Each component plays a key role in delivering the delightful flavor of Butterfinger Pie. So let’s gather these goodies and prepare for a delicious adventure!
How to Make Butterfinger Pie
Ready to dive into the creation of this luscious Butterfinger Pie? I promise it’s simpler than you might think! Let’s break it down step by step, ensuring that even a tired mom like you can whip this up without breaking a sweat.
Step 1: Cream Cheese and Peanut Butter Mixture
Start by grabbing a large mixing bowl. Beat the cream cheese and creamy peanut butter together until the mixture turns smooth and creamy. This should take about three minutes. The blending is the foundation of your pie, so make sure it’s well mixed!
Step 2: Add Vanilla Extract
Now it’s time to add in that lovely vanilla extract. Pour in two teaspoons and mix until everything is perfectly blended. This step only takes about a minute. The vanilla will add a warm, sweet scent that will make your kitchen smell amazing!
Step 3: Incorporate Powdered Sugar
Next, gradually add the powdered sugar to the cream cheese mixture. Mix it in until the filling is smooth and fluffy, which should take around four minutes. This is where the pie gets its sweetness! So, feel free to taste a little—don’t worry, I won’t tell!
Step 4: Fold in Crushed Butterfinger Bars
It’s time to bring in the stars of the show—those crushed Butterfinger bars! Gently fold them into the creamy mixture, saving a couple for topping. This should be done carefully to maintain the delicious texture. You want those chocolatey bits to shine through!
Step 5: Add Thawed Cool Whip
Now, let’s make this pie light and airy! Carefully fold in the thawed Cool Whip. Remember, you want to keep that lightness, so mix gently until just combined. This step makes every slice melt in your mouth!
Step 6: Spread into Crust
Finally, pour your beautiful filling into the prepared Oreo or chocolate graham cracker crust. Spread it evenly, and then sprinkle the reserved Butterfinger crumbs on top. This little touch adds extra charm and crunch. Now, you’re ready to chill it in the fridge until set!
Tips for Success
- Make sure your cream cheese is at room temperature for easy blending.
- For a fun twist, try adding a pinch of sea salt to enhance the flavors.
- Let your pie chill for at least four hours for the best texture.
- Don’t skip the reserved Butterfinger topping—it adds a delightful crunch!
- Store any leftovers in an airtight container in the fridge for up to three days.
Equipment Needed
- Large Mixing Bowl: Essential for combining all your ingredients. A sturdy glass or stainless-steel bowl works well.
- Electric Mixer: For a smooth mixture, an electric hand mixer or stand mixer saves time and effort.
- Spatula: Perfect for folding in ingredients without deflating your mixture.
- Measuring Cups and Spoons: Important for accuracy in your ingredients.
- Pie Dish: Use a 9-inch pie dish for the final presentation of your Butterfinger Pie.

Variations
- Nut-Free Option: Replace peanut butter with sun butter or omit it altogether for a nut-free dessert suitable for allergies.
- Healthier Twist: Use Greek yogurt in place of cream cheese for a lighter version while retaining creaminess.
- Different Chocolates: Swap out Butterfinger bars for Reese’s or Milky Way for a unique flavor profile that still satisfies your sweet tooth.
- Dairy-Free Version: Use dairy-free cream cheese and coconut whipped cream along with a gluten-free crust for a dairy-free delight.
- Fruity Addition: Stir in some chopped bananas or strawberries for a fresh fruit twist that adds sweetness and color.
Serving Suggestions
- Pair your Butterfinger Pie with a scoop of vanilla ice cream for a delightful contrast in temperature.
- A dollop of whipped cream on top adds a fun touch and more creaminess.
- Serve with a cup of coffee or a glass of cold milk for a classic combination.
- For a beautiful presentation, garnish with extra crumbled Butterfinger and chocolate drizzle.
FAQs about Butterfinger Pie
As you embark on your Butterfinger Pie adventure, you might have a few questions. I’m here to help clear things up! Here are some frequently asked questions to guide you along the way.
Can I make Butterfinger Pie ahead of time?
Absolutely! This no-bake Butterfinger Pie is perfect for making in advance. I often prepare it the night before, letting it chill overnight for the best taste and texture. Just cover it tightly in the fridge!
How do I store leftovers?
If you have any pie leftover—though that’s rare in my house—you can store it in an airtight container in the fridge for up to three days. Just make sure to keep it well-sealed to maintain its deliciousness!
Can I substitute the Cool Whip?
Sure! If you prefer, you can make your own whipped cream instead of using Cool Whip. Just whip heavy cream with a bit of powdered sugar until soft peaks form, and fold it in just like you would with the Cool Whip.
Is this Butterfinger Pie gluten-free?
To make a gluten-free version, simply use a gluten-free crust. Many brands offer gluten-free Oreo or chocolate graham cracker crusts available at grocery stores.
What can I serve with Butterfinger Pie?
This pie pairs wonderfully with vanilla ice cream or fresh fruit. You can also serve it with a drizzle of chocolate sauce for an extra indulgent treat.
Final Thoughts
Making this Butterfinger Pie has been nothing short of a delightful culinary adventure for me. The joy of mixing those creamy ingredients, combined with the nostalgia of Butterfinger bars, brings back sweet memories. I love how this no-bake dessert reflects both simplicity and indulgence—perfect for busy moms who still want to create special moments. Each slice offers a creamy burst of flavors that lightens up any gathering. So, as you serve this pie, watch your loved ones smiling with every bite, knowing you’ve created something truly special without too much effort. Enjoy every blissful moment!
Print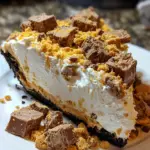
Butterfinger Pie
- Total Time: 15 minutes
- Yield: 8 servings 1x
- Diet: Vegetarian
Description
A rich and creamy Butterfinger Pie that’s perfect for any occasion and will impress your guests with its delicious flavor.
Ingredients
- 1 (8-ounce) package cream cheese, room temperature
- 1/2 cup creamy peanut butter
- 2 teaspoons vanilla extract
- 1 1/2 cups powdered sugar
- 1 (12.5-ounce) bag fun-sized Butterfinger bars, crushed (reserve 2 bars for topping)
- 1 (8-ounce) container Cool Whip, thawed
- 1 store-bought Oreo or chocolate graham cracker crust
Instructions
- In a large mixing bowl, beat cream cheese and peanut butter until smooth and creamy. (⏱️ 3 minutes)
- Add in vanilla extract and continue mixing until well combined. (⏱️ 1 minute)
- Gradually add powdered sugar, beating until smooth and fluffy. (⏱️ 4 minutes)
- Gently fold in the crushed Butterfinger bars, saving some for topping. (⏱️ 2 minutes)
- Fold in the thawed Cool Whip carefully to keep the mixture light and airy. (⏱️ 2 minutes)
- Spread the filling evenly into the prepared crust, then sprinkle with the reserved Butterfinger crumbs. (⏱️ 3 minutes)
Notes
- Ensure the cream cheese is at room temperature for easier mixing.
- For a crunchier topping, feel free to add more crushed Butterfinger bars on top.
- This pie can be made a day in advance to save time.
- Prep Time: 15 minutes
- Cook Time: 0 minutes
- Category: Dessert
- Method: No-Bake
- Cuisine: American
Nutrition
- Serving Size: 1 slice
- Calories: 320
- Sugar: 25g
- Sodium: 200mg
- Fat: 18g
- Saturated Fat: 7g
- Unsaturated Fat: 8g
- Trans Fat: 0g
- Carbohydrates: 32g
- Fiber: 1g
- Protein: 5g
- Cholesterol: 25mg