Introduction to Samoa Cheesecake
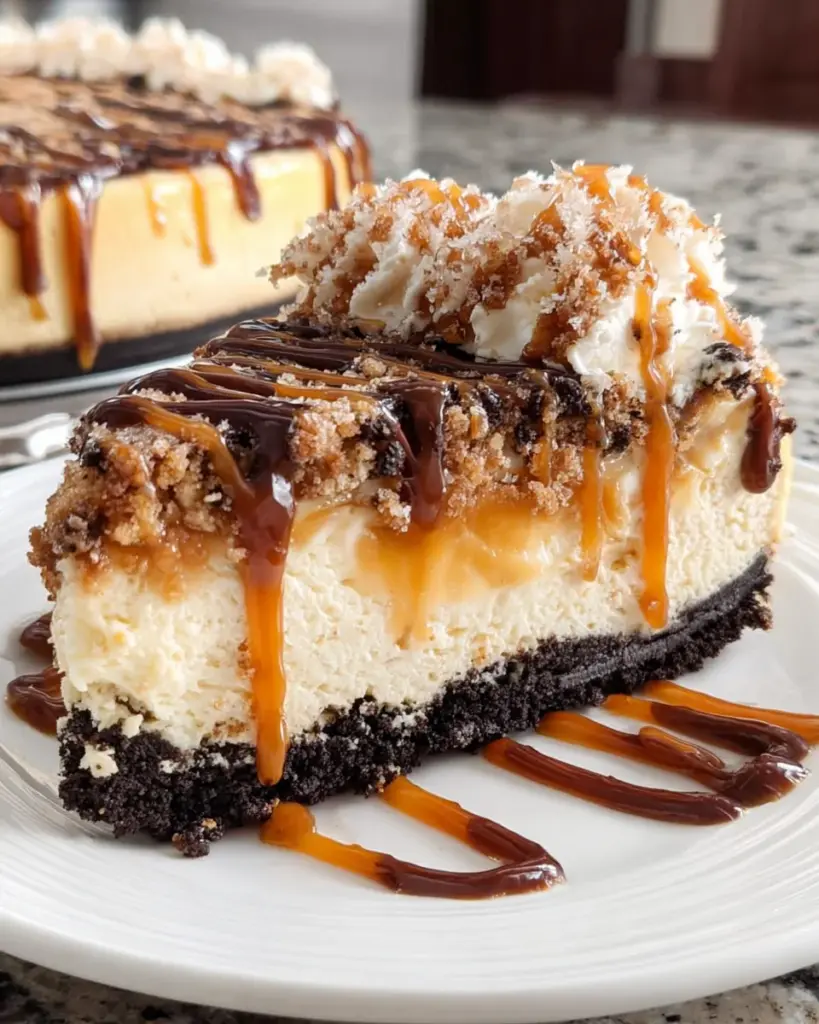
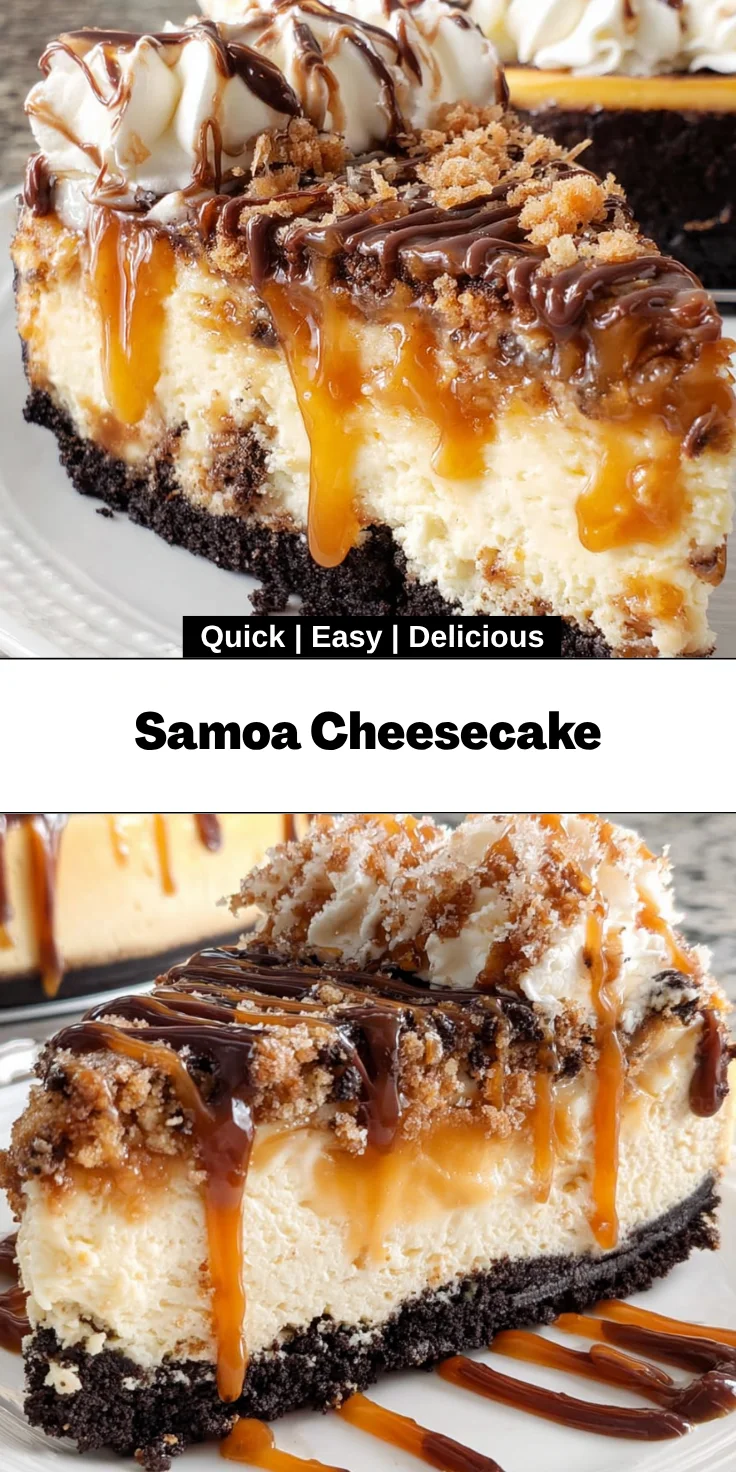
There’s something magical about indulging in dessert, isn’t there? It takes you back to those carefree childhood days filled with sweet delights. This Samoa Cheesecake combines the rich flavors of chocolate, coconut, and caramel, reminiscent of the beloved Samosa cookie. Picture this: a creamy cheesecake atop a delightful chocolate crust, bringing joy to your taste buds. Whether you’re a busy mom looking to impress guests or simply need a sweet nightcap after a long day, this dessert is your ticket to happiness. Trust me, it’s more than just a treat; it’s a slice of nostalgia!
Why You’ll Love This Samoa Cheesecake
This Samoa Cheesecake is a dream come true for dessert lovers like me. It’s super easy to make, blending the classic flavors of chocolate, caramel, and coconut into one blissful bite. As a busy mom, I know how hard it can be to juggle everything. This dessert is indulgent yet manageable, making it perfect for impressing guests or treating yourself after a long day—even if it’s just you enjoying the little moments!
Ingredients for Samoa Cheesecake
Chocolate Crust Layer
2 ½ cups chocolate sandwich cookie crumbs, from 26 original OREO cookies, finely ground
6 tablespoons unsalted butter, melted and cooled
½ teaspoon salt
Cheesecake Layer
32 ounces cream cheese, softened to room temperature (four 8-ounce blocks)
1 ½ cups granulated sugar
1 tablespoon vanilla extract
4 large eggs, room temperature
½ cup sour cream
3 tablespoons heavy cream
4 to 6 cups boiling water, for the water bath to bake the cheesecake
Samoas Cookie Topping
2 ¼ cup sweetened shredded coconut
1 cup salted caramel sauce, plus more to use as garnish (Mrs. Richardson’s brand)
Garnish
Chocolate dessert sauce, in a squeeze bottle (Ghirardelli brand)
Caramel dessert sauce, in a squeeze bottle (Mrs. Richardson’s or Ghirardelli brand)
Whipped Topping
Samoa or Coconut Dream Cookies
How to Make Samoa Cheesecake
Preparing the Crust
First things first, let’s get that chocolate crust ready! Preheat your oven to 350°F and grab a 9-inch springform pan. Lightly spray it with baker’s spray, then line the bottom with parchment paper. This ensures easy removal later on—trust me, you don’t want to be wrestling with your cheesecake!
In a medium bowl, combine 2 ½ cups of finely crushed chocolate sandwich cookies and 6 tablespoons of melted unsalted butter. Don’t forget the salt; just ½ teaspoon will do. Mix everything until it resembles wet sand. It’s just like building a sandcastle—so satisfying!
Now, press this mixture firmly into the bottom of your prepared springform pan. You want an even layer, so use your hands or the bottom of a measuring cup to really pack it down. Bake the crust for about 10 minutes. While it bakes, take a moment to breathe in that chocolatey aroma and let it cool at room temperature when done.
Making the Cheesecake Filling
With the crust cooling, it’s time to create that luscious cheesecake filling! Lower your oven temperature to 325°F for the cheesecake session.
In a large mixing bowl, beat 32 ounces of softened cream cheese and 1 ½ cups of granulated sugar on medium speed until the mixture is smooth—no lumps allowed! Add 1 tablespoon of vanilla extract and mix. Your kitchen is going to smell amazing!
Next, gradually incorporate 4 large eggs, adding one at a time. This helps the eggs blend in more seamlessly. Then, mix in ½ cup sour cream and 3 tablespoons heavy cream until you achieve a thick, creamy batter. If you’ve never tasted it, that creaminess alone is worth the effort!
Now, pour the cheesecake batter over the cooled chocolate crust, smoothing the top with a spatula. This is the moment we’ve all been waiting for! The creamy goodness is ready for a warm embrace.
Baking the Cheesecake
This is where patience comes into play. Take a large roasting pan and place your springform pan inside. Pour boiling water into the roasting pan until it reaches halfway up the sides of the springform pan. It’s all about that water bath which keeps the cheesecake moist and prevents cracks!
Bake for about 1 hour and 40-45 minutes. The edges should be set while the center still has a slight wobble. Once done, turn off the oven but let the cheesecake cool inside for 1 hour with the door slightly ajar. This gentleness helps with the texture.
Chilling and Finishing Touches
After an hour of cooling, take your cheesecake out and run a knife around the edges. This little trick helps it release easily when you unmold it. Now, refrigerate the cheesecake for at least 8 hours, but overnight is best. It gives those flavors a chance to meld beautifully!
While your cheesecake is chilling, let’s prepare the topping. In a skillet over medium heat, toast 2 ¼ cups of sweetened shredded coconut for about 4-6 minutes. Watch it closely—nobody wants burnt coconut!
Once toasted, mix the coconut with 1 cup of salted caramel sauce. When your cheesecake is chilled and ready, spread this dreamy mixture over the top. Drizzle with extra caramel and chocolate sauce for that gourmet touch. Just like that, you’ve transformed your homemade cheesecake into a showstopper!
Tips for Success
Making Samoa Cheesecake can be a breeze with these handy tips!
- Ensure cream cheese is completely softened for a smooth consistency.
- Use room temperature eggs to integrate them better into the batter.
- Don’t skip the water bath; it prevents cracks and keeps your cheesecake moist.
- Let the cheesecake cool gradually in the oven for the best texture.
- Chill overnight for optimal flavor and firmness.
Equipment Needed
To create your delightful Samoa Cheesecake, you’ll need a few key tools. These essentials will ensure a smooth process:
- 9-inch springform pan (for easy removal)
- Mixing bowls (for combining ingredients)
- Roasting pan (to create a water bath)
- Measuring cups and spoons (for precise ingredients)
- Spatula (to smooth out the cheesecake batter)
Variations
Don’t be afraid to get creative with your Samoa Cheesecake! Here are a few delicious variations you might enjoy:
- Make it gluten-free by using gluten-free chocolate sandwich cookies for the crust.
- Try different toppings, like crushed nuts or fresh fruit, for a unique twist.
- Incorporate a layer of chocolate ganache for rich chocolate flavor.
Serving Suggestions
Presenting your Samoa Cheesecake is half the fun! Here are some delightful ideas to elevate your serving experience:
- Pair with a dollop of whipped cream for extra creaminess.
- Serve alongside fresh strawberries or raspberries for a pop of color.
- Offer coffee or espresso to enhance the rich flavors.
- Garnish each slice with a sprinkle of toasted coconut for visual appeal.
FAQs about Samoa Cheesecake
Wondering about some common questions regarding Samoa Cheesecake? I’ve got you covered!
Can I store Samoa Cheesecake in the refrigerator?
Absolutely! It can be stored in the fridge for up to five days. Just make sure to cover it tightly to keep it fresh.
What can I substitute for the cream cheese?
If you’re looking for a lighter option, you can use mascarpone cheese. It will still yield a rich flavor!
Can I use a different crust?
Yes! Feel free to experiment with graham cracker or almond flour crusts for a unique twist.
How can I prevent cracks in my cheesecake?
The water bath really helps, but make sure you don’t overbake it! Remember, a slight wobble in the center is okay.
Enjoy creating your scrumptious Samoa Cheesecake!
Final Thoughts
There’s a profound satisfaction that comes from making something delicious to share with loved ones, and this Samoa Cheesecake is no exception. Each slice is a celebration, a delightful blend of flavors that brings smiles and warmth to any gathering. Whether it’s for a special occasion or just a quiet evening at home, savoring this cheesecake can transform ordinary moments into cherished memories. So go ahead, make it, share it, and relish the joy it brings. You’ve crafted not just a dessert, but a moment of happiness for yourself and those you love!
Print
Samoa Cheesecake
- Total Time: 8 hours 30 minutes
- Yield: 12 servings 1x
- Diet: Vegetarian
Description
Samoa Cheesecake is a decadent dessert combining the flavors of a classic Samoas cookie with a creamy cheesecake filling, all atop a chocolate cookie crust and finished with a sweet coconut and caramel topping.
Ingredients
- Chocolate Crust Layer
- 2 ½ cups chocolate sandwich cookie crumbs (from 26 original OREO cookies, finely ground)
- 6 tablespoons unsalted butter, melted and cooled
- ½ teaspoon salt
- Cheesecake Layer
- 32 ounces cream cheese, softened to room temperature
- 1 ½ cups granulated sugar
- 1 tablespoon vanilla extract
- 4 large eggs, room temperature
- ½ cup sour cream
- 3 tablespoons heavy cream
- 4 to 6 cups boiling water (for the water bath)
- Samoas Cookie Topping
- 2 ¼ cup sweetened shredded coconut
- 1 cup salted caramel sauce (plus more for garnish)
- Garnish
- Chocolate dessert sauce (in a squeeze bottle)
- Caramel dessert sauce (in a squeeze bottle)
- Whipped Topping
- Samoa or Coconut Dream Cookies
Instructions
- Preheat oven to 350°F. Lightly spray a 9-inch springform pan with baker’s spray and line with parchment paper. Wrap the outside with aluminum foil.
- In a medium bowl, combine finely ground chocolate cookie crumbs, unsalted butter, and salt. Mix until it resembles wet sand.
- Press the mixture into an even layer in the bottom of the springform pan.
- Bake the crust for 10 minutes and let it cool at room temperature.
- Lower oven temperature to 325°F.
- In a large mixing bowl, beat cream cheese and sugar on medium speed until smooth. Add vanilla and incorporate eggs one at a time.
- Add sour cream and heavy cream, mixing until the batter is thick and smooth.
- Pour the cheesecake batter into the crust and smooth the top.
- Place in a large roasting pan and pour boiling water to create a water bath. Bake for 1 hour 40-45 minutes.
- After baking, turn off the oven and let the cheesecake cool inside for 1 hour with the door slightly ajar.
- Remove from the oven, run a knife around the edges, and refrigerate for at least 8 hours, preferably overnight.
- For the topping, toast shredded coconut in a skillet over medium heat for 4-6 minutes until fragrant.
- Mix the toasted coconut with salted caramel sauce and spread over the chilled cheesecake.
- Garnish with extra caramel and chocolate sauces.
Notes
- Ensure cream cheese is softened to prevent lumps.
- Chilling the cheesecake overnight is recommended for the best texture.
- Be careful when using boiling water in the water bath to avoid spills.
- Prep Time: 30 minutes
- Cook Time: 2 hours
- Category: Dessert
- Method: Baking
- Cuisine: American
Nutrition
- Serving Size: 1 slice
- Calories: 450
- Sugar: 38g
- Sodium: 230mg
- Fat: 29g
- Saturated Fat: 15g
- Unsaturated Fat: 10g
- Trans Fat: 0g
- Carbohydrates: 40g
- Fiber: 2g
- Protein: 6g
- Cholesterol: 90mg