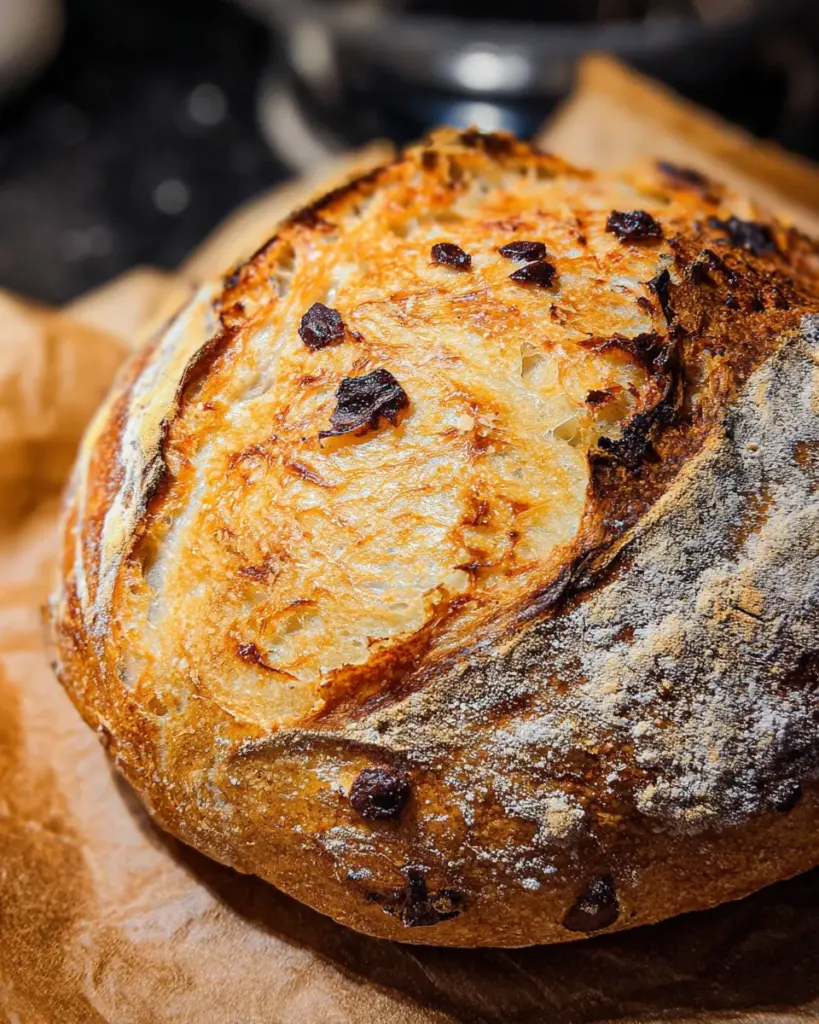
Introduction to Orange Chocolate Sourdough
There’s something magical about the aroma of freshly baked bread wafting through the house. Today, I’m excited to share my recipe for Orange Chocolate Sourdough. This delightful twist on traditional bread combines the zesty brightness of orange with the rich, decadent notes of dark chocolate. It’s perfect for those busy days when you need to impress your family or simply indulge yourself. Whether you’re a seasoned baker or just starting, this recipe brings joy and comfort to the kitchen, making the art of baking more accessible for everyone.
Why You’ll Love This Orange Chocolate Sourdough
What’s not to love about Orange Chocolate Sourdough? It combines the best of both worlds: a quick and straightforward process that delivers outstanding results. The vibrant orange flavor paired with the richness of dark chocolate makes every bite a delightful experience. Plus, it’s the kind of bread that sparks joy and brings everyone to the table, whether it’s breakfast, snack time, or dessert. You’ll enjoy the simplicity and taste!
Ingredients for Orange Chocolate Sourdough
Gathering the right ingredients is key to creating the perfect Orange Chocolate Sourdough. Here’s what you’ll need:
- Sourdough starter: This living culture is what gives our bread its wonderful flavor and texture. Make sure it’s active and bubbly before using!
- All-purpose flour: You’ll need both general-purpose flour and high-protein flour for structure. The high-protein version helps the bread rise beautifully, while the all-purpose keeps it tender.
- Water: Our dough needs hydration! The right amount of water helps activate the gluten and ensures a lovely crumb.
- Fresh orange juice: This adds a delightful citrus flavor, brightening up the whole loaf. Use freshly squeezed for the best taste.
- Orange zest: Finely grated zest enhances the orange flavor and infuses your bread with a fragrant aroma. It’s like sunshine in each slice!
- Granulated sugar: Just a touch helps to balance the flavors. It also enhances browning and crust texture.
- Salt: Essential for flavor and also strengthens the dough. I can’t stress enough how important it is in any bread recipe.
- Dark chocolate: The star of the show! Use high-quality chocolate for a rich, indulgent flavor that pairs perfectly with orange. You can even experiment with different percentages of cocoa.
For a detailed list of exact measurements, check the bottom of this article, where I’ve provided everything for easy printing. Now, let’s bring some joy into our kitchens with this vibrant recipe!
How to Make Orange Chocolate Sourdough
Prepare the Starter
Getting your sourdough starter ready is the heart of this recipe. I like to mix my starter ingredients in a bowl, giving it a good stir until everything is fully combined. It’s a bit like waking up a sleepy giant; you want it to be active and bubbly! Once mixed, I transfer the starter to a clean jar and cover it loosely. Find a cozy, warm spot for it to rest. You’ll want the starter to double in size, which usually takes around 4 to 6 hours. A little patience goes a long way here, as a strong starter ensures that your Orange Chocolate Sourdough rises beautifully.
Mixed Dough Autolyze
Once your starter is bubbly, it’s time to play mix-and-match with the other ingredients. In a large bowl, combine your bread flour, water, fresh orange juice, and orange zest. Give it a gentle mix with a fork or wooden spoon until it starts to come together into a shaggy ball. I find it easier to switch to wet hands for this step, as it keeps the dough from sticking like glue. Cover the bowl with a towel, and let it rest for about 30 minutes. This is called autolyze, and it helps develop the gluten, giving your bread its lovely texture.
Incorporate Starter and Knead
After the autolyze, you should have a slightly sticky dough. Now, it’s time to introduce the star of the show—your sourdough starter! I like to squish it in with wet hands, making sure it’s evenly distributed. Sprinkle in the salt last, as it’s crucial not to add it too early. Mix that in as well. I usually give it a few kneads on a lightly floured surface, which builds the structure and strength of the dough. Don’t worry if it seems wet at first; it will come together beautifully as the kneading continues!
The Stretch and Fold Technique
Now comes the fun part: the stretch and fold! Over the next three hours, every 30 minutes, you’ll pull the dough up and over itself. Imagine you’re tucking in a cozy blanket! Turn the bowl a quarter turn after each fold, repeating this on all sides. This technique helps develop the dough’s texture without beating it up. Use wet hands to keep the dough from sticking, making this process smooth as silk. You’ll notice the dough becoming more elastic and stronger with each fold.
Shape and Add Chocolate
After your final stretch and fold, it’s time to incorporate the chocolate and shape the dough. Lightly wet your work surface to make it easier to handle. Transfer the dough onto the bench and stretch it into a rectangle. Sprinkle half of the chopped chocolate over the dough, then fold it like a pamphlet to trap that decadence inside. Next, add in the rest of the chocolate. Roll the dough up into a tight log, then gently shape it into a ball. This is where you create surface tension, which helps it maintain shape during fermentation.
Bulk Proofing
Bulk proofing is vital to achieving a light and airy texture. Place the shaped dough back in the bowl and cover it with a towel. Let it rest for about one to two hours until you see bubbles forming on the surface. You’ll know it’s ready when the dough jiggles just a bit if you shake the bowl. Look out for those loving signs of activity, as this means your dough is on the rise!
Final Shaping
Now that the dough has bulk proofed, it’s time for the final shaping. Shift it onto a floured surface, and gently flatten it before folding it into a rectangle once more. This build-up of surface tension is crucial, as it helps your loaf retain its shape while baking. Roll it tightly into a ball or batard, depending on your basket size. Be gentle, but assertive, ensuring you’re creating a taut surface. Gently transfer it to a well-floured banneton, seam side up, and cover it with a towel.
Cold Proofing
Cold-proofing brings a depth of flavor to your Orange Chocolate Sourdough. By placing the dough in the refrigerator for 8 to 24 hours, you allow the fermentation to continue slowly. This gives the bread a beautiful taste and texture! So, if you plan to serve it on a certain day, prepare it ahead, and bake when it’s most convenient for you. Just remember that the longer it sits, the more delicious it becomes.
Baking Process
When you’re ready to bake, preheat your oven and Dutch oven to a scorching 450°F (230°C) for at least 30 minutes. This ensures that your bread gets that lovely crispy crust. Carefully flip your dough into the hot Dutch oven, scoring the top for some lovely designs. Bake it covered for the first 20 minutes to let it steam, which helps with oven spring. After that, remove the cover and let it bake for another 20 minutes to achieve that beautiful golden crust.
Cooling and Serving
Once your Orange Chocolate Sourdough is done baking, it’s crucial to let it cool for at least two hours. I know, it’s hard to wait, but trust me; it’ll be worth it! Cooling allows the crumb to set, making slicing much easier. When it’s finally time to slice, use a serrated knife for clean cuts. Trust me, savor every bite—you deserve it!

Tips for Success
- Ensure your sourdough starter is bubbly and active for the best rise.
- Use a kitchen scale for precise measurements, especially for flour and water.
- Keep your hands wet during handling to prevent sticking.
- Experiment with different types of dark chocolate for varied flavor profiles.
- Don’t rush the cooling process; it enhances texture and flavor.
Equipment Needed
- Mixing bowls: A large bowl for dough prep and a smaller one for the starter. Any size works!
- Dutch oven: Essential for baking; a heavy pot with a lid will do if you don’t have one.
- Banneton basket: If unavailable, use a regular bowl lined with a floured kitchen towel.
- Kitchen scale: Useful for accurate measurements, but measuring cups work fine too.
- Serrated knife: For slicing; a sharp regular knife can substitute if needed.
Variations of Orange Chocolate Sourdough
- Nutty Addition: Fold in chopped nuts like walnuts or hazelnuts for added texture and flavor.
- Fruit Twist: Experiment with dried fruits such as cranberries or apricots alongside the chocolate for a fruity contrast.
- Gluten-Free Option: Substitute part of the all-purpose flour with a gluten-free blend suitable for bread-making.
- Spiced Delight: Add a teaspoon of cinnamon or cardamom to the mix for a warm, spiced flavor.
- Vegan Version: Replace honey or sugar with maple syrup to create a naturally sweet loaf without animal products.
Serving Suggestions for Orange Chocolate Sourdough
- Pair with a slather of orange marmalade for a delightful breakfast treat.
- Serve warm alongside a rich cup of coffee or a soothing herbal tea.
- For dessert, enjoy it toasted with a sprinkle of powdered sugar.
- Top with whipped cream cheese for a creamy contrast.
- Present it on a wooden board for a rustic, inviting look.
FAQs about Orange Chocolate Sourdough
Can I use a different type of chocolate? Of course! While dark chocolate is a classic choice, feel free to experiment with milk or white chocolate for a sweeter flavor. Just keep in mind that it may change the overall taste of your Orange Chocolate Sourdough.
What if my sourdough starter isn’t bubbling? If your starter isn’t bubbly, it may need more feeding or warmth. Try placing it in a warm spot or feeding it with equal parts flour and water. An active starter is essential for a good rise in your bread.
How long does Orange Chocolate Sourdough stay fresh? This bread is best enjoyed fresh but can be stored at room temperature for up to three days in a paper bag. If you’d like it to last longer, slice it and freeze it for future enjoyment!
Can I make this recipe without a Dutch oven? Yes! If you don’t have a Dutch oven, you can bake it on a baking sheet. Just add a pan with water at the bottom of your oven to create steam, helping achieve that crispy crust.
Why should I cold-proof my dough? Cold-proofing enhances the flavor and texture of your Orange Chocolate Sourdough. It slows down fermentation, allowing for more complex flavors to develop, leading to a tastier loaf.
Final Thoughts
Baking Orange Chocolate Sourdough isn’t just about the end product; it’s a journey filled with joy and creativity. As the aroma fills your kitchen, you’ll find comfort in watching your family gather around the table, eager for a slice. Each bite is a little piece of happiness, with the bright notes of orange harmonizing perfectly with the rich chocolate. This recipe invites us to slow down and savor the simple pleasures of life through baking. So, grab your apron, and let the enchantment of this delightful bread create warm memories for you and your loved ones.
Print
Orange Chocolate Sourdough
- Total Time: Overnight proof + 2 hours cooling
- Yield: 1 loaf 1x
- Diet: Vegetarian
Description
A delightful recipe for Orange Chocolate Sourdough that combines the zesty flavor of orange with rich dark chocolate.
Ingredients
- 25 g sourdough starter
- 50 g all-purpose flour
- 50 g water
- 400 g all-purpose flour with protein of at least 11%
- 225 g water
- 60 g fresh orange juice
- 2 tbsp orange zest finely grated
- 12 g granulated sugar
- 8 g salt
- 90 g dark chocolate
Instructions
- Mix together the starter ingredients in a bowl and stir well until thoroughly mixed. Add it to a clean jar and loosely cover it. Leave it in a warm spot until it doubles in size.
- When the starter has almost finished rising, combine the bread flour, water, orange juice, orange zest, and sugar in a large mixing bowl. Use a fork or wooden spoon to bring it together, then switch to wet hands to mix it into a shaggy dough ball with no dry bits of flour remaining. Cover the bowl and let it autolyze at room temperature until the starter is ready.
- Add the starter to the dough and squish it in using wet hands. Add in the salt and mix it in. Add in a few slap and folds to incorporate it better and start developing the structure.
- Over the next 3 hours, stretch and fold this dough every 30 minutes. Pull the dough up and over itself, turn the bowl a quarter turn, and repeat. Do this on all sides, and always use wet hands.
- After the last fold, let the dough rest for 20 minutes, then pull it out of the bowl using wet hands, onto a bench lightly wetted with water. Stretch it into a rectangle and spread on half the chopped chocolate. Fold the dough like a pamphlet to trap the chocolate, then add on another layer of chocolate. Roll it up into a log, then shape it into a ball with the palms of your hands, rolling it on the bench and creating a bit of surface tension as you roll.
- Place it back in the bowl and give the dough another hour or two to finish the bulk proof. Observe definite signs of activity on the dough, like bubbles forming and the dough will jiggle if you give the bowl a shake.
- Shape the sourdough into a batard or ball depending on what basket you’re using.
- Line a banneton basket with a kitchen towel and flour it well. Tip your dough carefully on a lightly floured work surface and gently form it into a rectangle. Fold the dough as directed to create a packet, then roll to create surface tension.
- Cover the shaped dough with a kitchen towel and cold-proof in the refrigerator for 8-24 hours.
- Preheat the oven and Dutch oven to 450°F/230°C for at least 30 minutes.
- Carefully flip the dough into the hot Dutch oven and score it. Bake covered for 20 minutes, then uncovered for 20 minutes more, checking the doneness of the crust.
- Let the sourdough cool for at least two hours before slicing.
Notes
- Use a Dutch oven for best results.
- Flour your work surface generously to prevent sticking.
- Time may vary based on room temperature.
- Experiment with different types of chocolate for varying flavors.
- Prep Time: 90 minutes
- Cook Time: 40 minutes
- Category: Breads
- Method: Baking
- Cuisine: American
Nutrition
- Serving Size: 1 slice
- Calories: 230
- Sugar: 5 g
- Sodium: 150 mg
- Fat: 7 g
- Saturated Fat: 3 g
- Unsaturated Fat: 4 g
- Trans Fat: 0 g
- Carbohydrates: 34 g
- Fiber: 2 g
- Protein: 6 g
- Cholesterol: 0 mg