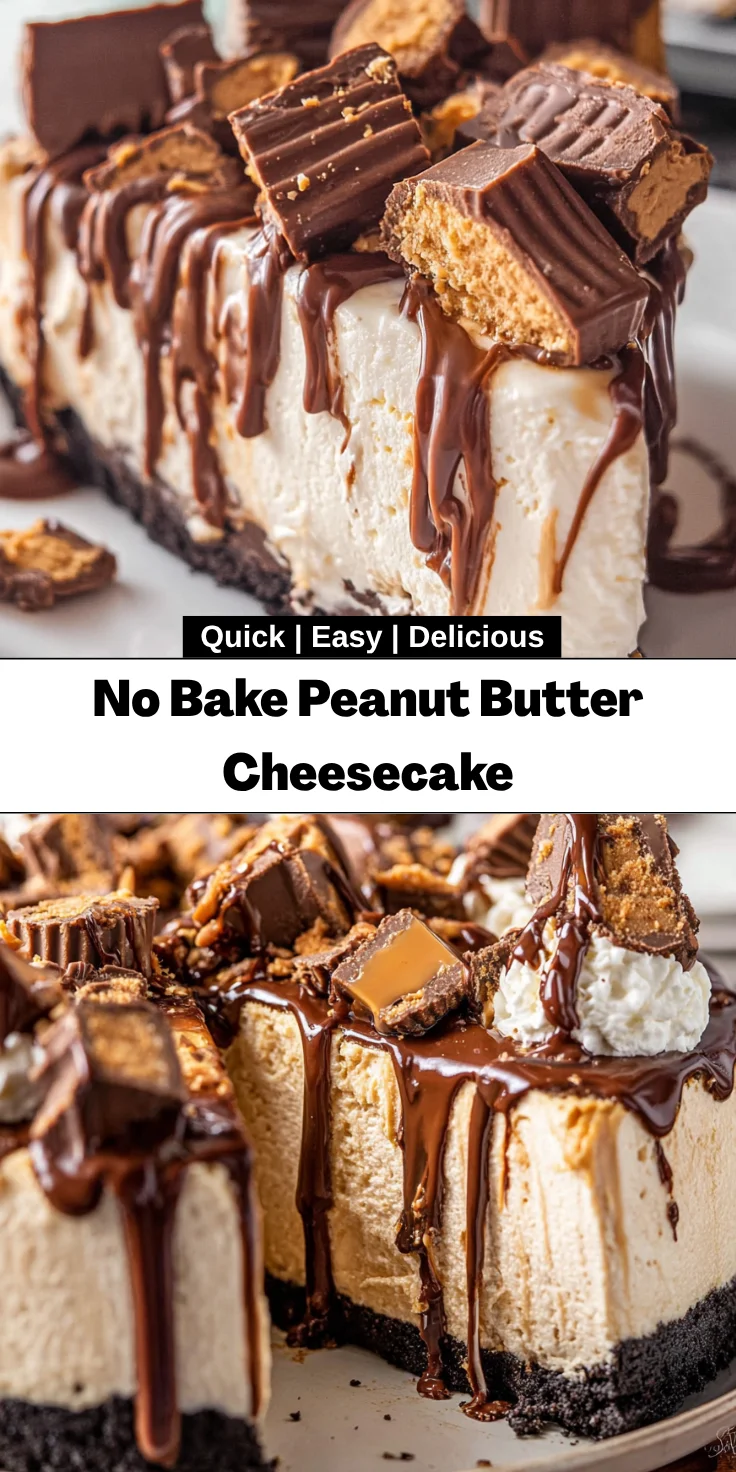
Introduction to No Bake Peanut Butter Cheesecake
If you’re anything like me, there are days that call for a special treat without the fuss of baking. Enter the No Bake Peanut Butter Cheesecake. It’s creamy, dreamy, and downright delightful! This dessert is perfect for busy moms and professionals alike, simplifying your sweet cravings with minimal effort. Imagine serving this sumptuous cheesecake at your next gathering or simply enjoying it after a long day. Just a few ingredients and a bit of patience, and you’ll be sinking your spoon into a peanut butter paradise. Trust me, you’ll want to keep this recipe handy!
Why You’ll Love This No Bake Peanut Butter Cheesecake
This No Bake Peanut Butter Cheesecake combines simplicity with scrumptiousness, making it a delightful choice for any occasion. If you’re juggling kids’ activities, work, or just the everyday hustle, this dessert is a lifesaver. It comes together quickly, requires no oven, and is heavenly creamy with a rich peanut butter flavor. Plus, who could resist the allure of chocolate and Reese’s on top? It’s a guaranteed crowd-pleaser!
Ingredients for No Bake Peanut Butter Cheesecake
Let’s dive into the star players of this No Bake Peanut Butter Cheesecake. Each ingredient adds its magic to the mix, creating a dessert that’s both indulgent and satisfying.
- Chocolate graham crackers: These create a sweet, crunchy base for the cheesecake. You can use regular graham crackers if you prefer a less chocolaty flavor.
- Sugar: Granulated sugar sweetens both the crust and the filling, balancing the rich flavors of the peanut butter and cream cheese.
- Creamy peanut butter: This is the heart and soul of our cheesecake! Choose a creamy version for a smooth texture, but if you love a little crunch, go for a chunky style.
- Cream cheese: Softened cream cheese provides that rich, delightful creaminess. Ensure it’s at room temperature for easy mixing.
- Sour cream: This adds a tangy flavor that wonderfully complements the sweetness. Full-fat is best for a creamy consistency.
- Whipped topping: For an airy finish, use thawed whipped topping. If you prefer homemade, use whipped cream, but fold it in gently to keep the mixture light.
- Hot fudge: Drizzled on top, it adds a warm, gooey richness that makes every bite feel special. You could also use chocolate ganache if you’re feeling fancy!
- Miniature Reese’s peanut butter cups: Quartered mini Reese’s add a fun festive touch and intense peanut butter goodness. Feel free to sprinkle extra on top for the peanut butter lovers!
Measurements for these ingredients can be found at the bottom of the article for easy printing. With this lineup, you’ll have a dessert that’s as satisfying to make as it is to eat!
How to Make No Bake Peanut Butter Cheesecake
Ready to dive into creamy deliciousness? Making this No Bake Peanut Butter Cheesecake is a breeze! Just follow these simple steps, and soon you’ll have a dessert that dazzles and delights.
Prepare the Crust
Crush the Chocolate Graham Crackers
Let’s begin with the crust, which needs some love. Start by placing the chocolate graham crackers in a food processor. Pulse them until they turn into fine crumbs — think sand at the beach. It should be so fine that it holds together when you press it, which is crucial for a sturdy base!
Mix in the sugar until it’s well combined. Then, add in that dreamy creamy peanut butter. Stir until it all comes together, feeling like playdough. Make sure you combine it well for an even flavor throughout.
Freeze the Crust
Develop a Sturdy Base
Now, here’s where patience pays off! Transfer your crumb mixture into a 9-inch springform pan. Press it down firmly to form an even crust, making sure to push it slightly up the sides. This forms a cute border for your cheesecake.
Cover the crust with plastic wrap and pop it in the freezer for about 20 to 30 minutes. This step is essential because it firms up the crust, ensuring it holds its shape and offers a delightful crunch when you take that first bite.
Make the Filling
Combine Cream Cheese and Sugar
With your crust chilling, let’s work on the filling! In a mixing bowl, beat together the softened cream cheese and granulated sugar. You want this to be creamy — about 2 to 3 minutes will do the trick. The mix should be light and fluffy, and that dreamy peanut butter will soon join the party!
Add the creamy peanut butter and continue mixing until it blends in beautifully. You want all the flavors to dance together, creating a luscious base that you can’t wait to devour.
Combine with Other Ingredients
Incorporate Sour Cream and Whipped Topping
Next, it’s time for the sour cream and whipped topping. Gently fold in the sour cream, which gives a tangy twist that pairs perfectly with the sweetness. Then, add the thawed whipped topping, ensuring the mixture stays light. Keep that air in—think fluffy clouds rather than a dense cake.
Assemble the Cheesecake
Layer Filling and Toppings
Now for the fun part! Retrieve your crust from the freezer and spread the filling evenly over it. Leave about ¼ inch from the top of the pan—you’ll want space for those divine toppings. Once smoothed out, sprinkle the quartered Reese’s miniatures over the top.
This not only adds a delightful crunch but a burst of peanut butter flavor. Don’t skimp on these! They’re the crown jewels of this dessert.
Chill the Cheesecake
Firm Up Before Serving
Your masterpiece is almost ready! Cover the cheesecake with plastic wrap and place it in the refrigerator. Chill for at least 6 hours, or better yet, overnight. This step allows the flavors to meld beautifully and the cheesecake to set well. Trust me, your patience will be rewarded!
Tips for Success
- Use room temperature cream cheese for easier blending.
- Don’t skip the chilling time; it helps set the cheesecake perfectly.
- For a prettier presentation, top with extra whipped cream and a drizzle of hot fudge.
- If you want a lower-sugar option, consider using sugar substitutes in the filling.
- Keep an eye on the crust; it should feel firm and hold shape when pressed.
Equipment Needed
- Springform pan: A must-have for easy removal. If unavailable, a regular pie dish works too, but slicing might be tricky.
- Food processor: Ideal for crushing the graham crackers. You can use a zip-top bag and rolling pin as a handy alternative.
- Mixing bowls: Essential for combining all your delicious ingredients. A large bowl makes it simple.
- Electric mixer: Perfect for achieving that fluffy filling, but a whisk will work if you’re feeling adventurous!

Variations
- Chocolate Hazelnut Delight: Replace the peanut butter with hazelnut spread for a dreamy Nutella-inspired twist.
- Fruit-Filled Bliss: Add fresh berries like strawberries or raspberries on top for a refreshing contrast to the richness.
- Vegan Option: Use vegan cream cheese and coconut whipped cream instead of regular dairy products to make a plant-based version.
- Gluten-Free Delight: Swap the chocolate graham crackers for gluten-free chocolate cookies for a delicious gluten-free dessert.
- Mint Chocolate Surprise: Mix in peppermint extract to the filling for a refreshing minty sensation that’s perfect for the holidays.
Serving Suggestions
- Coffee: A rich dark roast pairs perfectly with the creamy cheesecake, enhancing its flavors.
- Whipped Cream: Top each slice with a dollop of freshly whipped cream for an extra indulgent treat.
- Chocolate Shavings: Garnish with chocolate shavings to add a touch of elegance.
- Fresh Berries: Serve alongside fresh strawberries or raspberries for a burst of color and flavor.
- Presentation: Use a cake stand to present your No Bake Peanut Butter Cheesecake beautifully at gatherings.
FAQs about No Bake Peanut Butter Cheesecake
Got questions? I’ve got answers! Here are some common queries about this No Bake Peanut Butter Cheesecake that I’ve encountered along the way.
Can I use a different type of nut butter?
Absolutely! Feel free to swap out peanut butter for almond or cashew butter for a unique twist. Just remember, your cheesecake will have a different flavor profile.
How long will the cheesecake last in the fridge?
This No Bake Peanut Butter Cheesecake can be stored in the refrigerator for up to a week. Just be sure to cover it well to keep it fresh and tasty!
Can I freeze leftovers?
Yes, you can freeze it! Wrap individual slices in plastic wrap and store them in an airtight container for up to 3 months. Thaw overnight in the fridge before serving.
What if I don’t have a springform pan?
No worries at all! You can use a regular pie pan or any baking dish. Just be careful when slicing and serving, as it might not come out as neatly.
How can I make this cheesecake sugar-free?
Using sugar substitutes like stevia or erythritol can work wonders! Just make sure to adjust quantities according to the sweetness level of your chosen substitute.
Final Thoughts
This No Bake Peanut Butter Cheesecake is more than just a dessert; it’s a little slice of joy that fits into your busy lifestyle. Whether you’re celebrating with family or simply indulging after a long day, each creamy bite transports you to a state of bliss. The best part? It requires minimal effort and is always a hit with everyone. I love knowing that I can whip up such an impressive treat without turning on the oven. Keep this recipe close, and watch as it becomes a beloved favorite in your home!
Print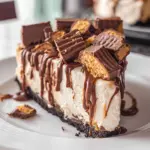
No Bake Peanut Butter Cheesecake
- Total Time: 6 hours 30 minutes
- Yield: 12 servings 1x
- Diet: Vegetarian
Description
A creamy, delightful no bake cheesecake infused with peanut butter and topped with chocolate and Reese’s miniatures.
Ingredients
- 18 chocolate graham crackers full sheets, 2 sleeves
- ¼ cup granulated sugar
- ⅔ cup creamy peanut butter
- 16 ounces cream cheese, softened
- ¾ cup granulated sugar
- ¾ cup creamy peanut butter
- ¾ cup sour cream (full fat is best)
- 16 ounces whipped topping (thawed)
- 8 tablespoons hot fudge
- 10 ounces miniature Reese’s peanut butter cups (quartered, about 1 cup)
Instructions
- Place chocolate graham crackers in a food processor and pulse until they are fine crumbs. Add in sugar and pulse until combined.
- Transfer to a bowl and mix in the peanut butter until the mixture holds together when pressed between your fingers.
- Press mixture into a 9-inch springform pan making sure the crust goes up a little bit on the sides as well.
- Cover the crust with plastic wrap and freeze for 20 to 30 minutes.
- Beat softened cream cheese and granulated sugar together until fully combined, about 2 to 3 minutes.
- Beat in the creamy peanut butter until light and fluffy, about 1 to 2 minutes.
- Add in the sour cream and whipped topping and beat until combined. The mixture should be light and creamy.
- Remove the crust from the freezer and evenly spread the filling in the springform pan up to about ¼ inch from the top of the pan.
- Sprinkle the top of the cheesecake with cut up Reese’s miniatures in an even layer.
- Cover the cheesecake with plastic wrap. Refrigerate for 6 hours or overnight. Serve cheesecake chilled.
Notes
- If using whipped cream instead of whipped topping, it should be folded into the mixture, not beaten in.
- Prep Time: 30 minutes
- Cook Time: 0 minutes
- Category: Dessert
- Method: No Bake
- Cuisine: American
Nutrition
- Serving Size: 1 slice
- Calories: 410
- Sugar: 30g
- Sodium: 300mg
- Fat: 27g
- Saturated Fat: 14g
- Unsaturated Fat: 9g
- Trans Fat: 0g
- Carbohydrates: 40g
- Fiber: 2g
- Protein: 6g
- Cholesterol: 80mg