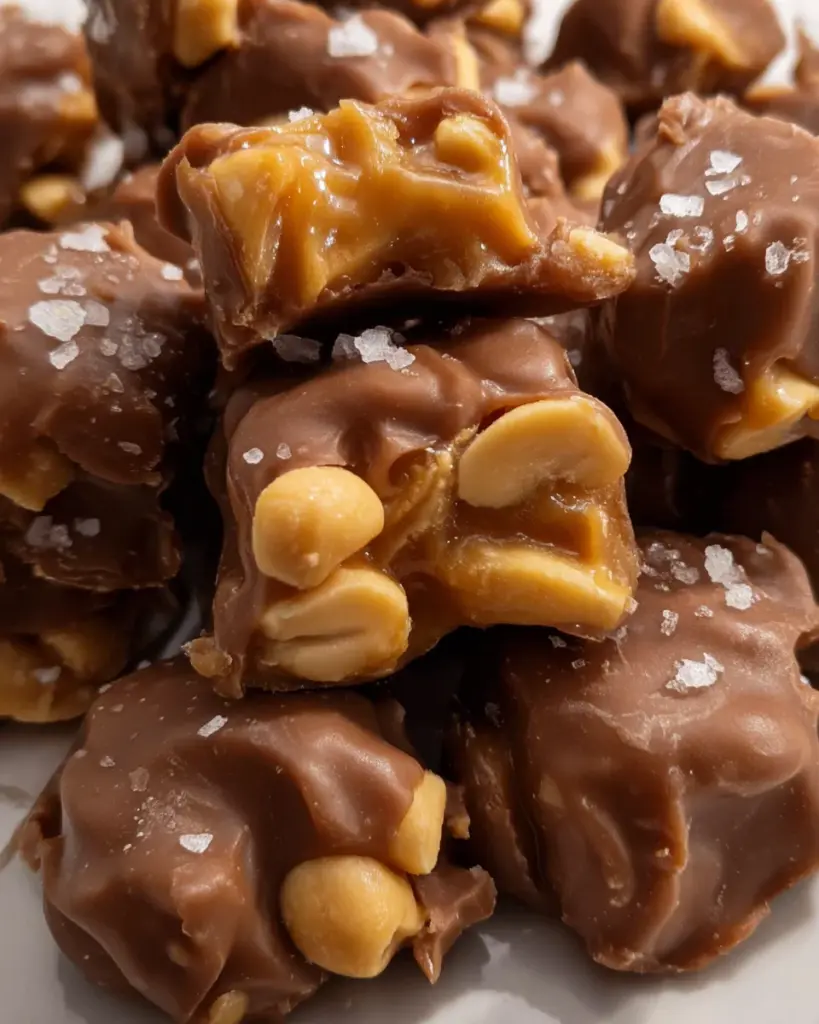
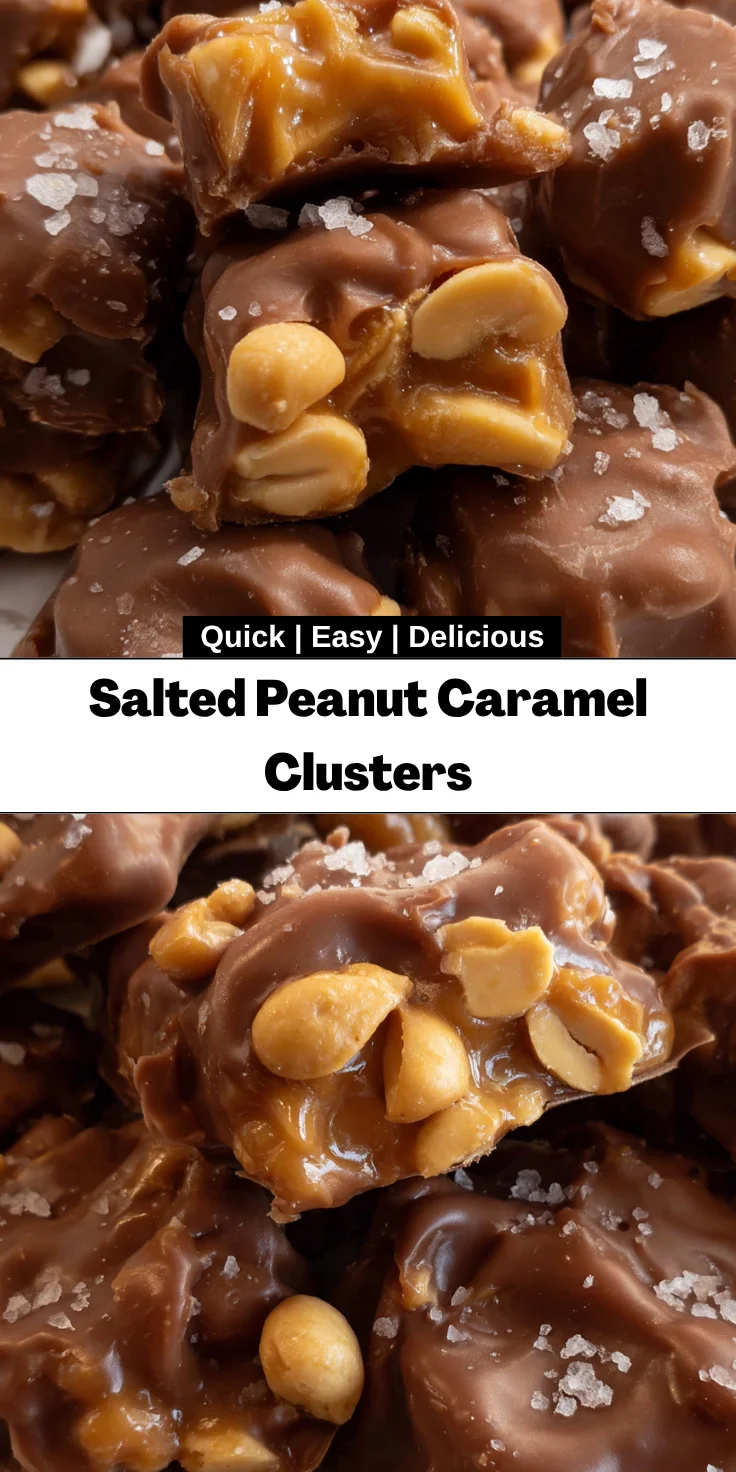
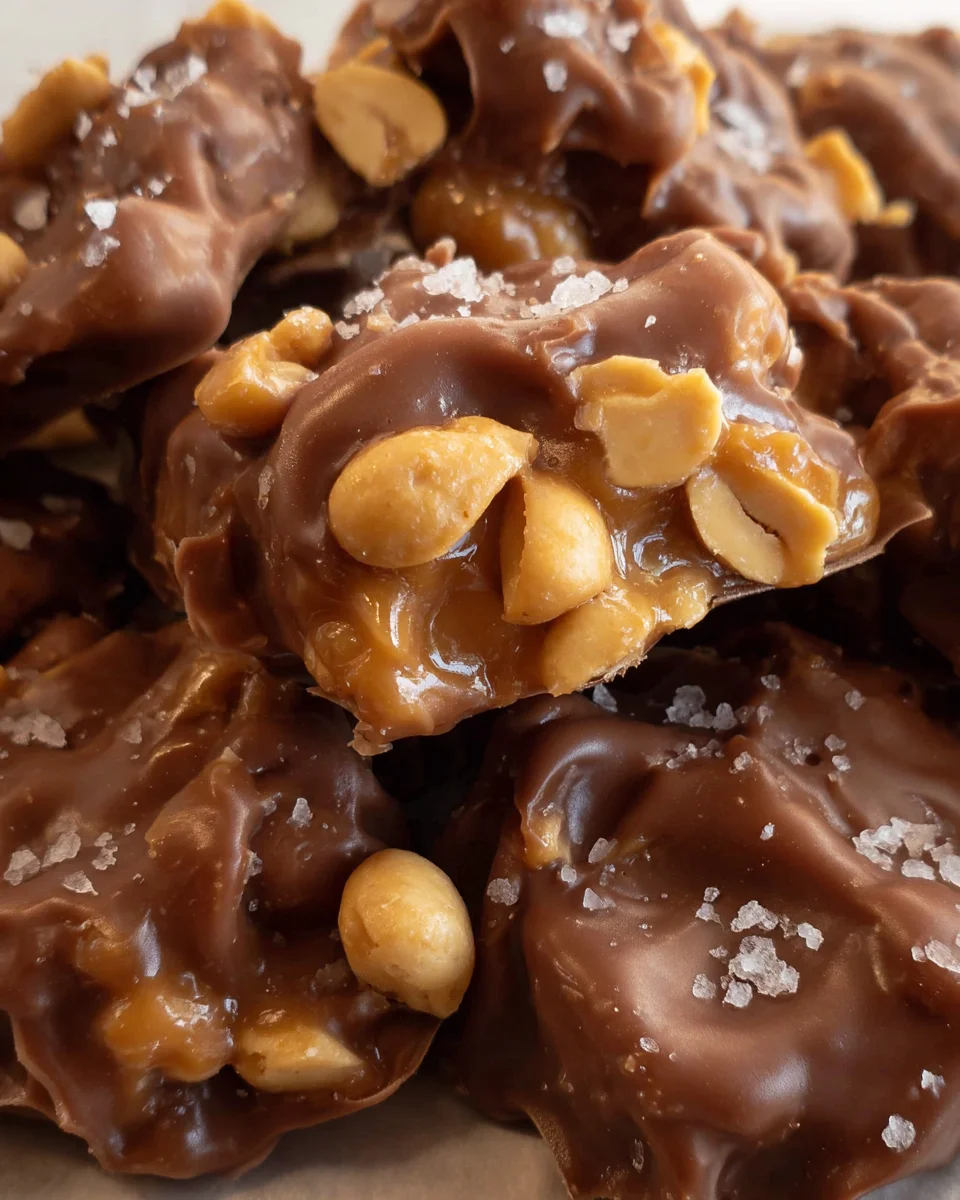
Introduction to Salted Peanut Caramel Clusters
Are you ready to sweeten up your day with a delightful little treat? Let me introduce you to my go-to dessert—Salted Peanut Caramel Clusters. These irresistible bites perfectly combine smooth caramel, crunchy salted peanuts, and rich chocolate. It’s a quick solution for those busy days when I need a delicious snack that impresses between work obligations and family activities. Not to mention, they make a wonderful treat to share with friends during casual get-togethers. Trust me; once you try these clusters, they’ll become your new favorite dessert, perfect for any occasion!
Why You’ll Love This Salted Peanut Caramel Clusters
If you’re like me, you crave a sweet treat that’s both quick and delightful. These Salted Peanut Caramel Clusters are just that! They come together in no time, requiring minimal effort. The taste? Oh, it’s a heavenly blend of salty and sweet that’ll have you coming back for seconds. Plus, they’re perfect for satisfying those late-night cravings or impressing guests at a last-minute gathering. What’s not to love?
Ingredients for Salted Peanut Caramel Clusters
Gathering the right ingredients is the first step in creating your Salted Peanut Caramel Clusters, and you might already have many of these in your pantry! Here’s a quick rundown:
- Kraft individually wrapped caramels: The star of our clusters! These caramels melt beautifully, providing that irresistible sweetness we all adore.
- Heavy cream: This creamy addition helps that luscious caramel achieve the perfect consistency, making it smooth and easy to mix.
- Salted butter: Just a few pats of butter lend richness and flavor, elevating the overall taste of the final product.
- Pure vanilla extract: A dash of vanilla is like a secret hug for your taste buds; it enhances the sweet caramel flavor.
- Salted dry roasted peanuts: Crunchy and flavorful, these peanuts provide that delightful salty punch and great texture.
- Milk chocolate candy wafer melts: For the heavenly chocolate coating, I love using wafer melts; they’re easy to work with and melt evenly.
- Flaky sea salt (optional): For those of you who like an extra touch of saltiness on top, this is the perfect garnish to enhance flavors.
For exact quantities, check the bottom of this article where you can also find a handy printable version!
How to Make Salted Peanut Caramel Clusters
Let’s dive into the delightful process of making your Salted Peanut Caramel Clusters! I promise you; it’s simple and oh-so-rewarding. Follow these steps, and you’ll be savoring these tasty treats in no time.
Prepare Your Baking Sheets
Begin by lining two baking sheets with either waxed paper, silpat mats, or parchment paper. If you prefer, give it a light spray of nonstick cooking spray. This little step is golden—it ensures that your clusters pop off easily once they’re ready. Trust me, there’s nothing more frustrating than losing a delicious cluster to sticky paper!
Melt the Caramel Mixture
Now, grab a medium-sized microwave-safe mixing bowl and toss in those unwrapped Kraft caramels along with the heavy cream. Microwave this mix in 30-second bursts, stirring well after each interval. Keep a close eye—don’t let the caramel overheat, or it might become a sticky mess instead of a velvety dream!
Incorporate Butter and Vanilla
Once your caramel is beautifully melted, it’s time to stir in the butter pats and pure vanilla extract. Combine everything smoothly; this enriches the flavor of your clusters. A well-mixed caramel is like a warm hug; it’s crucial for attaining that deliciousness we all crave.
Mix in the Peanuts
Now comes the fun part! Fold in the salted peanuts until they’re thoroughly coated with the caramel mixture. Give it about 30 minutes to rest at room temperature. This cooling period is essential— it enhances both the texture and flavor, making every bite absolutely scrumptious!
Form the Clusters
Using a cookie scoop, gather the mixture and create mounded tablespoons. Arrange these little beauties about 2 inches apart on your lined sheets. This spacing is vital; you don’t want them sticking together like old friends at a high school reunion!
Chill the Clusters
Pop those baking sheets into the refrigerator and chill for at least an hour. This step allows your clusters to firm up nicely. If not chilled, you might end up with messy chocolate-covered blobs instead of beautifully formed clusters!
Melt the Chocolate
While you’re waiting, let’s melt the chocolate! Place your milk chocolate candy wafers in a microwave-safe bowl. Heat on full power for 45 seconds, then stir. Continue heating in 30-second intervals until smooth. Be cautious here—chocolate can easily overheat, leading to a grainy texture that’s less than desirable.
Dip and Garnish
Once the clusters are chilled and the chocolate is melted, it’s time for the final touch! Dip each cooled cluster into the melted chocolate, using a fork to roll and remove. Tap gently on the edge of the bowl to shake off excess chocolate. While the chocolate is still wet, sprinkle a pinch of flaky sea salt on top. This little sprinkle of salt adds that gourmet flair we all love!
Tips for Success
- Make sure your caramels are completely melted for a smooth texture.
- Use a cookie scoop for evenly sized clusters—this helps with presentation!
- Don’t rush the cooling process; it’s key to achieving the right consistency.
- Keep the chocolate from overheating to maintain its glossy finish.
- Experiment with different types of nuts or chocolates for unique flavors.
Equipment Needed
- Medium-sized microwave-safe mixing bowl (a glass bowl works well)
- Cookie scoop (a tablespoon works in a pinch)
- Baking sheets (you can use any flat tray)
- Parchment paper or silpat baking mat (waxed paper is a good alternative)
- Microwave (or stovetop double boiler for melting chocolate)
Variations on Salted Peanut Caramel Clusters
- Nut Alternatives: Swap out peanuts for almonds, pecans, or cashews for a different crunch. Each nut adds a unique flavor profile to your clusters!
- Dark Chocolate Dip: For those who prefer a richer taste, use dark chocolate instead of milk chocolate. The slightly bitter notes will complement the sweetness beautifully.
- Spicy Twist: Add a dash of cayenne pepper or a sprinkle of chili powder to the peanut mixture for a sweet and spicy contrast. It’s a fun surprise for adventurous taste buds!
- Vegan Option: Use coconut cream and dairy-free chocolate to make a vegan-friendly version of these delicious treats. They’ll be just as delightful!
- Coconut Flakes: Toss some unsweetened shredded coconut into the caramel mixture for added texture and a tropical touch. It pairs wonderfully with the flavors!
Serving Suggestions for Salted Peanut Caramel Clusters
- Pair your clusters with a tall glass of cold milk or a warm cup of coffee for a delightful afternoon treat.
- Serve them on a decorative platter, garnished with a sprinkle of extra sea salt for that gourmet look.
- For a fun dessert table, arrange them alongside fresh fruit or other bite-sized treats.
- Wrap individual clusters in colorful foil for a charming party favor that your guests will love!
FAQs about Salted Peanut Caramel Clusters
Can I use regular peanuts instead of salted dry roasted peanuts?
Absolutely! While salted dry roasted peanuts add a wonderful flavor, you can use regular peanuts if you prefer. Just keep in mind that you might want to sprinkle a bit of salt on top to achieve that delightful salty-sweet balance.
How do I store my Salted Peanut Caramel Clusters?
I recommend storing these tasty treats in an airtight container at room temperature. They’ll stay fresh for about a week. If the weather is warm, consider refrigerating them to maintain their texture.
Can I make these clusters in advance for a party?
Yes! These Salted Peanut Caramel Clusters are perfect for making ahead of time. Just whip them up, chill and then store them until your gathering. They’ll be a hit with your guests!
What if I don’t have a microwave?
No problem! You can melt your chocolate and caramel mixture using a stovetop double boiler. Just be sure to stir frequently and keep the heat low to avoid burning your ingredients.
Can I freeze Salted Peanut Caramel Clusters?
You can! Just make sure to wrap each cluster tightly in plastic wrap or aluminum foil. When you’re ready to enjoy, let them thaw in the refrigerator for better texture. Enjoy the sweet treats any time!
Final Thoughts
Creating these Salted Peanut Caramel Clusters is more than just whipping up a sweet treat; it’s a journey filled with joy and satisfaction. Watching the clusters come to life, and knowing they’ll bring smiles to family and friends is what it’s all about. Each bite combines the crispiness of peanuts with the richness of chocolate and the delightful hint of salt. Whether you indulge alone or share with loved ones, these clusters are bound to become a cherished staple. Trust me, these simple yet scrumptious bites will capture your heart and make everyday moments just a bit sweeter!
Print
Salted Peanut Caramel Clusters
- Total Time: 1 hour 45 minutes
- Yield: Approximately 24 clusters 1x
- Diet: Vegetarian
Description
A delightful treat combining sweet caramel and salted peanuts, coated in smooth chocolate.
Ingredients
- 11 ounces Kraft individually wrapped caramels, unwrapped (311g)
- ¼ cup heavy cream
- 1 tablespoon heavy cream
- 3 tablespoons salted butter, sliced into pats
- ½ teaspoon pure vanilla extract
- 2 ½ cups salted dry roasted peanuts
- 3 cups milk chocolate candy wafer melts
- 1 to 2 teaspoons flaky sea salt (optional, for garnish)
Instructions
- Line 2 baking sheets with waxed paper, silpat baking mat, or parchment paper lightly sprayed with nonstick cooking spray.
- Add the unwrapped caramels and heavy cream to a microwave-safe medium-size mixing bowl. Heat at full power in 30-second intervals, stirring well after each interval, until completely melted.
- Once the caramels are completely melted, stir in the sliced butter pats and ½ teaspoon of vanilla until the butter is melted and smooth.
- Stir in peanuts. Allow the mixture to rest for 30 minutes at room temperature to continue cooling.
- Use a 1-tbsp cookie scoop to scoop up mounded tablespoons of the caramel and peanuts. Place them 2 inches apart.
- Chill the clusters in the refrigerator for 1 hour before dipping in chocolate.
- In a microwave-safe bowl, heat the chocolate candy melting wafers on full power for 45 seconds, then stir and continue heating in 30-second intervals until melted and smooth.
- Remove clusters from the refrigerator and dip them into the melted chocolate. Use a fork to roll and remove, tapping gently to remove excess chocolate.
- While the chocolate is still wet, sprinkle the tops with sea salt. Allow the chocolate to set at room temperature, then enjoy!
Notes
- Using Maldon sea salt or any flaky sea salt for garnish enhances flavor.
- Make sure to let the clusters cool at room temperature for better texture.
- Prep Time: 30 minutes
- Cook Time: 15 minutes
- Category: Dessert
- Method: Microwave and Chilling
- Cuisine: American
Nutrition
- Serving Size: 1 cluster
- Calories: 150
- Sugar: 12g
- Sodium: 80mg
- Fat: 8g
- Saturated Fat: 4g
- Unsaturated Fat: 2g
- Trans Fat: 0g
- Carbohydrates: 18g
- Fiber: 1g
- Protein: 3g
- Cholesterol: 10mg