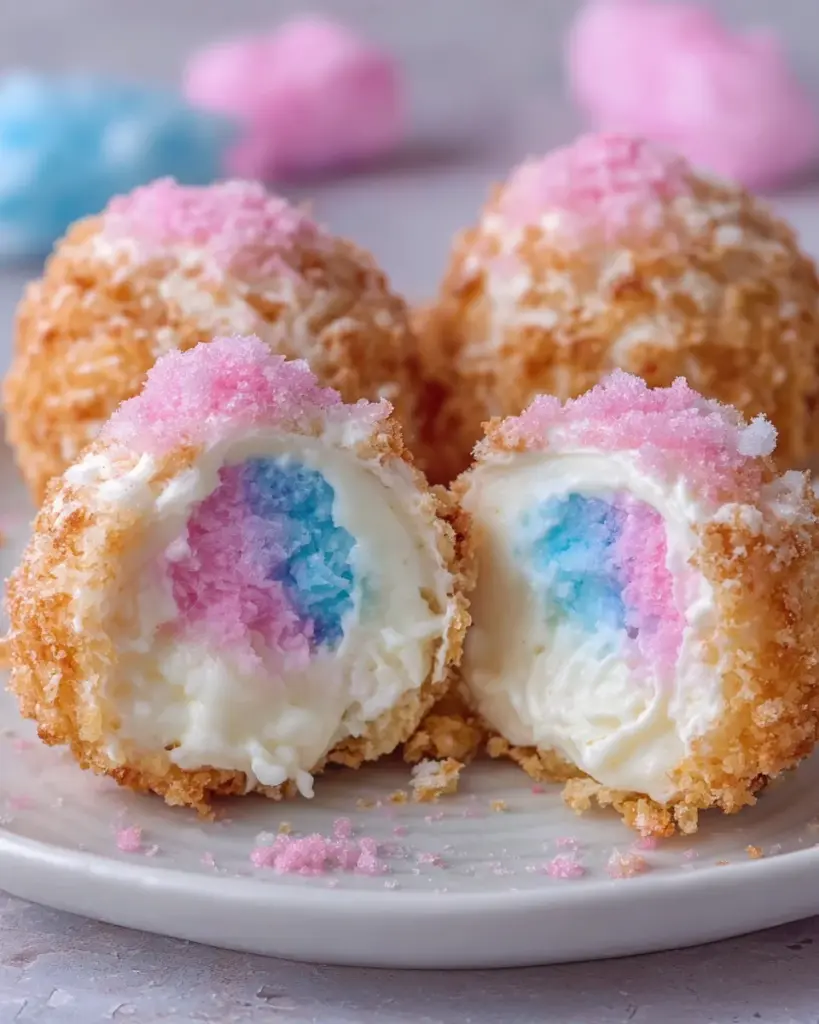
Introduction to Crispy Cotton Candy Cheesecake Bombs
As a passionate home cook, I understand how important it is to find delightful treats that make life a little sweeter, especially for busy moms and professionals. Enter the Crispy Cotton Candy Cheesecake Bombs! These delightful morsels are the perfect balance between creamy cheesecake and the whimsical joy of cotton candy, all wrapped in a crispy shell. Whether you’re hosting a festive gathering or just need a quick pick-me-up after a long day, these sweet bombs are sure to impress your loved ones and leave them wanting more. Let’s dive into this recipe that truly encapsulates the magic of dessert!
Why You’ll Love This Crispy Cotton Candy Cheesecake Bombs
These Crispy Cotton Candy Cheesecake Bombs are not just a treat; they’re a culinary adventure! They come together in a snap, making them perfect for those hectic weeknights or last-minute gatherings. The first bite reveals a creamy cheesecake filling, bursting with the nostalgic taste of cotton candy. Plus, they’re fun to make with the kids! You’ll find they melt in your mouth, leaving everyone craving just one more.
Ingredients for Crispy Cotton Candy Cheesecake Bombs
When preparing these Crispy Cotton Candy Cheesecake Bombs, having the right ingredients on hand is essential. Here’s a breakdown of what you’ll need:
- Cheesecake Filling: Start with cream cheese, which gives that rich, smooth texture. You’ll also need powdered sugar to sweeten it up, and a splash of vanilla extract for depth of flavor. The cotton candy flavoring is what truly makes these little bombs special. Whipped topping adds a light, airy quality, while heavy cream enhances the creaminess.
- Dough & Frying: A pack of refrigerated biscuit dough is not only easy to use but also provides that lovely crispy exterior. Light dusting with all-purpose flour makes rolling the dough a breeze. For frying, vegetable oil is ideal due to its high smoke point, ensuring a golden finish without burning.
- Cotton Candy Coating: Granulated sugar is the base for the coating, with optional cotton candy flavoring and food coloring for that extra pop. Imagine pink and blue swirling around your dish – kids will go wild!
- Garnish (Optional): Some fun options here! You can top the bombs with fluffy cotton candy or a sprinkle of powdered sugar for a classic touch. Whipped cream or a drizzle of white chocolate takes it to a whole new level!
Exact quantities for all these ingredients are listed at the bottom of the article, ensuring you have everything you need right at your fingertips for printing.
How to Make Crispy Cotton Candy Cheesecake Bombs
Step 1: Make the Filling
To create the delightful filling for these Crispy Cotton Candy Cheesecake Bombs, start by beating the cream cheese in a large bowl until it’s super smooth. Add in the powdered sugar, vanilla extract, and that magical cotton candy flavoring. This is where the fun begins! Fold in the whipped topping gently, creating a light texture. Finally, stir in a splash of heavy cream to make it extra creamy. Once mixed, let the filling chill in the fridge for about 30 minutes. This waiting time is key for a luscious consistency!
Step 2: Prep the Dough
Next up is the dough! Open your package of refrigerated biscuit dough, and separate each biscuit carefully. On a lightly floured surface, roll each biscuit into a thin circle. This step ensures the dough wraps evenly around the filling. If it gets sticky, just use a bit more flour! The thinner the dough, the crispier the final result will be. Don’t rush it; take your time for the best outcome!
Step 3: Assemble the Bombs
Now for the fun part— assembling the bombs! Grab your chilled cheesecake filling and scoop about 1 to 2 tablespoons onto the center of each dough circle. Gently fold the dough over the filling and seal it tightly. It’s crucial to seal the edges well to prevent any filling from escaping during frying. Roll each bomb between your hands to smooth out any imperfections. The goal is to create perfectly round delights ready for their golden transformation!
Step 4: Heat the Oil
Before frying, you need to heat the oil! Pour enough vegetable oil into a deep pan to cover the bombs while frying. Heat it to 350°F, checking with a thermometer if possible. This temperature is key for achieving that golden, crispy exterior. Maintaining a steady temperature is important, so adjust the heat as needed while you fry the bombs. You want them to cook evenly without burning!
Step 5: Fry the Bombs
Once the oil is hot, carefully place a few bombs in the pan. Fry them for about 1 to 2 minutes on each side, turning gently until they’re golden brown. You might hear a delightful sizzle, which is music to any cook’s ears! When they’re ready, remove them and let them drain on paper towels. This will help absorb any excess oil, keeping your bombs crispy without being greasy.
Step 6: Coat the Bombs
Now that your bombs are fried to perfection, it’s time to coat them! In a bowl, mix granulated sugar with a bit of optional cotton candy flavoring and food coloring to create a vibrant coating. While the bombs are still warm, roll them in this sugary mixture. Those colors will stick wonderfully, making them visually irresistible. This is where the magic happens, and I promise you, the kids will be delighted!
Step 7: Serve the Cheesecake Bombs
Finally, it’s serving time! Dust powdered sugar on top for that classic touch, or drizzle with white chocolate for an irresistible finish. You can also add some fluffy cotton candy to really make them stand out. Arrange them on a beautiful platter, and watch as your family and friends gather around with big smiles. These Crispy Cotton Candy Cheesecake Bombs not only look fabulous but will also disappear in no time!
Tips for Success
- Use a thermometer to ensure the oil is at 350°F for even frying.
- Don’t overfill the dough; 1 to 2 tablespoons is perfect!
- Seal the edges tightly to prevent leaks during frying.
- Let the bombs cool slightly before coating for better adhesion.
- Experiment with different flavors of cotton candy for fun variations!
Equipment Needed
- Deep pan or Dutch oven for frying (a large skillet works too).
- Thermometer to test oil temperature (a deep-frying thermometer is best).
- Mixing bowl and electric mixer for making the filling.
- Rolling pin for dough preparation (a wine bottle in a pinch).
- Slotted spoon for removing bombs from the hot oil.
Variations on Crispy Cotton Candy Cheesecake Bombs
- Chocolate Delights: Swap out the cheesecake filling for a rich chocolate ganache. This is perfect for the chocolate lovers in your life.
- Fruit Fusion: Add pureed strawberries or blueberries to the cheesecake filling for a fruity twist. It’s a refreshing summer treat!
- Gluten-Free Option: Use gluten-free biscuit dough to accommodate dietary needs while still enjoying the crispy goodness.
- Mini Bombs: Make bite-sized versions using smaller pieces of dough, perfect for parties or snacks!
- Nutty Surprise: Incorporate crushed nuts like almonds or pistachios into the filling for a delightful crunch.
Serving Suggestions for Crispy Cotton Candy Cheesecake Bombs
- Pair your bombs with a scoop of vanilla ice cream for that perfect contrast.
- Serve alongside fresh berries to enhance the flavor and color.
- Offer a selection of dipping sauces like chocolate or caramel for added fun.
- Use colorful plates or platters to showcase your delicious creations!
- For drinks, try lemonade or cotton candy-flavored beverages for a whimsical touch.
FAQs about Crispy Cotton Candy Cheesecake Bombs
As I’ve shared this delightful recipe, I often get a few questions from fellow home cooks eager to create their own Crispy Cotton Candy Cheesecake Bombs. Here are some common inquiries I’ve encountered:
Can I make the filling ahead of time?
Absolutely! You can prepare the cheesecake filling a day in advance and just store it in the fridge. This saves you time when you’re ready to assemble and fry the bombs.
Can these bombs be frozen?
Yes, you can freeze the assembled bombs before frying them. Just make sure to thaw them in the fridge before frying. It’s a handy trick for when unexpected guests drop by!
What can I use instead of cotton candy flavoring?
If you can’t find cotton candy flavoring, vanilla extract works well as a substitute. While it alters the taste a bit, it still gives a lovely sweetness to your cheesecake filling!
Can these be made without frying?
For a lighter version, you can bake the filled bombs at 350°F for about 12-15 minutes. They won’t be quite the same, but they’ll still be delicious and guilt-free!
What’s the best way to store leftovers?
If you happen to have any leftovers (which is rare!), store them in an airtight container in the fridge. They taste best within 2-3 days, but they may lose some crispiness over time.
Final Thoughts
Creating Crispy Cotton Candy Cheesecake Bombs is not just about baking; it’s about making sweet memories with your loved ones. This delightful treat transforms any ordinary day into a celebration, sparking joy and nostalgia with every bite. The combination of creamy cheesecake and sugary cotton candy in a crispy shell takes dessert to the next level. Whether for a family gathering or a late-night indulgence, these bombs are sure to bring smiles all around. So roll up your sleeves, gather your ingredients, and let the sweet magic begin. Your taste buds will thank you!
Print
Crispy Cotton Candy Cheesecake Bombs
- Total Time: 40 minutes
- Yield: 8 servings 1x
- Diet: Vegetarian
Description
Crispy Cotton Candy Cheesecake Bombs are a delightful dessert that combines the rich flavor of cheesecake with the fun and sweetness of cotton candy, all encased in a crispy fried dough.
Ingredients
- Cheesecake Filling
- 8 oz cream cheese, softened
- ½ cup powdered sugar
- 1 tsp vanilla extract
- ½ tsp cotton candy flavoring
- ¼ cup whipped topping
- 2 tbsp heavy cream
- Dough & Frying
- 1 package refrigerated biscuit dough (8-count)
- 2 tbsp all-purpose flour (for dusting)
- Vegetable oil, for frying
- Cotton Candy Coating
- 1 cup granulated sugar
- ½ tsp cotton candy flavoring (optional)
- Pink & blue food coloring (optional)
- Garnish (Optional)
- Cotton candy pieces
- Powdered sugar
- Whipped cream or white chocolate drizzle
Instructions
- Make the Filling: Beat cream cheese until smooth, add powdered sugar, vanilla, and cotton candy flavoring, then fold in whipped topping and heavy cream until fluffy; chill 30 minutes.
- Prep the Dough: Separate biscuits, lightly flour surface, and roll each biscuit into a thin circle.
- Assemble: Scoop 1–2 tbsp filling, roll into a ball, place in dough center, seal tightly, and roll smooth.
- Heat Oil: Warm oil to 350°F, keeping temperature steady for even frying.
- Fry: Fry bombs 1–2 minutes per side until golden, then drain on paper towels.
- Coat: Mix sugar with cotton candy flavoring and coloring, then roll warm bombs until coated.
- Serve: Dust with powdered sugar or drizzle with white chocolate and top with cotton candy just before serving.
Notes
- Ensure the oil temperature is consistent for the best frying results.
- You can customize the coating with different food coloring combinations.
- Do not overfill the dough to prevent bursting during frying.
- Prep Time: 30 minutes
- Cook Time: 10 minutes
- Category: Dessert
- Method: Frying
- Cuisine: American
Nutrition
- Serving Size: 1 bomb
- Calories: 250
- Sugar: 15g
- Sodium: 150mg
- Fat: 12g
- Saturated Fat: 5g
- Unsaturated Fat: 5g
- Trans Fat: 0g
- Carbohydrates: 32g
- Fiber: 1g
- Protein: 3g
- Cholesterol: 30mg