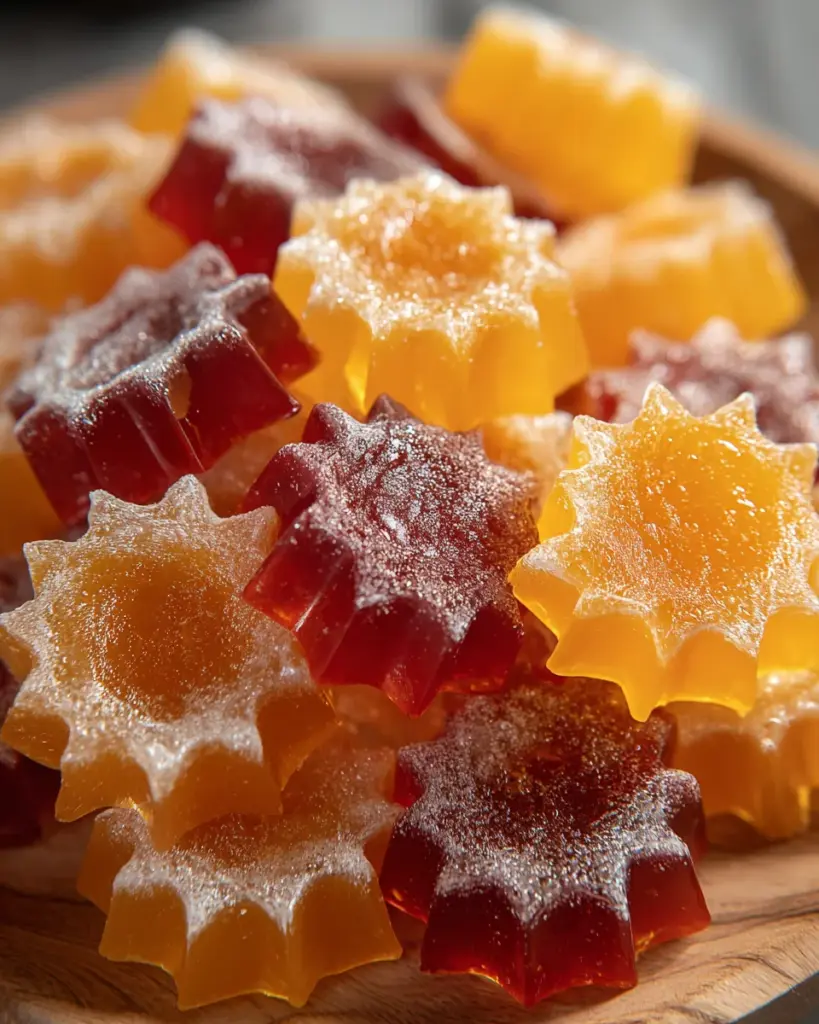
Introduction to Sweet Treats Made Easy
Life is so crazy, isn’t it? Sometimes that little bit of sweet craving creeps up and wouldn’t it be nice to have something delicious made easily? Enter Sweet Treats Made Easy! These homemade candies bring happiness to your kitchen, wherein the otherwise elaborate processes are simplified – thanks to just a few ingredients. Ideal for busy moms like us who want to pamper their family members without having to spend hours. If there’s a birthday bash or if it’s just going to be those candies post-dinner, the easy candy recipe is sure to come to your rescue and calm those sweet tooth cravings!
Why You’ll Love This Sweet Treats Made Easy
What’s better than homemade candy that requires minimal effort? This recipe not only saves you time but also gives you a delicious treat that your family will adore. With just a few simple ingredients, you can create personalized sweets. From kids to adults, everyone loves candies. Plus, the satisfaction of crafting something so delightful makes it all worthwhile. Trust me, you’ll find yourself making these sweet treats over and over again!
Ingredients for Sweet Treats Made Easy
Gathering your ingredients is like setting the stage for a delightful performance! Here’s what you’ll need to create your beautiful homemade candies.
- Flavored gelatin dessert mix: This is your star ingredient, providing the beautiful colors and flavors that make the candy so enticing. Choose your favorite flavor—be bold!
- Granulated sugar: Essential for sweetness, sugar is what transforms your ingredients into a lovely chewy candy. It also contributes to that delightful texture.
- Water: This helps dissolve the ingredients and create the perfect consistency for your candy mix. It’s the glue that holds everything together.
- Light corn syrup: Adds shine and a smoother texture to your candies, ensuring they don’t stick together. It’s a little magic ingredient!
- Citric acid (optional): If you’re in the mood for a tart twist, this ingredient will brighten the flavors. It’s like a refreshing citrus kick in every bite.
- Powdered sugar or cornstarch: Use this for dusting the finished candies to prevent sticking. It’s like preparing a beautiful backdrop for your sweet creations!
- Sprinkles (optional): These add a fun pop of color and personality to your candies. It’s the cherry on top, if you will!
For exact measurements, just scroll to the bottom of the article. Grab your ingredients and let’s get started on these delightful sweets!
How to Make Sweet Treats Made Easy
Creating your own homemade candies is a delightful adventure! Get ready to transform simple ingredients into sweet treats everyone will love. Let’s break it down into easy-to-follow steps!
Step 1: Prepare Your Molds
Before diving into the cooking, make sure to prepare your candy molds. Lightly grease them with a bit of oil or use a non-stick spray. This simple step will save you so much trouble later. No one likes when their sweet creations stubbornly cling to the mold! If you don’t have molds, lining a baking sheet with parchment paper works great too.
Step 2: Combine Your Ingredients
In a medium saucepan, mix together the flavored gelatin dessert mix, granulated sugar, water, and light corn syrup. Stir everything together until it’s well combined. This is where the magic starts! You want to make sure the sugar is fully dissolved; we don’t want any crunchy surprises in our tasty treats.
Step 3: Heat the Mixture
Now it’s time to bring your mixture to life. Place the saucepan over medium heat and let it warm up. Once it’s bubbling, increase the heat to medium-high. Here’s the fun part—insert a candy thermometer. You want the mixture to get to a precise 250°F (121°C). This is the sweet spot! Keeping a close eye on the thermometer ensures that we achieve that perfect chewy texture.
Step 4: Add Flavor
Once your mixture hits that magical temperature, it’s time to add the optional citric acid. This ingredient adds a lovely tang that balances all that sweetness. It’s like a squeeze of lemon in your favorite dessert, giving it depth and excitement. If you prefer traditional sweet candy, feel free to skip this step!
Step 5: Pour and Cool
Carefully pour the hot candy mixture into your prepared molds or spread it evenly on the lined baking sheet. Be cautious—it’s hot! If you’re using a baking sheet, you can control the thickness of the candy by spreading it to your desired level. Once poured, let it cool at room temperature completely. This can take some time, but the anticipation makes it even sweeter!
Step 6: Dust and Store
After your candies are set, it’s time to remove them from the molds or cut them into fun shapes if they’re on a baking sheet. Dust them lightly with powdered sugar or cornstarch to prevent sticking. Bonus tip: gently press some colorful sprinkles onto the surface for extra flair! Finally, store your finished candies in an airtight container at room temperature. They’ll certainly charm anyone who tries them!
Tips for Success
- Ensure your candy molds are well-greased or lined—this makes removal a breeze.
- Use a reliable candy thermometer to avoid burnt or undercooked candy.
- Experiment with different flavored gelatin mixes for unique tastes.
- Let the candy cool completely to achieve the right texture before removing.
- Store candies in a cool, dry place to keep them fresh longer.

Equipment Needed
- Medium saucepan: A regular pot works too if you don’t have a saucepan.
- Candy thermometer: If you don’t have one, a simple kitchen thermometer can suffice but ensure it’s accurate.
- Candy molds: You can also use a lined baking sheet as a substitute.
- Stirring spoon: A wooden or silicone spoon works perfectly for mixing.
- Measuring cups: If you lack fancy tools, just use standard cups from your kitchen!
Variations
- Dietary-Friendly Options: Use sugar substitutes like erythritol or stevia to make lower-calorie candies.
- Flavor Combinations: Blend different flavored gelatin mixes for unique tastes, such as combining raspberry and lemonade for a refreshing twist.
- Fruit Infusion: Add a few drops of your favorite fruit extract or puree for an extra fruity flavor boost.
- Colorful Treats: Use food coloring to create vibrant layers of color in your candies by pouring different colored mixtures one after the other.
- Chocolate Dip: Once set, dip the candies in melted chocolate for a decadent finish—perfect for special occasions!
Serving Suggestions
- Present your homemade candies in a decorative jar for a charming centerpiece.
- Pair these sweet treats with a warm cup of herbal tea or hot chocolate for a cozy experience.
- Create a fun candy buffet at celebrations—kids love to pick their favorites!
- Add a sprinkle of sea salt on top for a gourmet touch.
- Serve alongside fresh fruit for a delightful balance of flavors.
FAQs about Sweet Treats Made Easy
Can I use different flavors of gelatin for my candies?
Absolutely! Mixing and matching flavors is part of the fun. Each flavor will bring its personality to the candies, creating delightful surprises with every bite.
How do I store my homemade candies?
For best results, place your candies in an airtight container. Store them at room temperature to maintain their deliciousness, but avoid exposure to humidity.
Can I make these candies without citric acid?
Of course! Citric acid gives a tangy flavor that’s optional. If you prefer a sweeter profile, simply skip it and enjoy the rich flavor of your chosen gelatin.
What if my candy mixture didn’t thicken?
If your mixture doesn’t reach the right temperature of 250°F, it might not thicken correctly. Be sure to use a reliable candy thermometer for accuracy!
How long do these candies last?
When stored properly in an airtight container, these candies can last up to two weeks. Just try to resist eating them all at once!
Final Thoughts
Making homemade candies is a wonderful experience that brings joy not just to you, but to everyone lucky enough to taste your creations. There’s something magical about watching simple ingredients transform into delightful sweet treats. These quick and easy recipes are perfect for busy days, providing an opportunity to connect with your family through the joy of cooking. Plus, the smiles on their faces when they enjoy your treats are worth every moment spent in the kitchen. So, roll up your sleeves and let your creativity shine—after all, life’s sweeter with a little candy love!
Print
Sweet Treats Made Easy
- Total Time: 30 minutes
- Yield: Approximately 20 pieces 1x
- Diet: Vegetarian
Description
A simple recipe to create delicious homemade candies using flavored gelatin.
Ingredients
- 1 package (3 ounces) flavored gelatin dessert mix
- 2 cups granulated sugar
- 0.75 cup water
- 1 tablespoon light corn syrup
- 1 teaspoon citric acid (optional)
- Powdered sugar or cornstarch, for dusting
- Sprinkles, for decoration (optional)
Instructions
- Grease silicone candy molds lightly, or line a baking sheet with parchment paper if planning to cut the candy later.
- Place the flavored gelatin dessert mix, granulated sugar, water, and light corn syrup in a medium saucepan. Stir over medium heat until the sugar is completely dissolved.
- Raise the heat to medium-high and bring the mixture to a boil. Insert a candy thermometer and continue boiling without stirring until the thermometer reads 250°F (121°C).
- For a tangy flavor, stir in the citric acid after the mixture reaches 250°F (121°C).
- Carefully pour the hot candy mixture into the prepared molds, or spread evenly on the lined baking sheet to your preferred thickness.
- Allow the candy to cool fully at room temperature until completely firm.
- Once set, remove candy from molds or cut into desired shapes if cooled on a baking sheet. Dust lightly with powdered sugar or cornstarch to prevent sticking.
- If you wish, gently press sprinkles onto the candy surface before it finishes setting.
- Transfer finished candies to an airtight container and store at room temperature.
Notes
- The addition of citric acid will provide a tangier flavor to the candy.
- Store candies in an airtight container to maintain freshness.
- Prep Time: 15 minutes
- Cook Time: 15 minutes
- Category: Dessert
- Method: Boiling
- Cuisine: American
Nutrition
- Serving Size: 1 piece
- Calories: 70
- Sugar: 15g
- Sodium: 0mg
- Fat: 0g
- Saturated Fat: 0g
- Unsaturated Fat: 0g
- Trans Fat: 0g
- Carbohydrates: 18g
- Fiber: 0g
- Protein: 0g
- Cholesterol: 0mg


