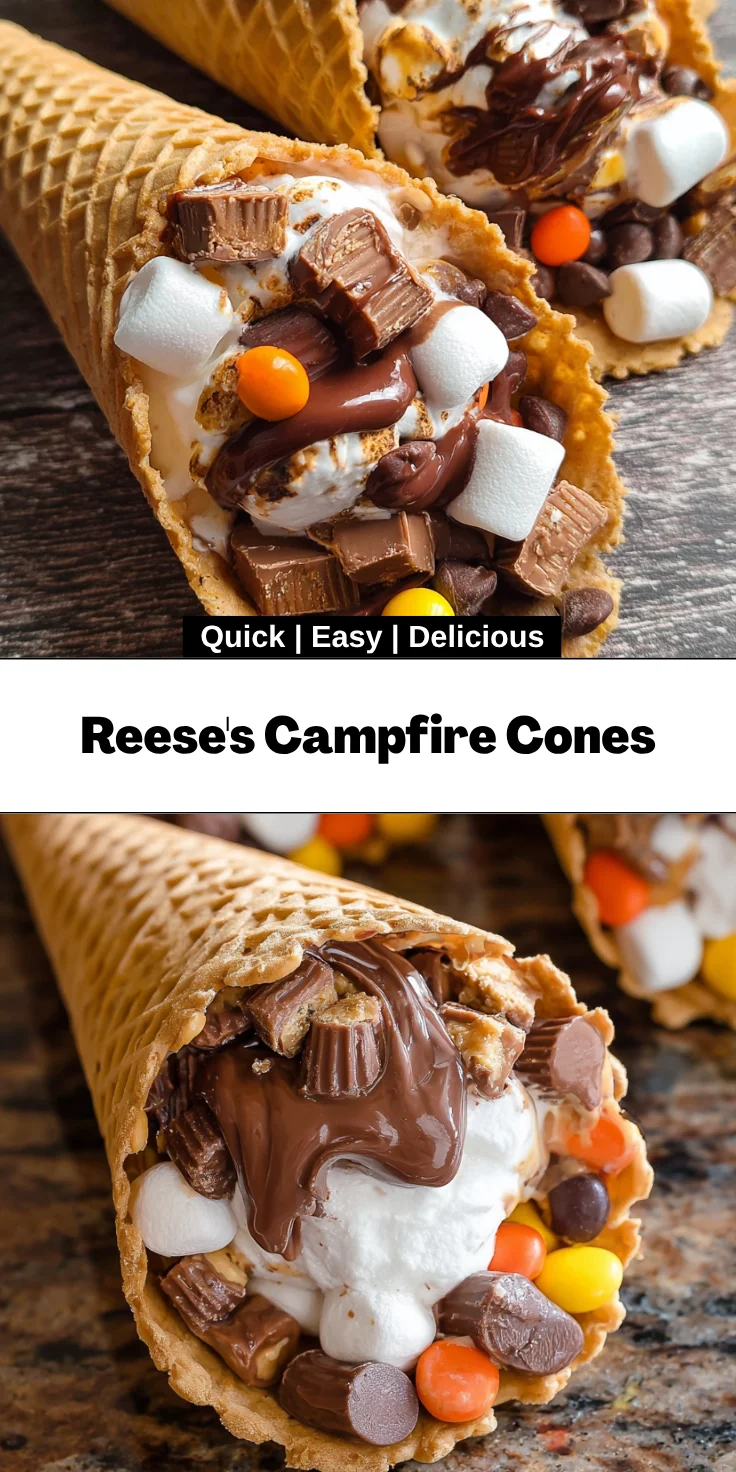
Introduction to Reese’s Campfire Cones
If you’re looking for a sweet treat that brings the thrill of childhood back, let me introduce you to Reese’s Campfire Cones. Picture this: creamy peanut butter cups, gooey chocolate, and fluffy marshmallows, all enveloped in a perfectly crunchy waffle cone. It’s not just a dessert; it’s an experience!
Perfect for busy moms like us, these cones are quick to prepare and make a delightful addition to any gathering—be it in the backyard or around the fire pit. Trust me, these little wonders are sure to impress every sweet tooth you know!
Why You’ll Love This Reese’s Campfire Cones
These Reese’s Campfire Cones are a dream come true for busy moms and aspiring chefs alike. They’re incredibly easy to make, taking only about 10 minutes to prepare! With every bite delivering a perfect balance of chocolatey goodness and peanut butter magic, your family will be begging for more. Plus, the customizable nature means everyone can enjoy their favorite flavors, satisfying even the pickiest eaters!
Ingredients for Reese’s Campfire Cones
Gathering the right ingredients for Reese’s Campfire Cones is one of the joys of this delightful recipe. Here’s what you’ll need to create this sweet treat:
- Waffle cones: The crunchy shell that holds all the deliciousness together. They add the perfect texture!
- Mini marshmallows: These fluffy delights melt beautifully, creating a sweet, gooey center.
- Chocolate chips: Rich and melty, they bring a deep chocolate flavor that pairs perfectly with peanut butter.
- Reese’s Mini Peanut Butter Cups: A must-have for the ultimate peanut butter lovers. They add a creamy surprise in every bite!
- Reese’s Pieces: These colorful candies give a delightful crunch and a pop of peanut butter flavor.
Feel free to explore and swap ingredients based on your family’s preferences. If you have chocolate allergies, consider using carob chips instead. For a lighter option, try dark chocolate and low-sugar marshmallows. Don’t hesitate to get creative with what you have on hand!
For exact measurements, check the bottom of the article where a handy printable version is available.
How to Make Reese’s Campfire Cones
Get ready to embark on a small culinary adventure! Making Reese’s Campfire Cones is as easy as pie—sorry, that’s a different dessert. Here’s a step-by-step guide to creating these delightful treats that your family will love.
Step 1: Prepare the Waffle Cones
First things first, let’s get those waffle cones ready! Grab your cones and fill them generously with mini marshmallows, about a quarter to a third of the way full. This fluffy foundation creates a delightful base for all the gooey goodness to come. Trust me, the marshmallows will turn into sweet little clouds of joy when they melt!
Step 2: Layer Additional Ingredients
Next, it’s time to get creative! Start layering in chocolate chips, followed by the Reese’s Mini Peanut Butter Cups. Pulling those little wrappers off feels like unwrapping tiny gifts! Then sprinkle in a handful of Reese’s Pieces for that extra crunch. Finish the layering with more mini marshmallows. Those layers should be packed tightly—like a sweet family reunion in each cone. Remember, the more, the merrier!
Step 3: Wrap the Cones
Now, let’s secure all this deliciousness! Take a piece of aluminum foil and carefully wrap each cone, starting at the top where the goodies are. Fold the foil around the cone and then fold up the bottom to keep everything safe and sound. Make sure it’s tightly sealed; you don’t want any surprises when they’re on the heat!
Step 4: Cooking Options
Here’s where the magic happens! If you’re using the oven, preheat it to 350°F. Place your wrapped cones on a baking sheet and bake them for 10-15 minutes. Keep an eye on them; it’s a gooey situation when they’re done! For grilling or campfire cooking, position the wrapped cones over the hot coals or on the grill. Cook for about 5-7 minutes, turning occasionally to prevent burning. The cones are ready when you smell that delicious aroma and the chocolate is perfectly melted.
Step 5: Serving and Enjoying
Once your cones are beautifully cooked, carefully take them away from the heat and let them cool for a minute. That’s the hardest part, I promise! After a brief moment of patience, unwrap the foil and voilà—your Reese’s Campfire Cones are now ready to be devoured. Grab a spoon or just dig in with your hands. The messier, the better—because let’s be honest, that’s part of the fun!
Tips for Success
- Don’t overfill the cones; leave a little space at the top to prevent spillage while cooking.
- Experiment with chocolate options; milk, dark, or even white chocolate can elevate your cones.
- Make a fun family event out of it! Let your kids choose their own fillings.
- Check your cones periodically while cooking to avoid burning the waffle.
- For a gourmet touch, drizzle melted chocolate over the finished cones before serving.
Equipment Needed
- Waffle cone holders: Not essential, but they help keep your cones stable. A baking tray works too!
- Aluminum foil: For wrapping; alternatively, use parchment paper if you’re grilling.
- Baking sheet: Required for oven baking, but a grill or campfire setup is just as good.
- Spoon: Helpful for packing layers and for serving—use a ladle for extra fun!
Variations
- Nut-Free Alternative: Swap out the Reese’s products for SunButter or other nut-free options to make it safe for those with allergies.
- Dairy-Free Version: Use dairy-free chocolate chips and marshmallows for a treat that everyone can enjoy!
- Fruit Delight: Add fresh fruit slices, like strawberries or bananas, for a fruity twist on flavor and added nutrition.
- Flavors Galore: Experiment with flavored marshmallows, like toasted coconut or strawberry, to amp up the taste!
- Decadent Drizzle: Drizzle caramel or chocolate sauce over the finished cones for an extra layer of indulgence.
Serving Suggestions
- Ice Cream: Serve with a scoop of vanilla ice cream on the side for a perfect combination.
- Fresh Fruit: Pair with sliced strawberries or blueberries for a refreshing contrast to the rich flavors.
- Drinks: Complement with iced tea or lemonade for a cool, summery vibe.
- Presentation: Serve cones in colorful baskets to brighten up your dessert table!
FAQs about Reese’s Campfire Cones
Can I make Reese’s Campfire Cones ahead of time?
Absolutely! You can prep the cones and wrap them in foil ahead of time. Just store them in the fridge until you’re ready to cook. This makes it super easy for busy moms like us!
What’s the best way to reheat leftover cones?
If you have any leftover Reese’s Campfire Cones, reheat them in the oven at 350°F for about 5-7 minutes. This will ensure that everything melts again perfectly!
What other fillings can I use?
Feel free to get creative! You can swap in different candies like M&Ms or a variety of nuts for crunch. Just stick to what you love!
Can I make these cones without a campfire?
Of course! You can easily make these delicious cones in the oven or on a grill. Just follow the baking instructions provided, and you’ll still get that wonderful melty goodness!
Are Reese’s Campfire Cones suitable for a gluten-free diet?
If you’re looking for a gluten-free option, just swap out waffle cones for gluten-free cones. You’ll still enjoy the same tasty flavors without the gluten!
Final Thoughts
Creating Reese’s Campfire Cones is not just about satisfying a sweet tooth; it’s about fun, laughter, and connection. Each cone tells a story, bringing together flavors that spark joy and childhood memories. Whether gathered around a campfire or in your backyard, these delightful treats are bound to make everyone smile.
Plus, they’re super easy to customize, making them perfect for every palate. So, gather your loved ones, roll up your sleeves, and dive into this delicious experience. With every bite, you’ll be reminded of the simple pleasures that life and good food can bring!
Print
Reese’s Campfire Cones
- Total Time: 25 minutes
- Yield: 4 servings 1x
- Diet: Vegetarian
Description
Reese’s Campfire Cones are a delicious and fun dessert perfect for camping or backyard gatherings. Filled with chocolate, peanut butter, and marshmallows, these cones are sure to satisfy your sweet tooth!
Ingredients
- 4 Waffle cones
- 1 cup Mini marshmallows
- 1 cup Chocolate chips
- 4 Reese’s Mini Peanut Butter Cups
- 1 cup Reese’s Pieces
Instructions
- Fill the bottom of each cone (about ¼ – ⅓) with mini marshmallows.
- Layer the chocolate chips, Reese’s Mini Peanut Butter Cups, Reese’s Pieces, and more mini marshmallows until filled as much as possible, gently packing the layers down as you go.
- Wrap each cone individually in aluminum foil, making sure they are tightly sealed. The easiest way to do this is by first covering the top of the cone where the ingredients are to ensure they don’t spill out. Then fold up the bottom and wrap up the sides.
- To bake in the oven: Preheat your oven to 350°F. Place the wrapped cones on a baking sheet and bake for 10-15 minutes or until everything is melted and gooey.
- Cook over the fire or on the grill: Place the wrapped cones over the hot coals of your campfire or on the grill grates. Cook for 5-7 minutes, turning occasionally, until the fillings are melted and the cone is slightly toasted.
- Carefully remove the cones from the heat and let cool for a minute or two.
- Unwrap the foil and enjoy!
Notes
- Feel free to customize the fillings based on your preferences!
- For a healthier version, you can use dark chocolate and mini marshmallows with lower sugar content.
- Always supervise kids while cooking over an open fire.
- Prep Time: 10 minutes
- Cook Time: 15 minutes
- Category: Dessert
- Method: Baking or Grilling
- Cuisine: American
Nutrition
- Serving Size: 1 cone
- Calories: 320
- Sugar: 30g
- Sodium: 70mg
- Fat: 15g
- Saturated Fat: 7g
- Unsaturated Fat: 3g
- Trans Fat: 0g
- Carbohydrates: 46g
- Fiber: 2g
- Protein: 4g
- Cholesterol: 5mg