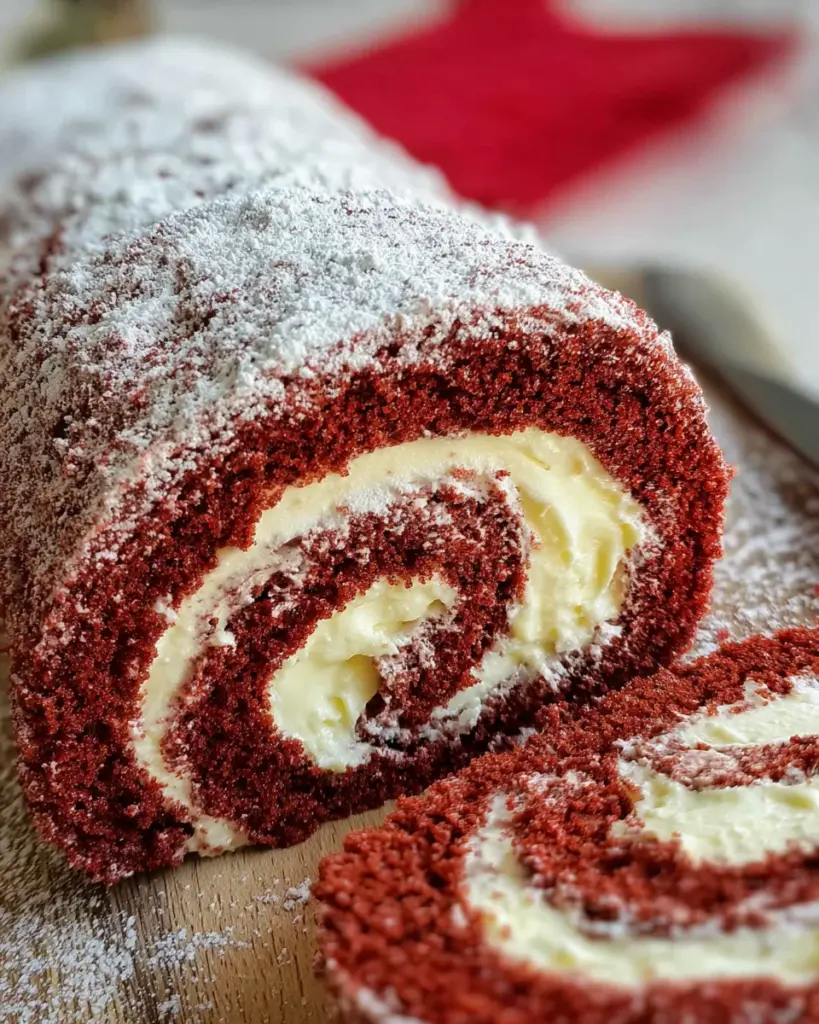
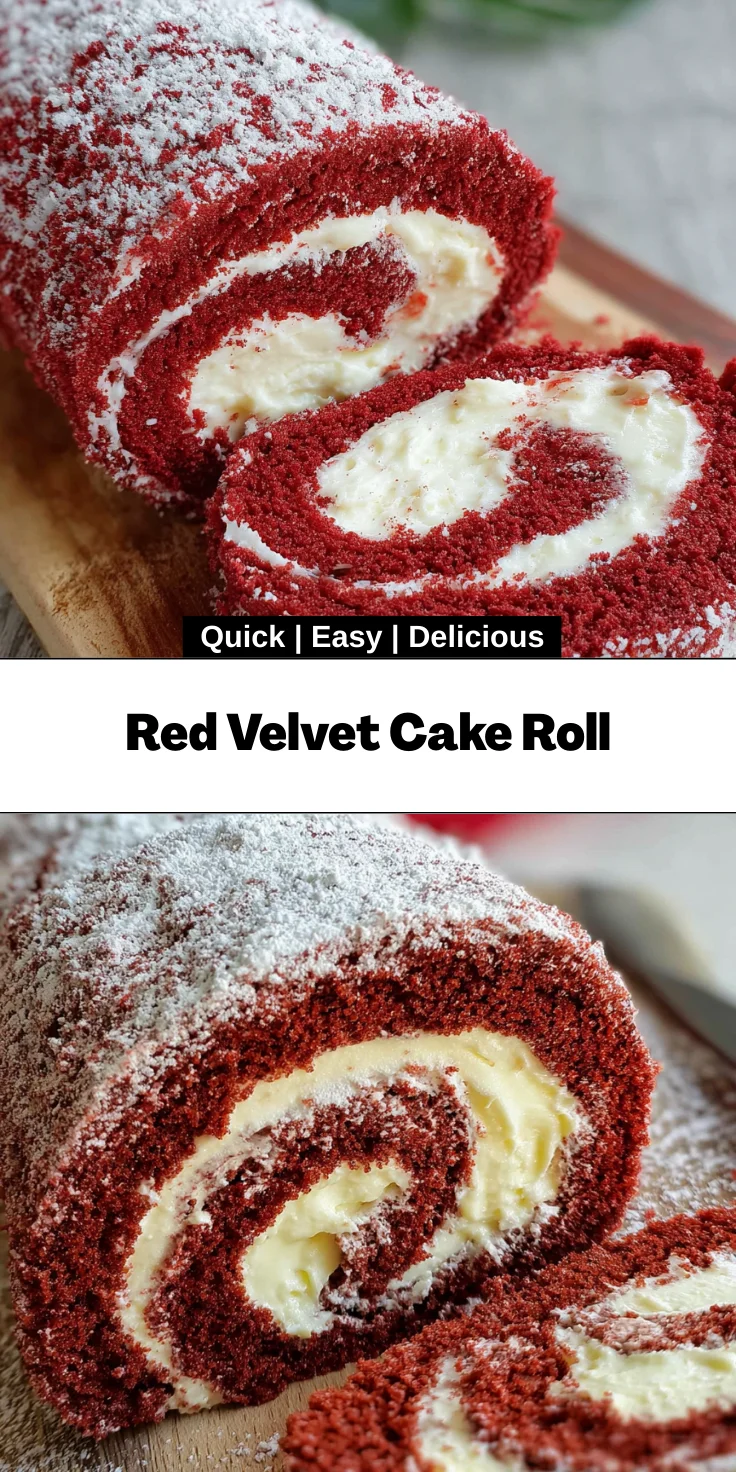
Introduction to Red Velvet Cake Roll
There’s something truly magical about a Red Velvet Cake Roll. It combines rich flavor with an impressive presentation, making it a perfect treat for any occasion. As a busy mom, I know how delightful it is to whip up something that not only tastes divine but also impresses family and friends. Whether you’re celebrating a birthday or just need a sweet ending to your week, this cake roll is sure to add some joy to your day. Plus, it’s easier than it looks, which is a win in my book!
Why You’ll Love This Red Velvet Cake Roll
This Red Velvet Cake Roll is a delightful treat that combines speed and flavor, making it a favorite in my kitchen. It’s light yet satisfying, perfect for both casual and special occasions. With just a few simple ingredients, you can create a stunning dessert that tastes as good as it looks. Plus, the joy of rolling the cake adds a fun twist to your baking routine, making it an absolute must-try!
Ingredients for Red Velvet Cake Roll
Before you dive into making this delightful Red Velvet Cake Roll, let’s gather our ingredients! Each one plays a crucial role in crafting this show-stopping dessert.
- Eggs: These provide structure and moisture. Fresh is best for optimal fluffiness.
- Sugar: Granulated sugar sweetens the cake and helps it rise for that light texture.
- Vegetable oil: This keeps the cake moist and contributes to its tenderness.
- Baking powder: A leavening agent, it gives the roll its light and airy quality.
- Salt: Just a pinch enhances the flavors and balances the sweetness.
- Vanilla extract: A splash of this adds lovely warmth and depth to the overall taste.
- Cocoa powder: This adds a subtle chocolate flavor, enhancing the richness of the red velvet.
- All-purpose flour: It’s essential for structure and creates the cake base.
- Red food coloring: This is what turns an ordinary cake into a striking red velvet masterpiece.
- Powdered sugar: Essential for dusting, this helps prevent sticking when rolling the cake.
- Cream cheese: Perfect for that rich, tangy filling; it’s a match made in baking heaven.
- Unsalted butter: It creates a smooth, creamy texture for the frosting.
- More powdered sugar: This sweetens and thickens the filling, making every bite heavenly.
- Additional vanilla: A little more for the frosting adds even more flavor to the filling.
You can find the exact measurements for these ingredients at the bottom of the article, handy for printing when you’re ready to cook!
How to Make Red Velvet Cake Roll
Now that we have all our ingredients, let’s get rolling—literally! Follow these steps to create your stunning Red Velvet Cake Roll. It’s easier than it seems, and soon enough, you’ll be impressing everyone with your baking skills.
Step 1: Preheat the Oven
Start by preheating your oven to 350°F (175°C). This is the magic number for our cake roll. Then, line a 10×15” cake pan with foil, giving it a light spray of floured nonstick cooking spray. This helps with easy removal after baking. Trust me; you’ll want to make this step count!
Step 2: Beat Eggs and Sugar
Next up, crack some large eggs into a large mixing bowl or the bowl of an electric mixer. Beat them at medium speed for about 3 to 5 minutes. You want them to be foamy and a lovely yellow hue. Add in the granulated sugar and keep mixing for another 2 minutes. This combination should thicken slightly, creating a perfect base for your cake.
Step 3: Mix in Remaining Ingredients
Now it’s time for some fun! Gently mix in the oil, baking powder, salt, vanilla extract, and cocoa powder. Once that’s well combined, slowly add the all-purpose flour and continue to mix until just combined. Avoid overmixing—the less you beat it here, the fluffier your cake will be!
Step 4: Bake the Cake
Pour the batter into your prepared pan, using a spatula to spread it evenly. Pop it into the oven and let it bake for about 10 to 15 minutes. Keep an eye on it—once the top is lightly browned and springs back when you tap it, it’s good to go!
Step 5: Roll the Cake
While your cake bakes, lay out a clean kitchen towel on your counter. Sprinkle about 1/4 cup of powdered sugar on it, just enough to dust the surface. When the cake is ready, flip it onto the towel, peel off the foil, and gently roll the cake from the short side using the towel. Let it cool completely in this rolled-up position. This will make for a perfect roll when we put on the filling!
Step 6: Prepare the Filling
While your cake cools, it’s the perfect time to whip up the cream cheese filling. Beat together the cream cheese and unsalted butter until creamy. Gradually mix in the powdered sugar, followed by the additional vanilla extract. Keep beating until it’s smooth and ready to spread!
Step 7: Assemble the Cake Roll
Carefully unroll the cooled cake. Don’t worry if it cracks a little—it’ll be covered in deliciousness! Spread the cream cheese filling evenly across the surface. Once spread, gently roll the cake back up, this time without the towel. Try to roll it as tightly as possible to keep that beautiful shape.
Step 8: Chill and Serve
After rolling, place the cake seam-side down on a serving platter. Chill it for about an hour to let the filling set and flavors mingle. Before serving, dust the top with powdered sugar for that café-style finish. And there you have it—your stunning Red Velvet Cake Roll is ready to wow everyone at the table!
Tips for Success
- Make sure your eggs are at room temperature for better volume when whisked.
- Use fresh ingredients—this will elevate the taste of your Red Velvet Cake Roll.
- Don’t skip the powdered sugar on the towel; it prevents sticking!
- Chill the cake after rolling to help it hold its shape.
- If cracks appear, don’t stress! A little extra frosting can hide them.
Equipment Needed
- 10×15 inch baking pan or jelly roll pan; a regular baking sheet works in a pinch.
- Mixing bowls; use a stand mixer for ease or a whisk and elbow grease.
- Spatula for spreading the batter; a rubber spatula is best, but any flat tool will do.
- A clean kitchen towel; a silicone baking mat can substitute.
- Whisk for mixing the filling; a fork or electric mixer works too!
Variations
- Chocolate Version: For a decadent twist, increase the cocoa powder to enhance the chocolate flavor in your Red Velvet Cake Roll.
- Vanilla Cream Filling: Swap out the cream cheese for whipped cream for a lighter taste. A vanilla custard or whipped topping could also work!
- Gluten-Free: Use a gluten-free flour blend to make this dessert suitable for those with dietary restrictions.
- Coconut: Add shredded coconut to the filling for a delightful chew and flavor contrast, creating a tropical vibe.
- Nutty Delight: Incorporate crushed pecans or walnuts into the filling for a delicious crunch that complements the soft texture of the cake.
- Berry Filling: Blend fresh or frozen berries, like raspberries or strawberries, into the cream cheese filling for a fruity twist.
Serving Suggestions
- Pair your Red Velvet Cake Roll with a scoop of vanilla ice cream for a delightful contrast.
- Serve with fresh berries on the side to enhance the visual appeal and add a burst of flavor.
- For drinks, a glass of cold milk or a steaming cup of coffee complements the sweetness beautifully.
- Garnish the plate with a sprinkle of cocoa powder or additional powdered sugar for an elegant touch.
FAQs about Red Velvet Cake Roll
As I’ve baked many a Red Velvet Cake Roll, I often get asked a few common questions. Here are the answers to help you navigate your own baking adventure!
Can I make this cake roll ahead of time?
Absolutely! You can prepare the cake roll a day in advance. Wrap it tightly in plastic wrap and store it in the fridge. This actually enhances the flavors as it sits!
What if my cake cracks while rolling?
Don’t worry if this happens! It’s a common issue. Just use extra frosting to cover those cracks, turning it into a delicious feature rather than a flaw. You’ll still have a lovely dessert!
Is there an alternative to red food coloring?
Yes! If you prefer a more natural approach, you can use beet juice or a natural red dye. Keep in mind that the color may vary, but the taste will still be delightful!
How should I store leftovers?
Store any leftovers in the refrigerator, wrapped tightly. It should stay fresh for up to three days, though I doubt it will last that long!
Can I freeze the Red Velvet Cake Roll?
Definitely! Wrap it well in plastic wrap and foil to prevent freezer burn. It can be frozen for up to two months. Just thaw it in the fridge overnight before you serve it!
Final Thoughts
Baking a Red Velvet Cake Roll brings a sense of joy that fills both the kitchen and heart. As the delightful aroma wafts through your home, it reminds me of special moments spent with family. This dessert is not just about taste; it’s about creating memories over a slice or two with loved ones. The beauty of this recipe lies in its simplicity and elegance, making it an enjoyable journey from start to finish. So, whether it’s a celebration or just a sweet treat to brighten your day, I encourage you to give this delightful roll a try!
Print
Red Velvet Cake Roll
- Total Time: 1 hour 35 minutes
- Yield: 12 servings 1x
- Diet: Vegetarian
Description
A delightful dessert that combines the classic flavors of red velvet cake within a rolled form, making it visually impressive and delicious.
Ingredients
- 3 large eggs
- ¾ cup (150g) granulated sugar
- 1 tablespoon (15ml) vegetable oil
- 1 teaspoon baking powder
- ¼ teaspoon salt
- 1 teaspoon vanilla extract
- 1 tablespoon (5g) unsweetened cocoa powder
- ¾ cup (93g) all purpose flour
- 1 tablespoon (15ml) red food coloring
- Powdered sugar to aid in rolling
- 4 ounces (113g) cream cheese (room temperature)
- ¼ cup (57g) unsalted butter (room temperature)
- 2 cups (226g) powdered sugar
- 1 teaspoon vanilla
Instructions
- Preheat oven to 350°F. Line a 10×15” or 10.5×15” cake/jelly roll pan with foil and spray with floured nonstick cooking spray.
- Place eggs in a large bowl or the bowl of an electric mixer. Beat at medium speed with mixer for 3-5 minutes until foamy and yellow. Add sugar and mix for 2 more minutes, until the mixture is thickened slightly.
- Mix in oil, baking powder, salt, vanilla, and cocoa, then add flour and mix slowly until just combined.
- Pour into prepared pan, spreading as needed with a spatula. Bake for 10-15 minutes, or until the top is browned and the cake springs back when touched lightly.
- While the cake is baking, lay out a clean kitchen towel onto the counter. Spread with about 1/4 cup powdered sugar.
- Remove the hot cake from the oven and carefully flip the cake onto the towel. Carefully remove the pan and foil and then, using the towel, roll up the cake from the short side. Let this cool completely before continuing.
- Make the filling: beat cream cheese and butter until creamy, then mix in powdered sugar slowly. Add vanilla and beat until smooth.
- To fill the cake: Carefully unroll the cake. Spread with the frosting. Carefully roll the cake back up as tight as possible.
- Chill for one hour before slicing. Before serving, dust the top with powdered sugar.
- If the cake cracks, double the frosting recipe and frost the outside as well.
Notes
- Wrap the cooled cake in plastic wrap and let it sit overnight for enhanced flavor.
- If cracks occur, additional frosting can conceal imperfections.
- Prep Time: 20 minutes
- Cook Time: 15 minutes
- Category: Dessert
- Method: Baking
- Cuisine: American
Nutrition
- Serving Size: 1 slice
- Calories: 290
- Sugar: 25g
- Sodium: 220mg
- Fat: 15g
- Saturated Fat: 8g
- Unsaturated Fat: 5g
- Trans Fat: 0g
- Carbohydrates: 36g
- Fiber: 1g
- Protein: 3g
- Cholesterol: 70mg


