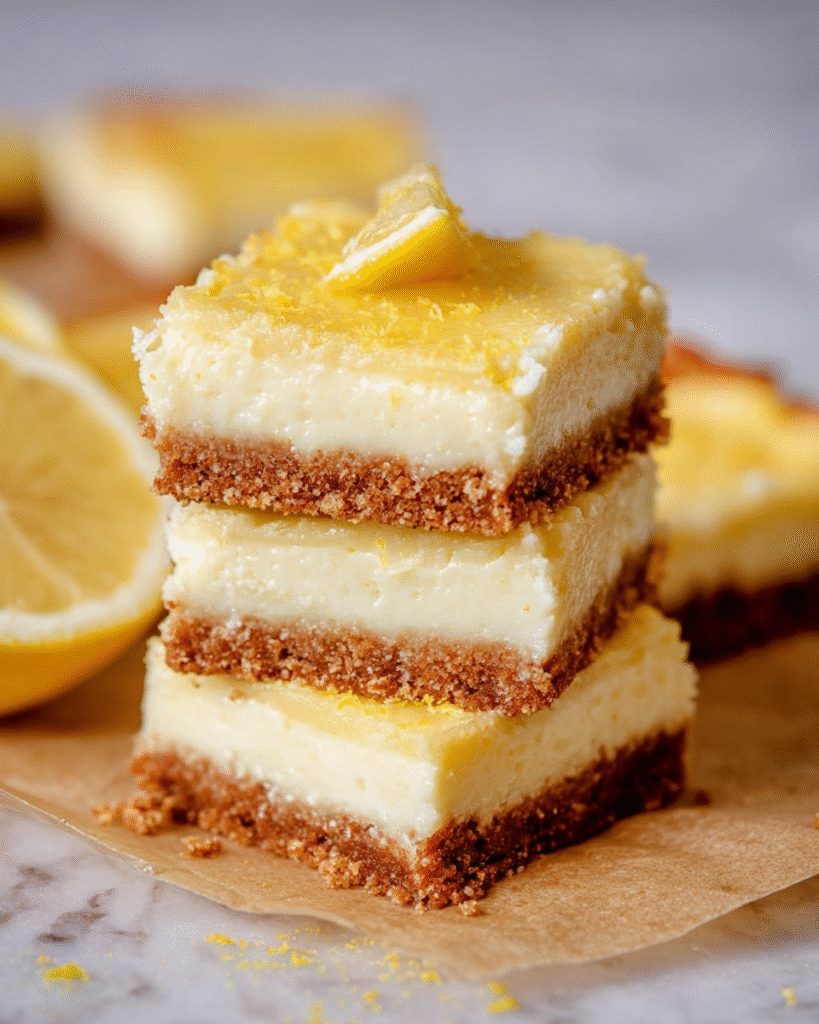
Introduction to Lemon Cheesecake Bars
So let’s dicsuss Lemon Cheesecake Bars– the cool icy-sweet treat
even on the most hectic days of the week. As an enthusiastic amateur chef, I adore receips that cut rihgt throught he anarchy of my life, offering utter contentment with every bean- these bars fit that description! They’re ridiculously easy to put together so perfect for when I really want to blow my family or friends away but don’t want to spend my whole day in the kitchen: every time I roll these out for potluck dinners, or birthday parties, or even just a Sunday afternoon, they always come through for me. Trust me, they will make your mouth sing, and you’ll be anointed at the new dessert throne!
Why You’ll Love This Lemon Cheesecake Bars
These Lemon Cheesecake Bars are a delightful combination of creamy and tangy flavors, bringing sunshine to any occasion. They’re quick to prepare, making them a perfect choice for busy moms and professionals like us who crave delicious desserts without the hassle. With minimal effort and just a few simple ingredients, you’ll impress your loved ones every time you serve them. Plus, they’re a great way to bring a taste of spring to your table anytime of the year!
Ingredients for Lemon Cheesecake Bars
Let’s dive into the wonderful world of ingredients that create these Lemon Cheesecake Bars. This recipe calls for a delightful mix that gives you that creamy, dreamy texture paired with the perfect balance of tart and sweet!
- Graham cracker crumbs – The foundation of our crust, giving it that delicious crunch and nostalgic flavor.
- Granulated sugar – Sweetness is essential, and it balances the tartness of the lemons beautifully.
- Unsalted butter – This adds richness to the crust; melted butter binds everything together, adding moisture.
- Ground cinnamon – A warm spice that creates depth in the crust. It complements the lemon perfectly.
- Lemon zest – This adds a pop of brightness and amplifies the lemon flavor throughout the dessert.
- Full-fat cream cheese – The star of our cheesecake filling! It provides that rich, creamy texture we all love.
- Vanilla extract – Adds a hint of warmth and enhances the overall flavor of the cheesecake.
- Eggs – They play a crucial role in providing structure and stability to the cheesecake.
- Lemon juice – Freshly squeezed for the best flavor! It brightens the filling and adds that delightful tang.
- All-purpose flour – Just a touch to help hold the cheesecake together and maintain its creamy consistency.
- Lemon curd – This luscious swirl brings an extra layer of lemony goodness, making every bite heavenly.
The exact measurements for all these ingredients can be found at the bottom of the article. Happy baking!
How to Make Lemon Cheesecake Bars
Step 1: Preheat the Oven
The first and crucial step is to preheat your oven to 325°F. This ensures that the heat is just right for baking our Lemon Cheesecake Bars. An even temperature means your dessert will bake perfectly, avoiding a soggy bottom and ensuring a scrumptious rise. Don’t skip this step; your bars will thank you later!
Step 2: Prepare the Baking Pan
Grab a 9-inch square baking pan and line it with parchment paper. I love this trick! Just leave some overhang on the sides. This little detail makes it super easy to lift the bars out later. Plus, no more sticky mess—just perfect, clean edges when you slice into them!
Step 3: Make the Crust
In a medium bowl, mix the graham cracker crumbs, sugar, ground cinnamon, lemon zest, and melted butter. Stir until it’s all combined and resembles damp sand. Now, press this mixture evenly into the bottom of your prepared baking pan. Use the back of a measuring cup or your fingers for a firmly packed crust. It’s the solid base your delicious cheesecake layer needs, so press hard enough!
Step 4: Prepare the Cheesecake Mixture
For the cheesecake, start by beating the room-temperature cream cheese in a large mixing bowl. Add granulated sugar and vanilla extract, and mix until smooth and creamy, about three minutes on medium speed. Scrape down the sides of the bowl to make sure everything’s blended. We’re aiming for that velvety texture that makes each bite irresistible. Then, it’s time to toss in those eggs—one at a time, mixing well after each addition!
Step 5: Combine and Pour
Once you’ve mixed in the eggs, add the fresh lemon juice and give it another quick stir. Now, gently fold in the flour. This step helps bind the cheesy goodness without overmixing. When everything looks well combined, pour this creamy mixture over the crust. Spread it evenly with a spatula to create a smooth surface for that heavenly topping to come!
Step 6: Add Lemon Curd Swirls
Here comes the fun part—swirling in the lemon curd! Using a knife or toothpick, gently swirl the lemon curd into the cream cheese layer. You want to create beautiful swirls, not mix it completely. Each alluring swirl brings a pop of flavor and a lovely visual, making these bars even more tempting!
Step 7: Baking Time
Now, it’s time to bake! Pop the pan in the preheated oven for about 35 to 40 minutes. Keep an eye on them—you want the edges to be set but the center should still have a slight jiggle. If they’re browning too quickly, cover with foil for the last few minutes. This will help your Lemon Cheesecake Bars cook evenly without burning!
Step 8: Cooling and Refrigeration
Once baked, remove the pan from the oven and let it cool at room temperature for about 30 minutes. Patience is key here! After cooling, place the bars in the refrigerator for at least 8 hours, if you can wait that long. Chilling allows the flavors to meld beautifully, giving you that fantastic, creamy texture that makes this dessert unforgettable!
Tips for Success
- Always use room-temperature cream cheese for a smoother mixture.
- Wrap the edges of the baking pan with foil if they start to brown before the center is set.
- Let the bars chill overnight to enhance the flavors.
- Feel free to adjust the sweetness to suit your taste.
- Use a sharp knife for clean slices after chilling.

Equipment Needed
- 9-inch square baking pan – A round pan works too if that’s what you have.
- Parchment paper – You can use aluminum foil in a pinch, but parchment is better for easy removal.
- Mixing bowls – Just any to mix your ingredients, but a large one is ideal.
- Hand mixer – A whisk works well too; just be prepared for a workout!
- Spatula – Useful for spreading the cheesecake mixture smoothly.
Variations for Lemon Cheesecake Bars
- Berry Bliss: Add fresh or frozen berries like blueberries or raspberries to the cream cheese mixture for a delightful fruity twist.
- Gluten-Free Option: Substitute graham cracker crumbs with gluten-free cookie crumbs or almond flour for a gluten-friendly dessert.
- Coconut Dream: Mix in shredded coconut into the crust or sprinkle it on top of the lemon curd for a tropical flair that’s irresistible!
- Chocolate Lover’s: Drizzle melted chocolate over the cooled bars for a rich contrast to the creamy lemon flavor.
- Vegan Version: Use nut cream cheese, aquafaba instead of eggs, and maple syrup as a sweetener for a plant-based treat!
Serving Suggestions
- Pair with a dollop of whipped cream for an extra creamy touch.
- Serve alongside fresh berries like strawberries or raspberries for a burst of freshness.
- Enjoy with a refreshing glass of iced tea or lemonade to complement the zesty flavor.
- Garnish with lemon slices or zest for a beautiful presentation that pops!
- Add a sprig of mint for an elegant finishing touch on each plate.
FAQs about Lemon Cheesecake Bars
Let’s tackle some frequently asked questions about these delicious Lemon Cheesecake Bars. After all, I know that a smooth baking experience makes for a happier kitchen! Here are some of the questions I often hear from fellow bakers:
Can I use low-fat cream cheese?
While low-fat options can work, I recommend sticking with full-fat cream cheese for the creamiest texture. Low-fat varieties tend to result in a less rich flavor.
How do I know when my bars are done baking?
You want the edges to be set, while the center should still jiggle slightly. A good rule of thumb is to check around the 35-minute mark. If the edges darken, cover them loosely with foil.
Can I make these bars ahead of time?
Absolutely! In fact, making them a day in advance enhances the flavors. Just be sure to refrigerate them overnight and cover with plastic wrap.
What’s the best way to cut Lemon Cheesecake Bars?
Using a sharp, hot knife is key for clean slices. Simply dip the knife in hot water, wipe it, and then cut through the bars for perfectly smooth edges!
Can I freeze Lemon Cheesecake Bars?
You can! Just wrap the cooled bars tightly in plastic wrap and then in aluminum foil. Thaw them in the refrigerator, and you’ll still enjoy that rich taste!
Final Thoughts
Making Lemon Cheesecake Bars is like crafting a little piece of joy in your kitchen. With every bite, you get that luscious creaminess paired with a zesty zing that can brighten anyone’s day. I love how easy they are to whip up, yet they feel so special and indulgent. Whether you’re celebrating a festive occasion or simply looking for a sweet treat after dinner, these bars never disappoint. The joy on my family’s faces when they enjoy these delightful squares is priceless. I hope this recipe brings you as much happiness as it brings me!
Print
Lemon Cheesecake Bars
- Total Time: 8 hours 60 minutes
- Yield: 9 servings 1x
- Diet: Vegetarian
Description
Lemon Cheesecake Bars are a creamy and tangy dessert with a delicious graham cracker crust and a rich cheesecake filling swirled with lemon curd.
Ingredients
- 1 ½ Cups graham cracker crumbs
- 3 Tablespoons granulated sugar
- 7 Tablespoons unsalted butter, melted
- 1 Teaspoon ground cinnamon
- 1 Teaspoon lemon zest
- 24 Ounces cream cheese, full-fat, at room temperature
- ½ Cup granulated sugar
- 1 Teaspoon vanilla extract
- 3 eggs, at room temperature
- juice from half a lemon
- 5 Tablespoons all-purpose flour
- ¾ Cup lemon curd
Instructions
- Preheat the oven to 325°F.
- Line a 9-inch square baking pan with parchment paper, leaving an overhang on the sides for easy removal.
- In a medium bowl, combine the graham cracker crumbs, granulated sugar, cinnamon, lemon zest and melted butter. Mix until well combined.
- Press the mixture evenly into the bottom of the prepared pan and set aside.
- In a large mixing bowl, beat the cream cheese, sugar and vanilla extract until smooth and creamy, about 3 minutes on medium speed.
- Add the eggs one at a time, mixing well after each addition.
- Add the lemon juice and mix.
- Fold in the flour gently and pour the cream cheese mixture over the crust.
- Gently swirl the lemon curd into the cream cheese layer using a knife or toothpick.
- Bake in the preheated oven for 35 to 40 minutes or until the edges are set and the center is slightly jiggly. Add foil on top partway through cooking if they brown too fast.
- Cool for half an hour at room temperature and then refrigerate the bars for at least 8 hours before slicing and serving.
Notes
- Make sure the cream cheese is at room temperature for easier mixing.
- Chilling the bars overnight enhances the flavor.
- You can adjust the sweetness by adding more or less sugar according to personal preference.
- Prep Time: 20 minutes
- Cook Time: 40 minutes
- Category: Dessert
- Method: Baking
- Cuisine: American
Nutrition
- Serving Size: 1 bar
- Calories: 250
- Sugar: 20g
- Sodium: 200mg
- Fat: 14g
- Saturated Fat: 8g
- Unsaturated Fat: 3g
- Trans Fat: 0g
- Carbohydrates: 27g
- Fiber: 1g
- Protein: 4g
- Cholesterol: 120mg