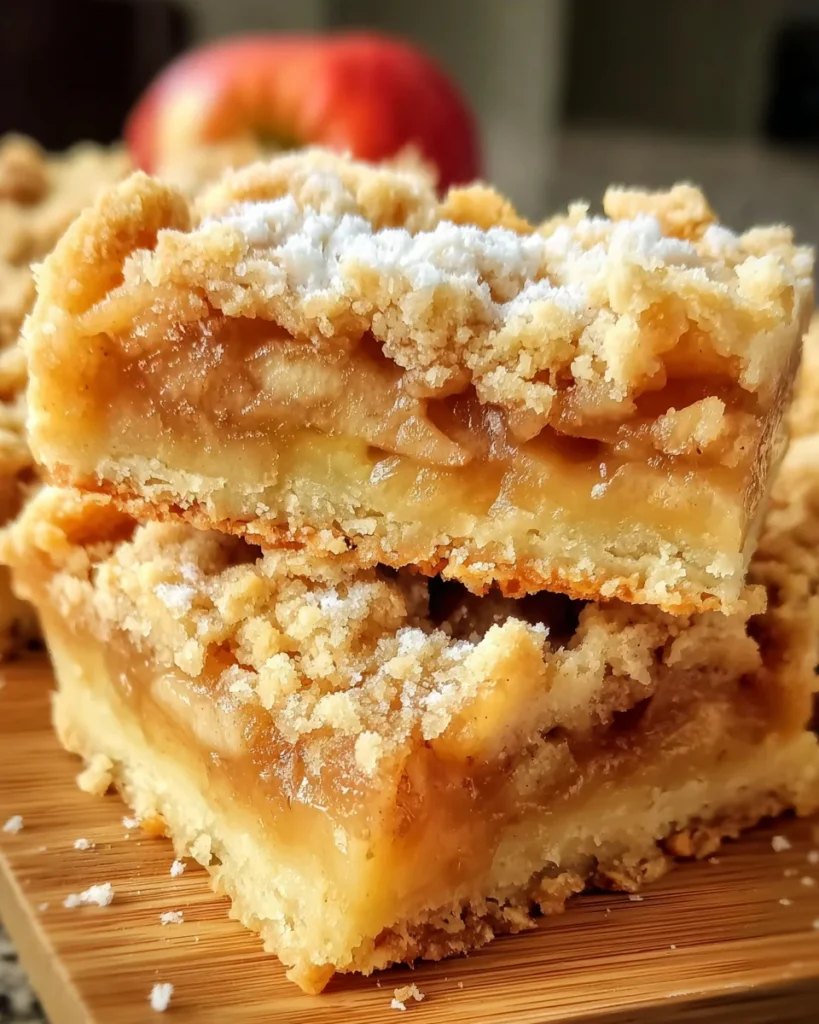
Introduction to Homemade Apple Bars Flaky
Welcome to my kitchen. If you are anything like me, you are always on the hunt for fairly easy, yummy treats that will blow your company away. That’s where these Homemade Apple Bars Flaky come in. They’re not just one more dessert; they’re a hug on a busy day or a sweet note to share with loved ones. Think of buttery, flaky layers wrapped around tender spiced apples for that delightful harmony of flavor. That’s all it takes to have a little bit of nostalgia and love ladled onto your table and have this dessert the undeniable hit with everyone.
Why You’ll Love This Homemade Apple Bars Flaky
These Homemade Apple Bars Flaky are perfect for anyone juggling busy schedules. They come together quickly, making them a fantastic last-minute dessert. The flaky crust is not only a delight to bite into, but it also perfectly contrasts the sweet, spiced apple filling. Plus, they can be made ahead of time and served warm or chilled, making them versatile for any occasion. You can truly impress your loved ones with minimal effort!
Ingredients for Homemade Apple Bars Flaky
Before we dive into the kitchen mayhem, let’s gather our ingredients for these irresistible Homemade Apple Bars Flaky. Each one plays a crucial role in crafting that perfect bite. Here’s what you’ll need:
- All-purpose flour: The foundation of our flaky crust. A staple in any baking pantry, it lends structure and puff to the bars.
- Softened shortening: This magical ingredient is key to achieving that irresistible flaky texture. You can substitute it with butter for a richer flavor.
- Salt: A pinch of salt elevates flavors, balancing the sweetness of the apples beautifully.
- Egg yolk: Helps bind the dough while adding richness. Keep the egg white handy for later!
- Milk: It brings moisture to the dough, making it easier to roll out.
- Sliced apples: The star of the show. Choose your favorite varieties—Granny Smith for tartness or Honeycrisp for sweetness.
- White sugar: Sweetens the apple filling. Feel free to adjust based on the apples’ natural sweetness.
- Ground cinnamon: Adds warmth and a lovely hint of spice—perfect for cozy fall vibes.
- Additional salt: Trust me, this enhances the flavors of your filling even more!
- All-purpose flour (again): Used in the apple filling to help thicken juices that will bubble up while baking.
- Tapioca: A little known secret to avoiding a soggy bottom crust, it helps soak up extra moisture from the apples.
- Egg white: This will make your top crust shiny and delightful; it’s the finishing touch that adds a bit of elegance.
- White sugar (for sprinkling): A simple sprinkle on top before baking gives a sweet crunch to your crispy bars.
All the exact quantities are at the bottom of the article and are available for printing. Happy baking!
How to Make Homemade Apple Bars Flaky
Now that we have our ingredients, let’s get to the fun part—making these Homemade Apple Bars Flaky! Follow these simple steps, and you’ll be savoring the sweet aroma of baked apples in no time.
Step 1: Prepare the Dough
Start by blending together the all-purpose flour, softened shortening, and salt in a large bowl. You want these ingredients nicely incorporated, creating that flaky texture. It’s like mixing a cloud with a sprinkle of magic!
In a separate bowl, beat the egg yolk and milk until they’re smooth. This mixture will hydrate our dough and add richness. Gradually fold this wet mix into the flour mixture and combine until you see a soft, cohesive dough form. No need to overwork it; this dough prefers a gentle touch!
Divide the dough in half and roll out one portion on a floured surface. You’ll want this sheet to fit your greased 11″ x 17″ cookie sheet. Aim for about a quarter-inch thickness. Don’t sweat if it’s not perfect; it’s going to taste amazing either way!
Step 2: Create the Apple Filling
Now, let’s focus on the filling that will shine in our bars! Take your sliced apples and toss them in a bowl with white sugar, ground cinnamon, salt, and the additional all-purpose flour.
This mixture is essential! The flour will help absorb any juices released during baking, keeping our bottom crust flaky instead of soggy. So, mix until the apples are well coated, releasing delicious scents that make your kitchen feel like a cozy café.
Once mixed, pour the apple filling evenly over your rolled-out dough in the cookie sheet. It should look like a lovely apple blanket just waiting to be covered!
Step 3: Assemble and Bake
Roll out the second half of the dough just like the first. Place this over the top of the apple filling. Pinch the edges to seal in the luscious apple goodness. You want every bite to be bursting with flavor!
Whip the egg white until frothy, then brush it gently over the top crust for that glossy finish. Don’t forget to sprinkle some white sugar over the entire top before popping it into the oven. This will give your bars a delightful crunch.
Preheat your oven to 350ºF (175ºC) and bake for 35-40 minutes. Keep an eye out for that beautiful golden-brown crust. Once they’re ready, let the bars cool for a bit before slicing. Trust me; a little patience goes a long way!
Tips for Success
- Use chilled shortening to enhance the flakiness of your dough.
- Let the apple filling rest for a few minutes to allow flavors to meld.
- Try different apple varieties for unique flavor combinations.
- Don’t skip the sprinkling of sugar on top—it creates a delightful crunch!
- Cool completely before cutting for tidy, beautiful bars.
Equipment Needed
- Mixing bowls: You can use any size bowls you have; just make sure there’s enough space for mixing!
- Rolling pin: A good substitute is a wine bottle if you don’t have one handy.
- 11″ x 17″ cookie sheet: A similar-sized baking dish will work just fine.
- Spatula: Great for spreading the filling and dough evenly!

Variations
- Nutty Delight: Add chopped walnuts or pecans to the apple filling for an extra crunch.
- Dried Fruits: Toss in some raisins or dried cranberries with the apples for a chewy texture.
- Spiced Up: Experiment with a mix of spices, such as nutmeg or allspice, alongside the cinnamon for deeper flavor.
- Gluten-Free: Substitute all-purpose flour with a gluten-free baking blend for a delicious alternative.
- Vegan Option: Swap shortening with coconut oil and skip the egg for a plant-based version!
Serving Suggestions
- Serve warm with a scoop of vanilla ice cream for an indulgent treat.
- Pair with a dollop of whipped cream and a sprinkle of cinnamon.
- Enjoy with a cup of hot tea or spiced apple cider for a cozy afternoon.
- For a touch of elegance, dust with powdered sugar before serving!
FAQs about Homemade Apple Bars Flaky
As you embark on your delicious journey with these Homemade Apple Bars Flaky, you might have a few questions. Don’t worry—I’ve got you covered!
Can I make the dough ahead of time?
Absolutely! You can prepare the dough a day in advance and store it in the refrigerator. Just make sure to wrap it tightly so it doesn’t dry out.
How do I store leftover apple bars?
To keep your apple bars fresh, store them in an airtight container at room temperature for up to three days. They can also be refrigerated for a week. You can even freeze them for up to two months!
What if I don’t have shortening?
No fears! You can substitute the shortening with unsalted butter. It will create a rich flavor while still giving you that delightful flaky texture.
Can I use frozen apples?
Yes, you can! Frozen apples work well, but be sure to thaw and drain them before mixing with the sugar and spices to prevent excess moisture.
What should I do if my crust is too dry?
If your crust seems too crumbly, add a tablespoon of milk at a time until it holds together. It should feel like a soft dough but still remain pliable. Happy baking!
Final Thoughts
There’s something magical about preparing Homemade Apple Bars Flaky that brings me back to cherished memories spent in the kitchen. Each slice is a delightful reminder that simple ingredients can create lasting joy and warmth. Whether it’s a family gathering or a midweek treat, these bars are sure to evoke smiles all around. Plus, the aroma while they bake? Pure bliss! So, gather your loved ones and indulge in the comfort of these homemade delights. Trust me, your kitchen will become a haven of sweetness and laughter, one flaky bar at a time!
Print
Homemade Apple Bars Flaky
- Total Time: 1 hour
- Yield: 16 bars 1x
- Diet: Vegetarian
Description
Deliciously flaky bars filled with sweet apples, perfect for any dessert lover.
Ingredients
- 2 1/2 cups all-purpose flour
- 1 cup softened shortening
- 1 teaspoon salt
- 1 egg yolk
- 1/2 cup milk
- 7 sliced apples
- 1 1/4 cups white sugar
- 1/4 teaspoon ground cinnamon
- 1/4 teaspoon salt
- 2 tablespoons all-purpose flour
- 2 teaspoons tapioca
- 1 egg white
- white sugar (for sprinkling)
Instructions
- Blend flour, shortening, and salt together in a bowl. Set aside.
- In a separate bowl, mix egg yolk and milk thoroughly.
- Add the egg yolk and milk mixture to the flour mixture. Mix until a uniform dough forms.
- Divide the dough in half. Roll out one half on a floured surface to fit an 11″x17″ greased cookie sheet. Set aside.
- In a bowl, mix sliced apples, sugar, cinnamon, salt, and all-purpose flour until combined. Pour the mixture over the prepared bottom crust.
- Evenly sprinkle tapioca over the apple filling.
- Roll out the remaining dough to match the size of the cookie sheet. Place it over the apple filling.
- Whip the egg white and brush it over the top crust. Sprinkle white sugar evenly over the top.
- Preheat the oven to 350ºF (175ºC). Bake for 35-40 minutes, or until the crust is golden brown.
Notes
- Let the bars cool before slicing for cleaner cuts.
- Can be served warm or chilled.
- Adjust sugar based on the sweetness of apples used.
- Prep Time: 20 minutes
- Cook Time: 40 minutes
- Category: Dessert
- Method: Baking
- Cuisine: American
Nutrition
- Serving Size: 1 bar
- Calories: 220
- Sugar: 14g
- Sodium: 150mg
- Fat: 9g
- Saturated Fat: 3g
- Unsaturated Fat: 6g
- Trans Fat: 0g
- Carbohydrates: 33g
- Fiber: 1g
- Protein: 2g
- Cholesterol: 20mg