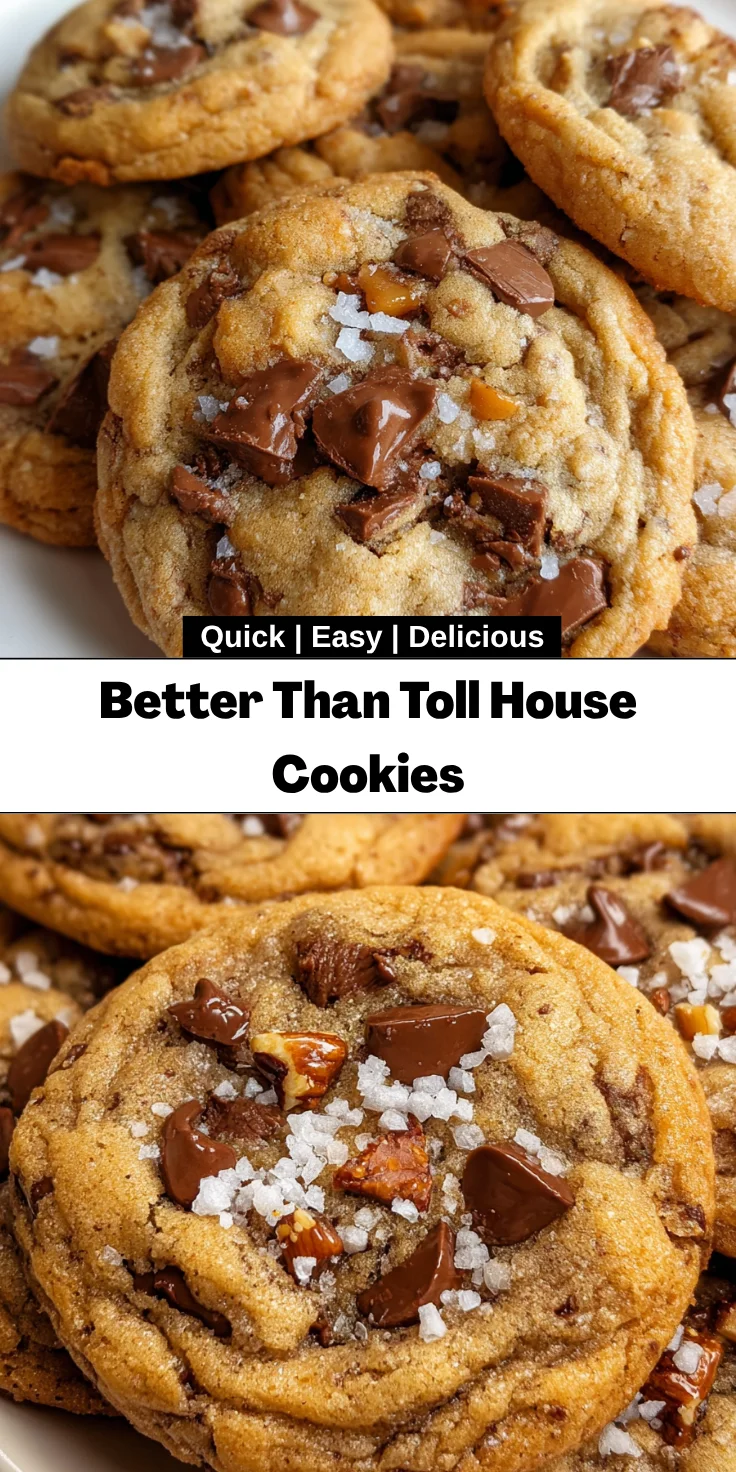
Introduction to Better Than Toll House Cookies
Ah, the classic Toll House cookie—who doesn’t love that warm, gooey goodness? But what if I told you there’s a version that’s even better? That’s right! These Better Than Toll House Cookies will become your new go-to treat. Perfect for busy days when you crave something sweet, or if you need a show-stopper for a family gathering, this recipe is your kitchen companion. I understand the struggle of finding time to bake, and trust me, these cookies are as simple as they are delicious. Let’s dive into the world of cookies that outshine the classic!
Why You’ll Love This Better Than Toll House Cookies
These Better Than Toll House Cookies are a game changer! They’re quick to whip up, making them ideal for those hectic days. You’ll love the rich, buttery flavor that lingers on your palate, tempting you for just one more bite. Plus, they make your kitchen smell heavenly—a cozy embrace that pulls everyone to the table. Trust me, once you try these delights, you won’t look back!
Ingredients for Better Than Toll House Cookies
Let’s talk about the magic that makes these Better Than Toll House Cookies so special! Here’s what you’ll need:
- All-purpose flour: The backbone of your cookie, providing structure and texture.
- Malted milk powder: Adds a unique sweetness and a hint of nostalgia, perfect for elevating flavor.
- Baking soda: Your trusty leavening agent, ensuring those cookies rise to perfection.
- Fine sea salt: Enhances the sweetness and balances the flavors for a delicious contrast.
- Salted butter: Cold and sliced, it lends richness and a desirable crumble to each bite—just make sure it stays cold!
- Granulated sugar: Provides sweetness and helps achieve that enticing golden-brown color.
- Dark brown sugar: Packed for moisture and a deeper, caramel-like flavor that is hard to resist.
- Vanilla extract: The warm aroma and comforting flavor instantly elevates your cookie experience.
- Large eggs: Help bind everything together, contributing to a soft yet chewy texture.
- Semi-sweet chocolate: Finely chopped for luscious melty bites, adding indulgence to every cookie.
- Chopped walnuts (optional): For a delightful crunch and a nutty flavor, but feel free to skip if you’re nut-sensitive.
- Semi-sweet chocolate chips (optional): Adds extra chocolatey goodness to every cookie, perfect for chocolate lovers!
- Flaky sea salt (optional): A sprinkle on top after baking gives that gourmet finish and a touch of sophistication.
For precise measurements, check the bottom of the article where you can print this recipe and make it your own!
How to Make Better Than Toll House Cookies
Preparing the Baking Sheet
First things first, let’s get your baking sheet ready! Line a large baking sheet with parchment paper. This will keep the cookies from sticking and make cleanup a breeze. If you don’t have parchment paper, a silicone baking mat works just as well! Now that your sheet is prepped, it’s time to dive into the mixing. This simple step sets the stage for your gooey, soft cookies, so don’t skip it!
Mixing Dry Ingredients
In a medium bowl, whisk together the all-purpose flour, malted milk powder, baking soda, and fine sea salt. Mixing these dry ingredients together helps distribute the leavening agents, which are essential for your cookies’ lift. The flour provides structure, while the malted milk powder adds a subtle flavor. Make sure there are no lumps; we want everything to blend harmoniously. This is the first step towards creating that cookie perfection!
Creaming the Butter and Sugars
Now comes the fun part! In your stand mixer, cream the cold, sliced butter with both sugars and vanilla extract on medium speed. The key here is using cold butter. This keeps your cookies from spreading too much while baking—no one wants flat cookies! Be sure to scrape down the bowl after a minute to ensure everything gets mixed well. This step adds air into the mix, giving your cookies that melt-in-your-mouth texture!
Incorporating Eggs
Next, it’s time to incorporate the eggs—one at a time, please! Adding them one at a time ensures they blend thoroughly into the mixture. This helps create a smooth consistency, which is crucial for the final texture of your Better Than Toll House Cookies. Plus, it makes sure that flavor really shines through. Your cookies deserve that perfect combination, right?
Bringing It All Together
Now, take those dry ingredients and gradually add them to the wet mixture. This is where patience comes in! Mix just until combined to avoid overmixing, which can lead to tough cookies. You want everything to be just incorporated, leaving you with a lovely dough. The dry ingredients need to blend in, but not so much that they lose their fluffiness! You’re almost there; the cookie magic is about to happen!
Forming the Cookie Dough
Grab a medium cookie scoop, which is about 1.5 tablespoons, and start forming 1-ounce portions of dough. To create those tall, chewy cookies everyone loves, stack an extra scoop on each portion. Gently press these together, making a mound. This technique helps the cookies hold their shape while chilling. Don’t forget, chilling is key for achieving that perfect texture, so be patient and let the dough chill in the fridge for at least three hours!
Baking the Cookies
Once your dough is chilled, preheat the oven to 175°C (350°F). Arrange your chilled dough stacks on the prepared baking sheet, leaving at least 8 cm apart. This gives them room to spread. Bake for 9 to 12 minutes, keeping an eye on them as they approach doneness. The edges should be golden, while the centers look set but still soft. After removing them from the oven, let them cool on the pan for a few minutes before transferring to a cooling rack. Can you smell those cookies already?
Tips for Success
- Chill dough for at least 3 hours to enhance texture.
- Use quality chocolate for a richer flavor experience.
- Don’t skip lining your baking sheet to prevent sticking.
- Monitor baking time closely for perfectly soft centers.
- Add a sprinkle of flaky sea salt on top for a gourmet touch!
Equipment Needed
- Baking sheets: You can use traditional ones or non-stick varieties for easier cleanup.
- Parchment paper: A silicone baking mat works as a great alternative.
- Stand mixer: A handheld mixer can also get the job done.
- Medium cookie scoop: A tablespoon can work in a pinch.
- Cooling rack: A plate can be used for cooling if you don’t have one.
Variations of Better Than Toll House Cookies
- Nut-Free: Omit the walnuts or substitute them with sunflower seeds for a nut-free option.
- Gluten-Free: Replace all-purpose flour with a 1:1 gluten-free flour blend to make these cookies gluten-free.
- Vegan: Swap butter for coconut oil and use flax eggs instead of regular eggs for a vegan version.
- Dark Chocolate Delight: Substitute semi-sweet chocolate with dark chocolate for a richer taste.
- Peanut Butter Swirl: Add a tablespoon of peanut butter to the dough for a delightful nutty twist.
- Spiced Cookies: Add a teaspoon of cinnamon or nutmeg to the dry ingredients for a warm spice flavor.
Serving Suggestions for Better Than Toll House Cookies
- Pair cookies with a tall glass of cold milk for a classic treat.
- Serve warm with a scoop of vanilla ice cream on top for an indulgent dessert.
- Add a sprinkle of flaky sea salt just before serving for a gourmet touch.
- Present on a colorful platter for a visually appealing treat at gatherings.
FAQs about Better Than Toll House Cookies
Curious about these delightful treats? Here are some frequently asked questions that might help you out!
Can I freeze the cookie dough?
Absolutely! You can freeze the cookie dough for up to three months. Just scoop the dough portions onto a baking tray, freeze them until solid, then store in a freezer-safe bag. Bake directly from the freezer, adding a couple of minutes to the baking time!
What’s the best way to store the cookies?
For the best freshness, store your Better Than Toll House Cookies in an airtight container at room temperature. They will stay soft and delicious for up to a week—if they last that long!
Can I use different types of chocolate?
Sure thing! Feel free to mix it up using milk chocolate, dark chocolate, or even white chocolate. Each variety will give a unique twist to your cookies!
Do I have to use malted milk powder?
While the malted milk powder adds a special touch, you can omit it if needed. Just replace it with a bit more flour and enjoy your cookies without it!
What if my cookies come out too flat?
If your Better Than Toll House Cookies spread too much, it’s likely due to warm butter. Always use cold butter for the best texture. Chilling the dough is also crucial for keeping their shape!
Final Thoughts
Wrapping up this delightful journey into the world of cookies, I can’t help but feel the joy that these Better Than Toll House Cookies bring. Each bite delivers a warm embrace of chocolatey goodness and nostalgic flavor that lingers in your heart. These cookies aren’t just a treat; they’re memories in the making. Whether you’re baking for a crowd or just indulging in some self-care, this recipe is sure to brighten any busy day. So, roll up your sleeves, gather your ingredients, and create a batch today. Your taste buds will thank you, and so will those you love!
Print
Better Than Toll House Cookies
- Total Time: 3 hours 42 minutes
- Yield: 24 cookies 1x
- Diet: Vegetarian
Description
A delicious recipe for cookies that are even better than the classic Toll House cookies, featuring a rich flavor and a perfect texture.
Ingredients
- 325 g all-purpose flour, spooned and leveled
- 20 g malted milk powder
- 1 teaspoon baking soda
- 1 teaspoon fine sea salt
- 227 g salted butter, cold and sliced
- 150 g granulated sugar
- 165 g dark brown sugar, packed
- 1 teaspoon vanilla extract
- 2 large eggs
- 340 g semi-sweet chocolate, finely chopped
- 120 g chopped walnuts (optional)
- 90 g semi-sweet chocolate chips (optional)
- Flaky sea salt (optional)
Instructions
- Line a large baking sheet with parchment paper and set aside.
- In a medium bowl, whisk together all-purpose flour, malted milk powder, baking soda, and fine sea salt. Set aside.
- In a stand mixer fitted with a paddle attachment, cream cold, sliced butter with granulated sugar, dark brown sugar, and vanilla extract on medium speed for 3 minutes, scraping down the bowl after each minute.
- Mix in the eggs one at a time, blending until fully incorporated.
- Gradually add the dry flour mixture to the wet ingredients, mixing just until combined.
- Fold in most of the chopped semi-sweet chocolate and walnuts (if using), reserving some for topping.
- Use a medium cookie scoop (about 1.5 tablespoons) to form 1-ounce portions of dough. Place scoops onto prepared tray and stack an additional scoop of dough atop each portion. Gently press to adhere.
- Top each dough mound with remaining chopped chocolate and sprinkle with flaky sea salt if desired.
- Chill the assembled tray of dough for at least 3 hours for best texture and flavour.
- Preheat the oven to 175°C and line another large baking tray with parchment paper.
- Arrange 6 chilled dough stacks at least 8 cm apart on the tray. Bake for 9 to 12 minutes until edges are golden and centers appear set but still soft.
- Immediately after removing from the oven, gently press chocolate chips into the tops of each cookie if desired. Allow cookies to cool on the pan for 2 to 3 minutes before transferring to a cooling rack.
- Repeat the baking process with remaining dough, cooling baking tray between batches as needed.
Notes
- For best results, chill the dough for at least 3 hours.
- Use high-quality chocolate for richer flavor.
- Store cookies in an airtight container for freshness.
- Prep Time: 30 minutes
- Cook Time: 12 minutes
- Category: Dessert
- Method: Baking
- Cuisine: American
Nutrition
- Serving Size: 1 cookie
- Calories: 193
- Sugar: 14g
- Sodium: 125mg
- Fat: 9g
- Saturated Fat: 5g
- Unsaturated Fat: 4g
- Trans Fat: 0g
- Carbohydrates: 26g
- Fiber: 1g
- Protein: 2g
- Cholesterol: 28mg