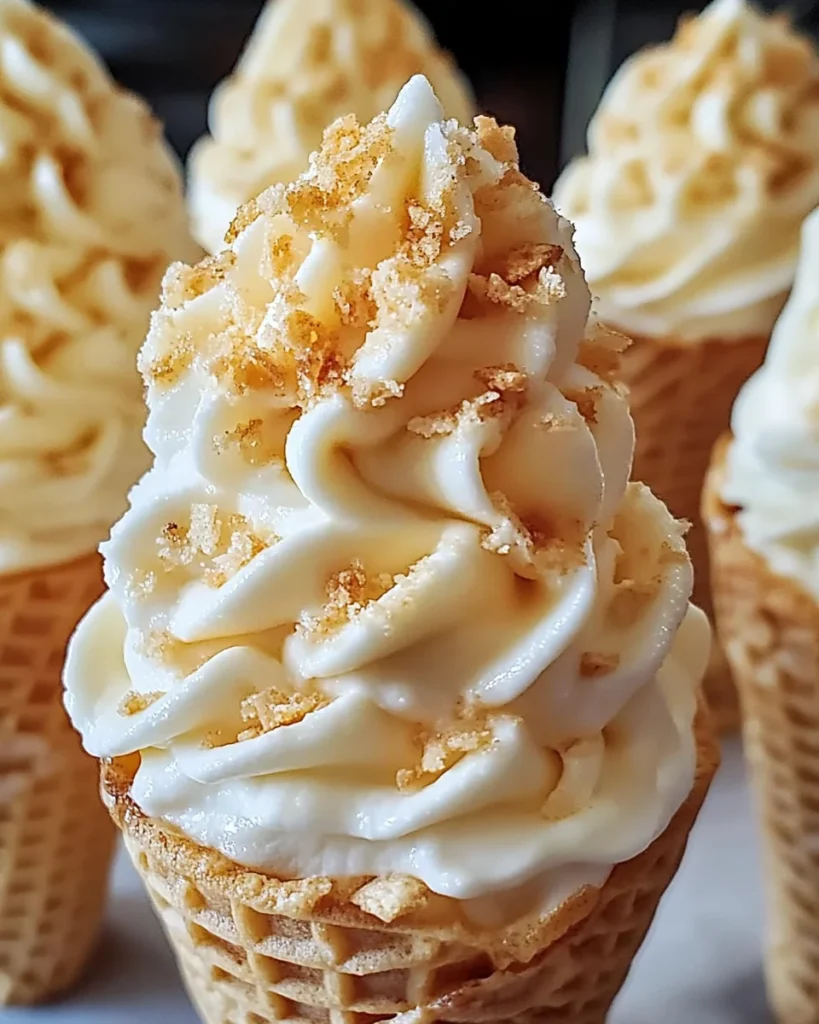
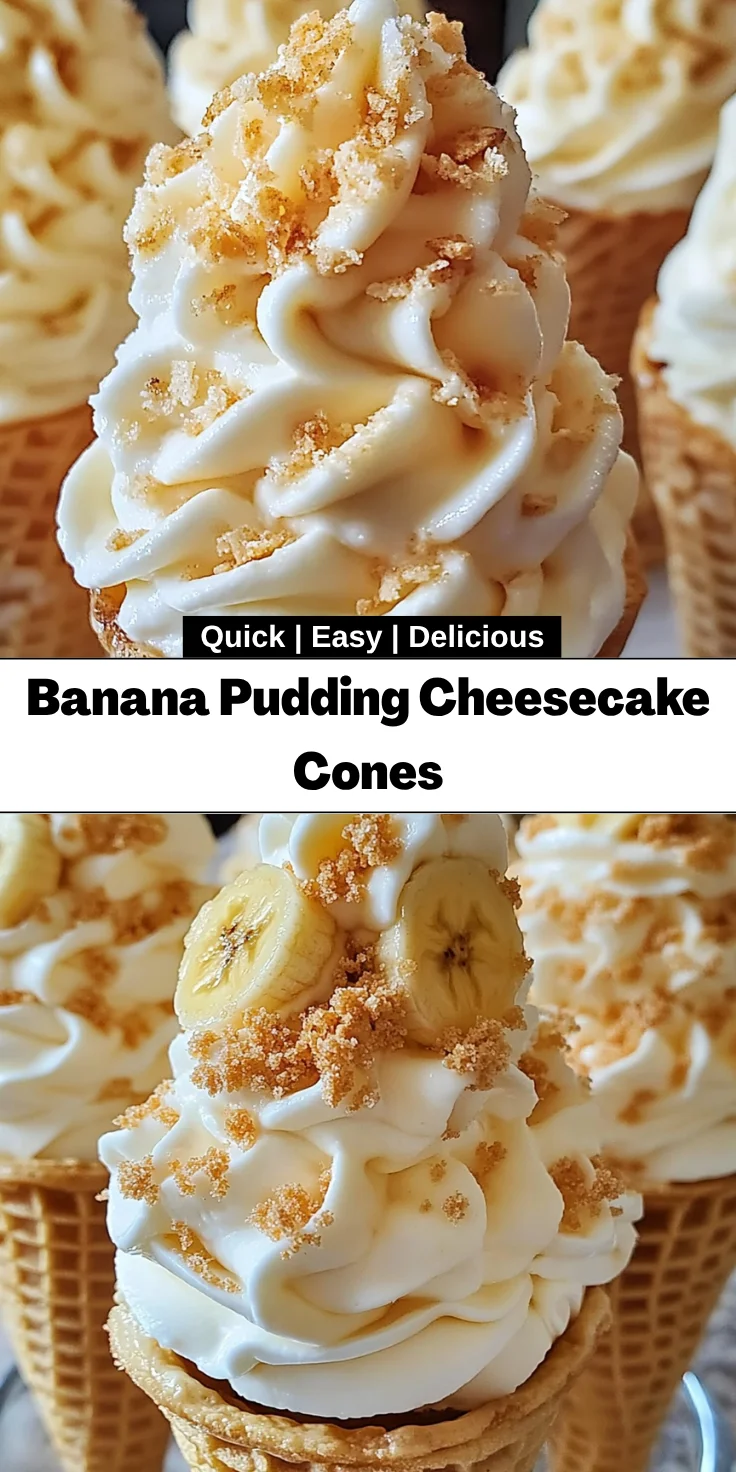
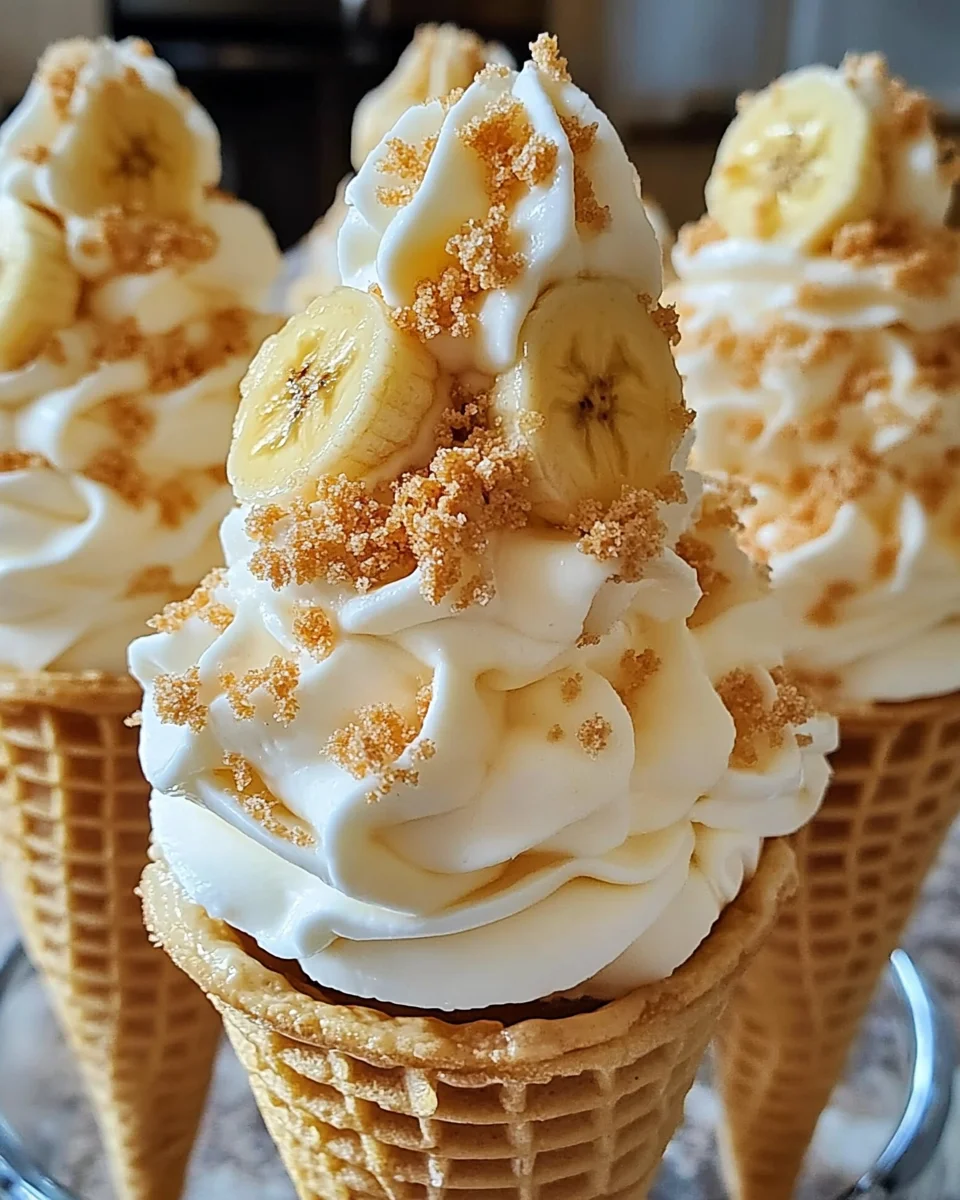
Introduction to Banana Pudding Cheesecake Cones
As a busy mom, I crave simple yet delightful desserts that bring smiles to my family’s faces. That’s why I absolutely adore these Banana Pudding Cheesecake Cones. They’re quick to whip up, incredibly satisfying, and perfect for any occasion—be it a weeknight treat or a family gathering.
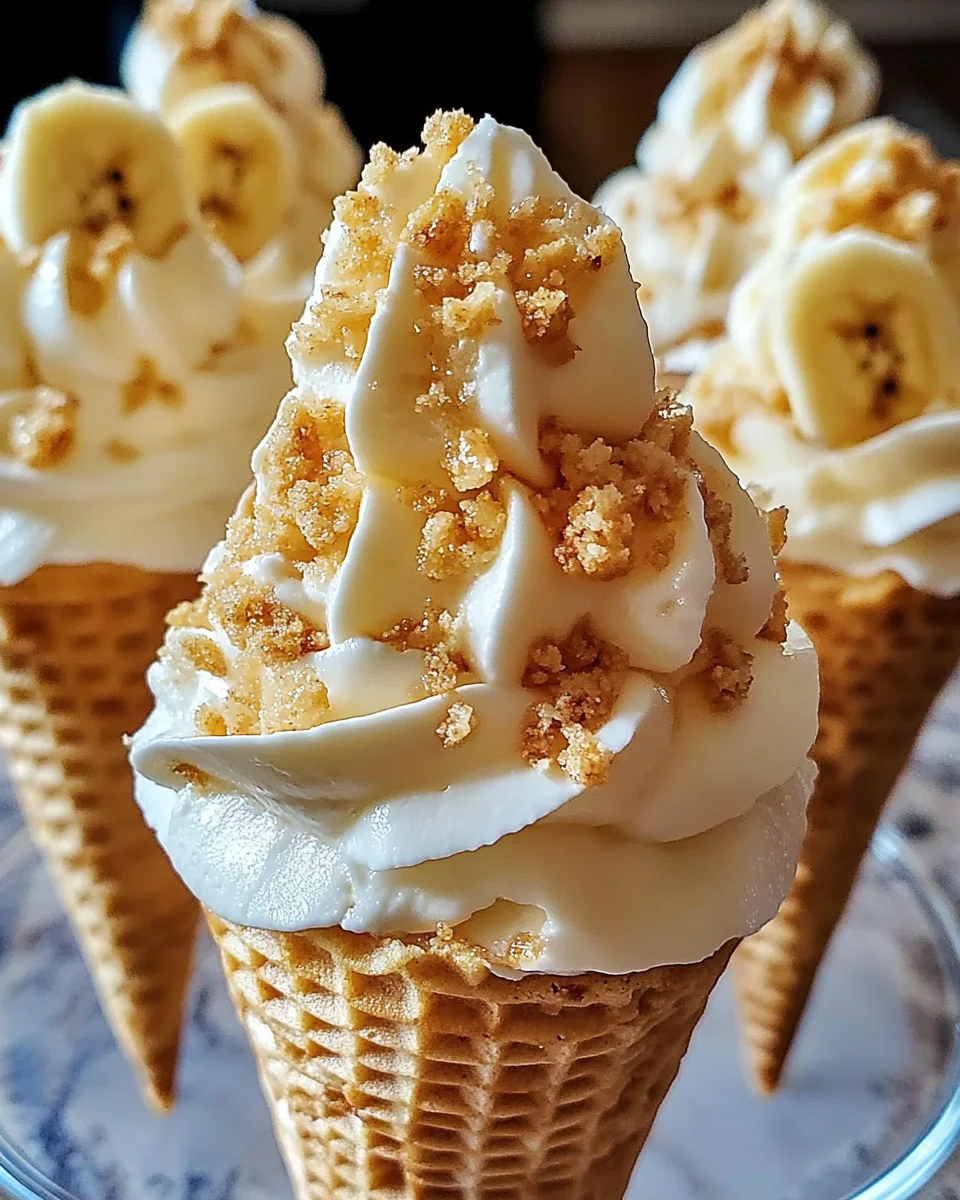
The creamy cheesecake blends beautifully with the nostalgic taste of banana pudding, all nestled in a crunchy graham cracker cone. It’s not just a dessert; it’s a sweet escape from the hustle and bustle of daily life. Trust me—everyone will be reaching for seconds!
Why You’ll Love This Banana Pudding Cheesecake Cones
What’s not to love about a dessert that comes together in just 15 minutes? These Banana Pudding Cheesecake Cones are not only fast but also effortless to make. The creamy filling embraces the sweet bananas, all tucked inside a crispy cone. It’s the perfect harmony of flavors and textures that satisfies even the pickiest eaters. Plus, kids can help decorate, turning dessert time into family fun!
Ingredients for Banana Pudding Cheesecake Cones
Gathering the right ingredients for your Banana Pudding Cheesecake Cones is half the fun! Here’s what you’ll need:
- Graham cracker cones: These provide a crunchy, sweet base for your dessert. You can find them at most grocery stores. If you can’t find cones, consider using small cups instead.
- Cream cheese: This is the star of your cheesecake filling. Use softened cream cheese to make blending easier. Philadelphia is my go-to brand!
- Powdered sugar: This adds sweetness and helps create a smooth texture in your cheesecake filling. Sift it first to avoid lumps!
- Vanilla extract: A splash of vanilla enhances the flavor of your cheesecake. Opt for pure vanilla extract for the best taste; imitation can work, but it lacks depth.
- Bananas: Choose ripe bananas for that sweet, delightful flavor. They’re a key component, adding freshness to the creamy filling.
- Whipped cream: This adds volume and lightness to your filling. You can use store-bought for convenience or whip your own from heavy cream for a touch of homemade charm.
For delicious variations, consider drizzling chocolate sauce or caramel on top for extra flavor! You can find the exact ingredient quantities at the bottom of the article, all ready for printing.
How to Make Banana Pudding Cheesecake Cones
Now, let’s dive into the fun part—making these Banana Pudding Cheesecake Cones! Follow these simple steps, and you’ll have a dessert that’s sure to impress.
Step 1: Prepare Your Ingredients
First things first, let’s get organized! Gather all your ingredients and tools on the countertop. This simple step ensures we won’t be hunting for things while trying to whip up our sweet treat. It makes the process smoother and more enjoyable.
Step 2: Make the Cheesecake Filling
In a mixing bowl, combine the softened cream cheese and sifted powdered sugar. Use an electric mixer or a sturdy whisk. Beat until the mixture is creamy and smooth. Then, add that splash of vanilla extract. Mix again until everything is well combined. You want a fluffy filling that melts in your mouth!
Step 3: Fold in the Whipped Cream
Next, grab that fluffy whipped cream. This step is crucial for achieving the light, airy texture of your filling. Gently fold the whipped cream into the cream cheese mixture using a rubber spatula. Be gentle! You want to maintain that fluffiness you just created. It’s like mixing clouds into your dessert!
Step 4: Fill the Cones
Now comes the fun part—filling the cones! You can use a spoon or a piping bag to fill each graham cracker cone with your delightful cheesecake mixture. Don’t be shy; fill them generously! The idea is to create a beautiful, towering delight that’s hard to resist.
Step 5: Add Toppings
It’s time for the final touches! Top each filled cone with sliced bananas and an extra dollop of whipped cream. If you’re feeling adventurous, drizzle some caramel or chocolate sauce on top for added sweetness. The visual appeal will make everyone’s mouths water!
Step 6: Serve or Store
For the best crunch, serve your cones immediately. If you need to prepare them ahead of time, store them upright in a glass in the fridge. They keep well for a couple of hours, but trust me, they won’t last long once the family sees them!
Tips for Success
- Make sure your cream cheese is fully softened for a smooth blend.
- Use ripe bananas for the sweetest flavor in your cones.
- Don’t overmix the filling after adding whipped cream; keep it light and fluffy!
- Store filled cones upright to maintain their crunch until serving.
- Try adding nutmeg or cinnamon for an extra flavor twist!
Equipment Needed
- Mixing bowl: A large mixing bowl for combining ingredients. A sturdy dish will do the trick.
- Electric mixer or whisk: An electric mixer speeds up the process, but a good whisk works just as well.
- Rubber spatula: Perfect for folding in the whipped cream without deflating it.
- Piping bag or spoon: For filling your cones; a piping bag adds a professional touch!
- Glass for storage: A tall glass keeps cones upright in the fridge, ensuring they maintain their crunch.
Variations of Banana Pudding Cheesecake Cones
- Peanut Butter Swirl: Stir in some creamy peanut butter into the cheesecake filling for a delicious twist on flavors.
- Add Nuts: Sprinkle chopped pecans or almonds on top of the bananas for a crunchy texture that complements the dessert beautifully.
- Use Different Fruits: Swap bananas for strawberries, blueberries, or even mango slices for a fruity explosion of flavors.
- Dairy-Free Option: Replace cream cheese with a dairy-free alternative and use coconut whipped cream for a lighter option.
- Chocolate Lovers: Mix in cocoa powder with the cream cheese for a chocolatey cheesecake filling, and top with shaved chocolate.
Serving Suggestions for Banana Pudding Cheesecake Cones
- Pair with a tall glass of cold milk or a creamy vanilla shake for a timeless combo.
- Serve alongside a fresh fruit salad for a refreshing contrast to the sweet cones.
- Present on a colorful platter, garnished with mint leaves for a pop of color.
- Add a sprinkle of graham cracker crumbs on top for extra texture and flair!
FAQs about Banana Pudding Cheesecake Cones
Can I make Banana Pudding Cheesecake Cones ahead of time?
You can prepare the filling in advance and store it in the fridge. However, I recommend filling the cones just before serving. This keeps the cones crispy and prevents them from getting soggy.
What can I use instead of graham cracker cones?
If you can’t find graham cracker cones, small plastic cups or waffle cones work beautifully. The creamy filling will just crave a delicious home, no matter the vessel!
Can I use other fruits in this recipe?
Absolutely! While bananas are the star here, try strawberries, raspberries, or peaches. Just slice them up and let your creativity shine through with flavor combinations!
How long do Banana Pudding Cheesecake Cones last in the fridge?
Filled cones are best enjoyed fresh, but you can keep them in the fridge for about 2-3 hours. Make sure to store them upright to maintain their delightful crunch.
Is this dessert suitable for special diets?
This recipe can easily accommodate dietary needs. For a gluten-free version, use gluten-free cones and swap the cream cheese with a dairy-free alternative. Your Banana Pudding Cheesecake Cones will still be a hit!
Final Thoughts
Creating Banana Pudding Cheesecake Cones is more than just making dessert; it’s crafting a joyful experience for my family. Each cone combines creamy goodness, sweet bananas, and a crunchy texture that dances on your palate.
The smiles on my loved ones’ faces when they take their first bite are priceless.
Whether it’s a sunny afternoon or a bustling weeknight, these cones brighten the day. With minimal effort and maximum flavor, they prove that sweet moments can fit into our busy lives. So pull out those cones and let the good times roll!
Print
Banana Pudding Cheesecake Cones
- Total Time: 15 minutes
- Yield: 6 servings 1x
- Diet: Vegetarian
Description
As a busy mom, I crave simple yet delightful desserts that bring smiles to my family’s faces. That’s why I absolutely adore these Banana Pudding Cheesecake Cones. They’re quick to whip up, incredibly satisfying, and perfect for any occasion—be it a weeknight treat or a family gathering.
Ingredients
- 6 graham cracker cones
- 8 oz cream cheese (softened)
- 1 cup powdered sugar (sifted)
- 1 tsp vanilla extract
- 2 ripe bananas (sliced)
- 1 cup whipped cream (homemade or store-bought)
Instructions
- Prepare all ingredients by gathering them on your countertop for easy access.
- In a mixing bowl, beat together softened cream cheese and sifted powdered sugar until smooth. Add vanilla extract and mix until combined.
- Gently fold in the whipped cream until the mixture is light and fluffy.
- Spoon or pipe the cheesecake filling into each graham cracker cone generously.
- Top with sliced bananas and add an extra dollop of whipped cream.
- Serve immediately for the best crunch or store upright in a glass in the fridge until ready to enjoy.
Notes
- For added flavor, consider drizzling some caramel or chocolate sauce on top.
- Make sure the cream cheese is softened for easier mixing.
- Bananas should be ripe for the best flavor.
- Prep Time: 15 minutes
- Cook Time: 0 minutes
- Category: Dessert
- Method: No-bake
- Cuisine: American
Nutrition
- Serving Size: 1 cone
- Calories: 230
- Sugar: 14g
- Sodium: 150mg
- Fat: 10g
- Saturated Fat: 5g
- Unsaturated Fat: 5g
- Trans Fat: 0g
- Carbohydrates: 30g
- Fiber: 1g
- Protein: 3g
- Cholesterol: 30mg