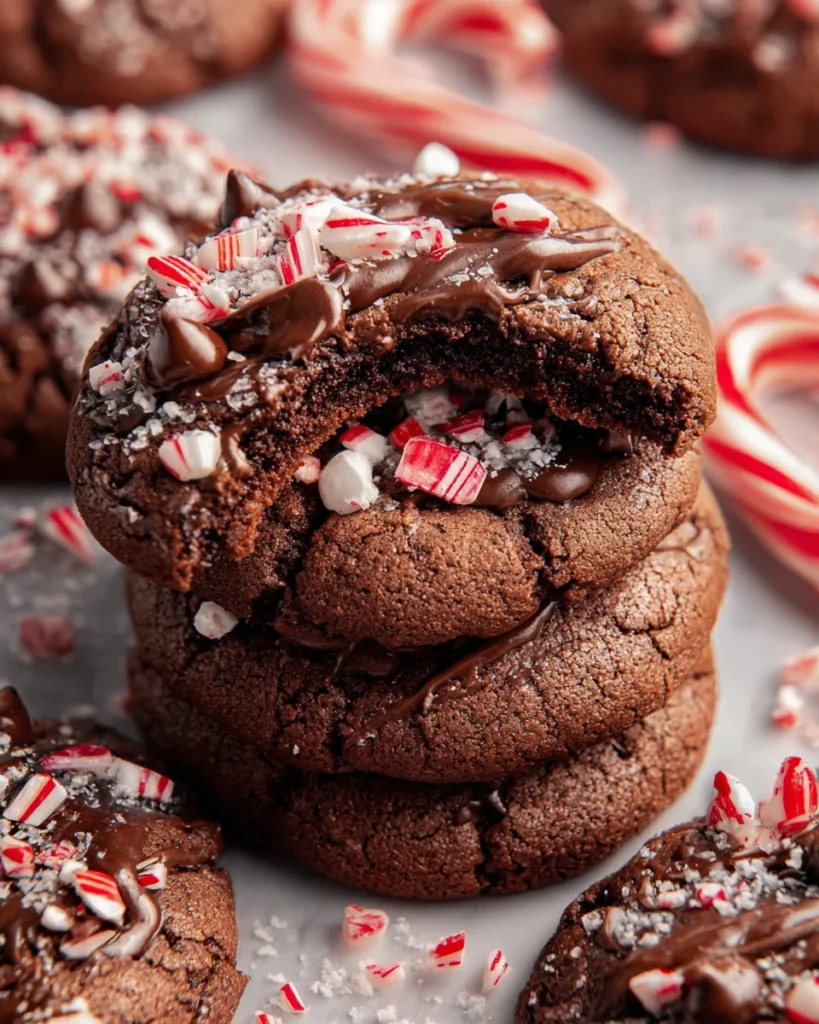
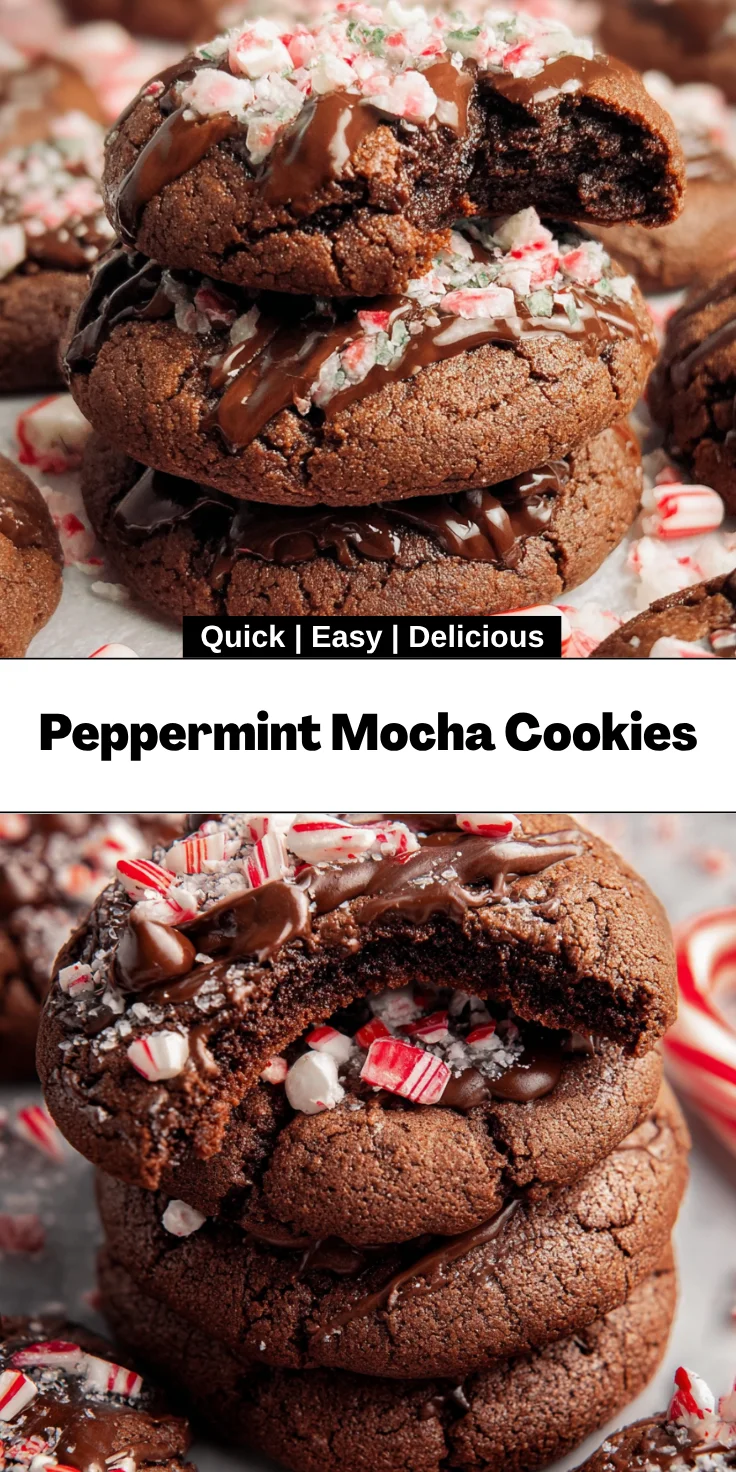
Introduction to Peppermint Mocha Cookies
As the holidays approach, my kitchen often fills with the warm scents of baking and cheer. I know how hectic this time can be for busy moms and professionals. That’s why I’m excited to share my recipe for Peppermint Mocha Cookies! These delightful treats are not just a quick solution for a busy day; they encapsulate the flavors of the season in every bite. Imagine soft, chewy cookies infused with chocolate, coffee, and a hint of refreshing peppermint. They’re perfect for gifting, holiday get-togethers, or even enjoying with a cup of hot cocoa.
Why You’ll Love This Peppermint Mocha Cookies
These Peppermint Mocha Cookies are a holiday dream come true! Not only are they incredibly easy to whip up, but they also come together in under 30 minutes. The delightful combination of rich chocolate, invigorating peppermint, and a hint of coffee makes each bite an indulgence. Trust me, your family and friends will be clamoring for the recipe. Plus, they make festive gifts that spread joy and warmth!
Ingredients for Peppermint Mocha Cookies
Gathering the right ingredients is a crucial part of any baking adventure. For these Peppermint Mocha Cookies, let’s explore what you’ll need to create these delightful treats:
- All-Purpose Flour: The backbone of our cookies, giving them that perfect texture.
- Unsweetened Cocoa Powder: This adds depth, providing a rich chocolate flavor without extra sugar.
- Instant Coffee Granules: A dash of coffee elevates the chocolate, making the flavors sing.
- Baking Soda: This leavening agent gives cookies that lovely rise and prevents them from being too dense.
- Salt: Just a pinch enhances overall flavor and balances sweetness.
- Unsalted Butter: Softened to perfection, it’s essential for achieving a light and fluffy texture.
- Granulated Sugar: This sweetens the cookies and helps create a crisp edge.
- Packed Brown Sugar: Adds moisture and a hint of caramel flavor, taking your cookies to the next level.
- Large Egg: The binder that holds everything together while contributing to a soft texture.
- Vanilla Extract: This classic flavor enhances sweetness and complements the chocolate beautifully.
- Peppermint Extract: A must-have for that festive touch, adding a refreshing minty kick.
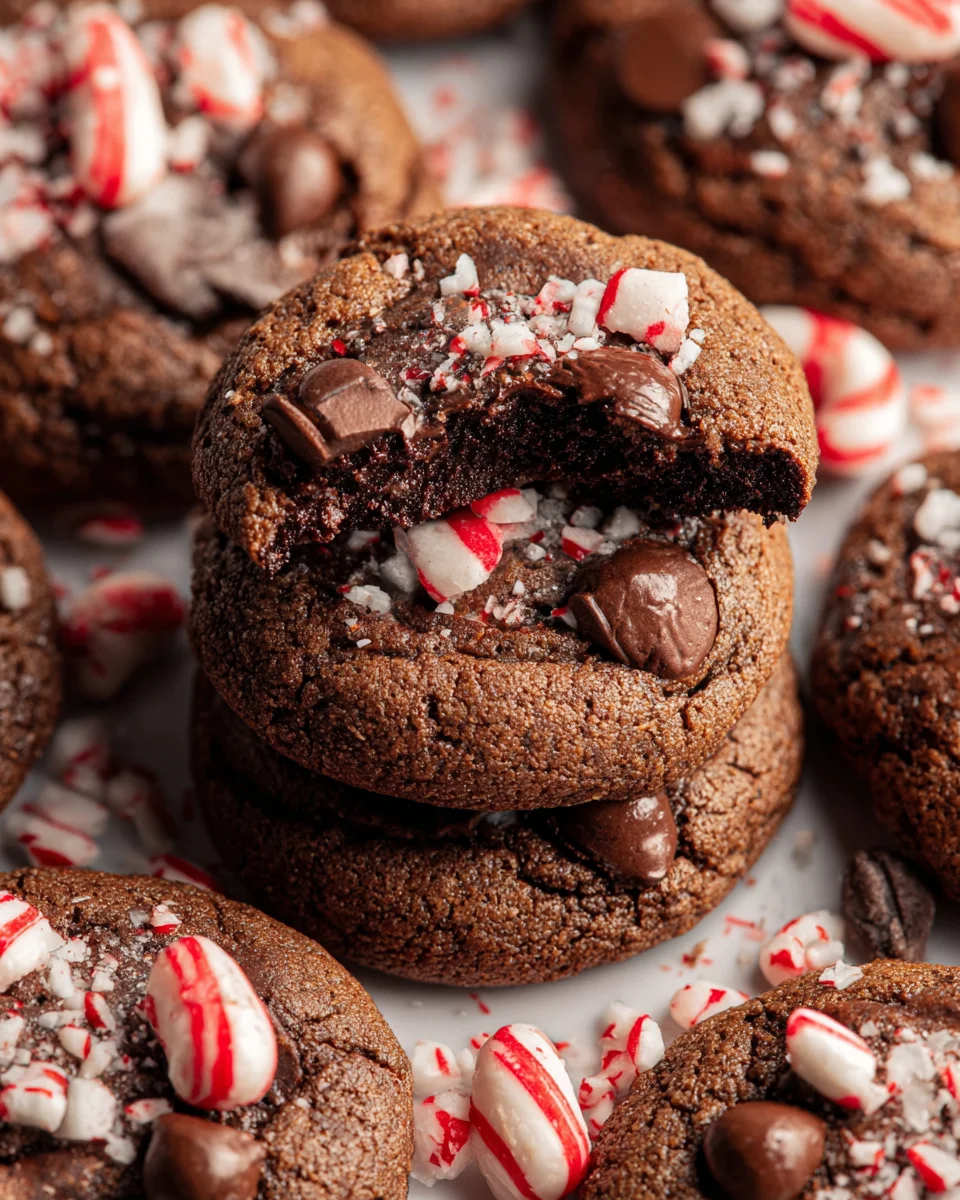
- Semisweet Chocolate Chips: These little indulgences provide a delicious melty goodness in every bite.
- Crushed Candy Canes or Peppermint Candies: Perfect for topping off your cookies with extra holiday flair!
- Dark Chocolate or Chocolate Chips for Drizzling: This adds a decadent finish and elevates the visual appeal of your cookies.
Don’t forget, all ingredient quantities are listed at the end of this article and are easily printable. As you gather these elements, let the holiday spirit inspire you!
How to Make Peppermint Mocha Cookies
Now that you have all your ingredients ready, it’s time to dive into the fun part—making these delightful Peppermint Mocha Cookies! With each step, I’ll guide you through, ensuring you create cookies that not only taste heavenly but also look fabulous.
Preheat Your Oven and Prepare Baking Sheet
First things first, preheat your oven to 350°F (175°C). This step is crucial as it ensures your cookies bake evenly and come out perfectly fluffy. While the oven warms up, line a baking sheet with parchment paper. This prevents sticking and makes clean-up a breeze. Trust me; it’s worth it!
Mix the Dry Ingredients
In a medium bowl, whisk together the all-purpose flour, cocoa powder, instant coffee granules, baking soda, and salt. Mixing these dry ingredients helps distribute the cocoa and coffee evenly, ensuring that every cookie bursts with taste. Once mixed, set it aside; this will be the foundation of your cookie joy!
Cream the Butter and Sugars
In a large bowl, it’s time to cream the softened butter with the granulated and brown sugars. Using an electric mixer, beat until light and fluffy. This creates air pockets, giving your cookies that lovely soft texture we all crave. Aim for a pale, creamy consistency, and don’t rush this step—it makes all the difference!
Incorporate the Egg and Extracts
Next, add in the large egg, vanilla extract, and peppermint extract to your butter-sugar mixture. Blend well until everything is beautifully combined. Mixing thoroughly here is vital; it ensures that the egg emulsifies with the sugar and butter, creating a smooth cookie dough. Ah, the aroma already is magical!
Combine Dry and Wet Ingredients
Now it’s time to bring the dry ingredients into play. Gradually add the flour mixture to your wet ingredients, gently mixing until just combined. Be careful not to overwork the dough; we want fluffy cookies, not dense bricks! Use a spatula to fold and ensure everything comes together harmoniously.
Add Chocolate Chips
Time for the best part—fold in those semisweet chocolate chips! Use a spatula to mix them evenly throughout the dough. This way, you’ll have chocolatey bursts in every bite. Feel free to add more if you’re a true chocolate lover; I won’t judge!
Portion the Cookie Dough
Using a cookie scoop or a tablespoon, drop rounded portions of dough onto the prepared baking sheet, leaving about 2 inches between them. This space is essential because these cookies will spread as they bake. Aim for uniform sizes so they bake evenly; think of them as little holiday mounds of joy!
Bake the Cookies
Pop your baking sheet into the oven and bake for 10-12 minutes. Keep an eye on them—you’ll know they’re ready when the edges are set, but the centers still look slightly soft. Remember, they’ll continue to cook a bit once out of the oven, so don’t wait until they’re completely firm!
Cool and Drizzle with Chocolate
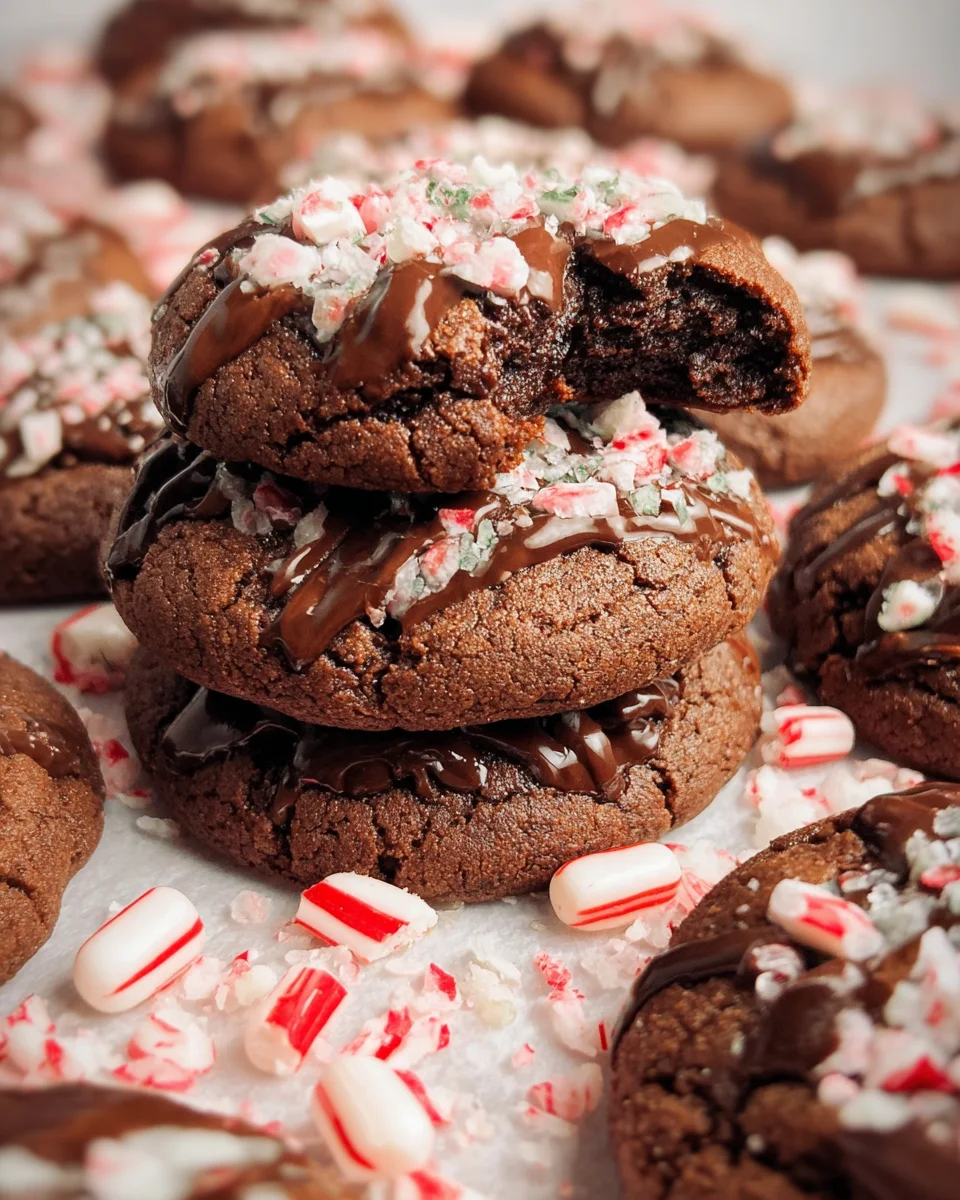
Once baked, remove the cookies from the oven and allow them to cool on the baking sheet for about 5 minutes. This extra time helps them firm up. Then, transfer them to a wire rack to cool completely. To finish, drizzle melted chocolate over the cooled cookies and sprinkle with crushed candy canes. What a festive touch!
Tips for Success
- Always use room temperature butter for easier creaming.
- Don’t skip the chilling step—30 minutes in the fridge can improve texture!
- For uniform cookies, use a cookie scoop for even portions.
- Watch the bake time closely; cookies may look underdone but will firm up as they cool.
- Experiment with toppings, like white chocolate or sprinkles, for a fun twist!
Equipment Needed for Peppermint Mocha Cookies
- Mixing bowls: Use any size, but make sure they’re large enough for blending.
- Electric mixer: A hand mixer will do, but a stand mixer saves time.
- Baking sheet: A cookie sheet works great, or use any flat baking pan.
- Parchment paper: Wax paper is a great substitute, but it’s not non-stick.
- Cookie scoop or tablespoon: A spoon works too; just aim for even portions!
Variations for Peppermint Mocha Cookies
- Gluten-Free: Substitute all-purpose flour with a gluten-free baking blend for a delicious gluten-free version.
- Vegan: Use plant-based butter and a flax egg instead of the large egg for a vegan-friendly treat.
- Add Spices: Enhance the flavor by incorporating a dash of cinnamon or nutmeg for a warm twist.
- Mint Chocolate Swirl: Mix in mint chocolate chips along with the semisweet ones for a double chocolate treat.
- Experiment with Nuts: Add chopped walnuts or pecans for a delightful crunch and extra flavor.
Serving Suggestions
- Pair your Peppermint Mocha Cookies with a warm cup of hot cocoa or coffee for a cozy treat.
- Serve them on a festive platter, garnished with extra crushed candy canes for color.
- These cookies also make a perfect gift when wrapped in a holiday-themed tin!
FAQs about Peppermint Mocha Cookies
Can I use different types of chocolate in Peppermint Mocha Cookies?
Absolutely! Feel free to experiment with dark chocolate, white chocolate, or even mint chocolate chips. Each option adds a unique twist to your Peppermint Mocha Cookies!
How should I store Peppermint Mocha Cookies?
To keep your cookies fresh, store them in an airtight container at room temperature. They’ll remain delicious for about a week, but I doubt they’ll last that long!
Can I freeze Peppermint Mocha Cookies?
You bet! Freeze them in a single layer on a baking sheet, then transfer to an airtight container. They can last up to three months. Just thaw at room temperature before enjoying!
What’s the best way to drizzle chocolate on the cookies?
The easiest way to drizzle chocolate is by using a piping bag or a zip-top bag with a corner snipped off. This gives you more control and creates a lovely design!
Can I make the dough ahead of time?
Yes! You can prepare the cookie dough and refrigerate it for up to 24 hours. Just let it sit at room temperature for a few minutes before scooping and baking. This is a great time-saver for busy days!
Final Thoughts
Creating Peppermint Mocha Cookies is more than just baking; it’s about bringing joy into your home during the festive season. As the warm aroma fills your kitchen, you’ll be reminded of all the magical moments shared with family and friends. Every bite of these cookies is a delightful blend of flavors—rich chocolate, invigorating peppermint, and a hint of coffee that sparkles like holiday lights. Whether you’re indulging yourself or gifting these treats, they’ll surely spread laughter and cheer. So roll up your sleeves, embrace the holiday spirit, and let the baking adventures begin!
Print
Peppermint Mocha Cookies
- Total Time: 32 minutes
- Yield: 24 cookies 1x
- Diet: Vegetarian
Description
Delicious Peppermint Mocha Cookies infused with holiday flavors of mint and chocolate.
Ingredients
- 1 3/4 cups all-purpose flour
- 1/4 cup unsweetened cocoa powder
- 1 tsp instant coffee granules
- 1/2 tsp baking soda
- 1/4 tsp salt
- 1/2 cup unsalted butter, softened
- 1 cup granulated sugar
- 1/4 cup packed brown sugar
- 1 large egg
- 1 tsp vanilla extract
- 1/2 tsp peppermint extract
- 1/2 cup semisweet chocolate chips
- Crushed candy canes or peppermint candies
- 1/4 cup dark chocolate or chocolate chips, for drizzling
Instructions
- Preheat your oven to 350°F (175°C) and line a baking sheet with parchment paper.
- In a medium bowl, whisk together the flour, cocoa powder, instant coffee, baking soda, and salt. Set aside.
- In a large bowl, cream together the softened butter, granulated sugar, and brown sugar until light and fluffy.
- Add the egg, vanilla extract, and peppermint extract to the butter-sugar mixture. Mix well to combine.
- Gradually add the dry ingredients to the wet ingredients, mixing until just combined. Be careful not to overmix.
- Fold in the chocolate chips until evenly distributed throughout the dough.
- Using a cookie scoop or tablespoon, drop rounded portions of dough onto the prepared baking sheet, spacing them about 2 inches apart.
- If desired, gently press down on each cookie with the back of a spoon to slightly flatten.
- Bake in the preheated oven for 10-12 minutes, or until the edges are set but the centers are still slightly soft.
- Remove from the oven and allow the cookies to cool on the baking sheet for 5 minutes, then transfer them to a wire rack to cool completely.
- In a microwave-safe bowl, melt the 1/4 cup of semisweet chocolate chips in the microwave in 30-second intervals, stirring in between, until smooth and melted.
- Drizzle the melted chocolate over the cooled cookies using a spoon or piping bag.
- Sprinkle crushed candy canes or peppermint candies on top of the chocolate drizzle for added peppermint flavor and decoration.
- Allow the chocolate drizzle to set before serving or storing the cookies.
Notes
- Store cookies in an airtight container to maintain freshness.
- Can substitute ingredients for vegan versions if desired.
- Prep Time: 20 minutes
- Cook Time: 12 minutes
- Category: Dessert
- Method: Baking
- Cuisine: American
Nutrition
- Serving Size: 1 cookie
- Calories: 150
- Sugar: 10g
- Sodium: 100mg
- Fat: 7g
- Saturated Fat: 4g
- Unsaturated Fat: 2g
- Trans Fat: 0g
- Carbohydrates: 22g
- Fiber: 1g
- Protein: 2g
- Cholesterol: 15mg