
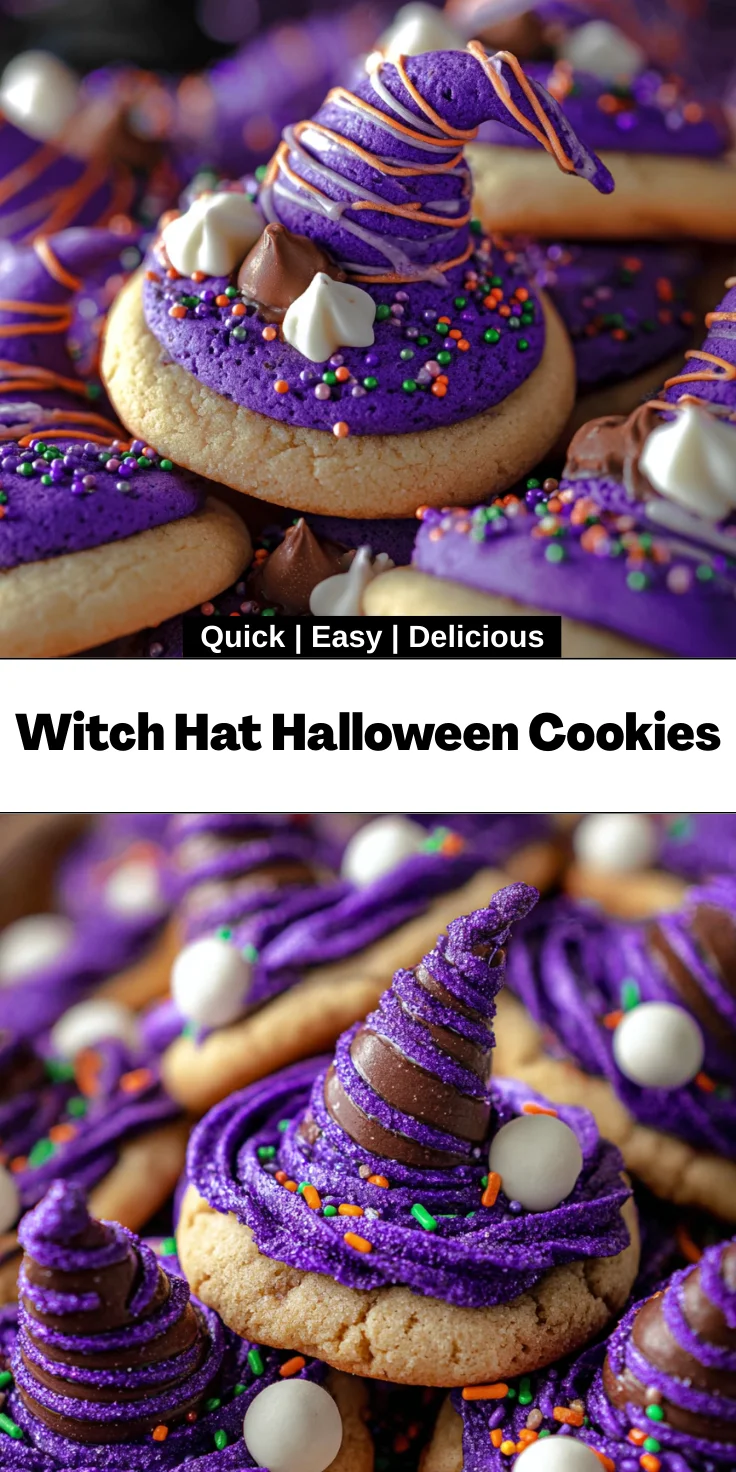
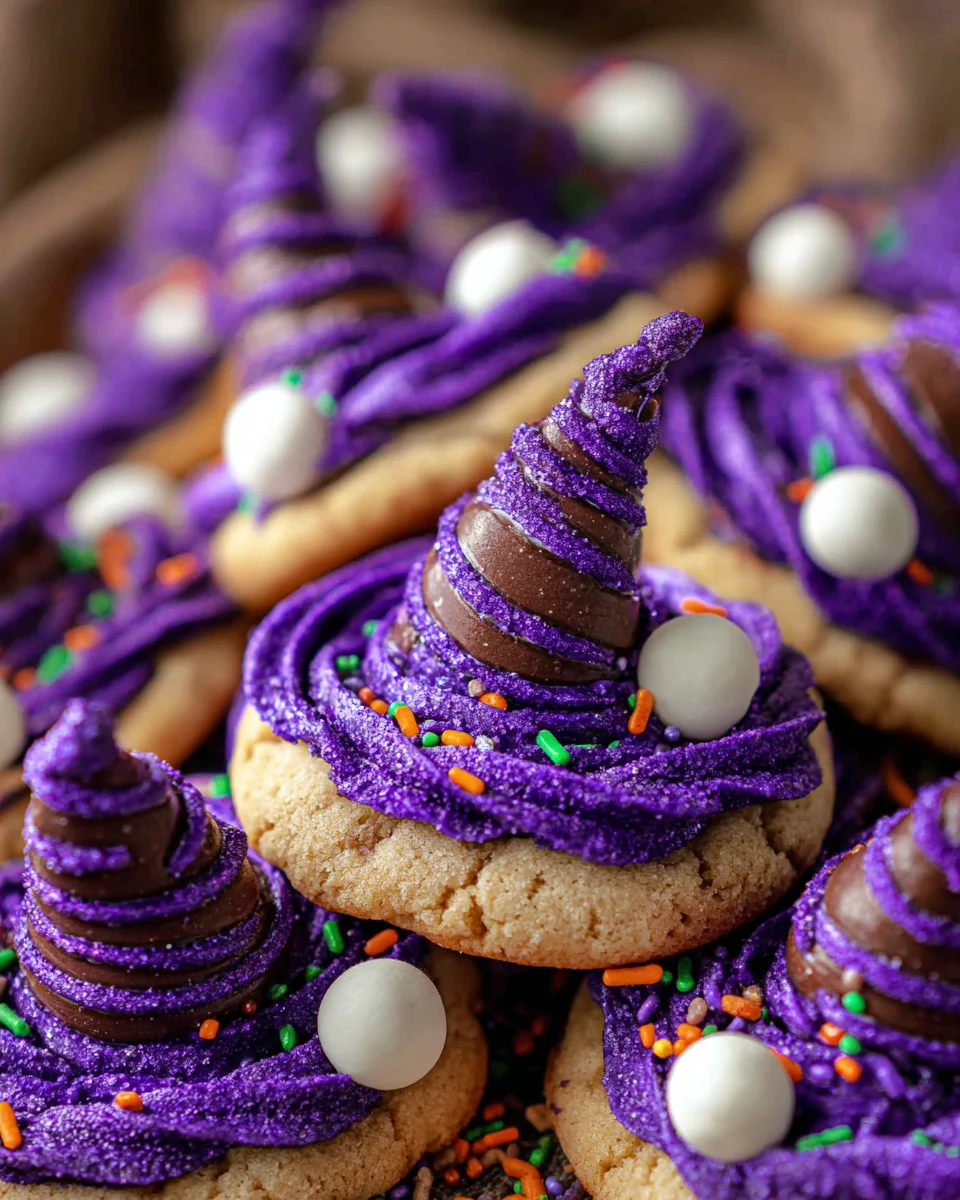
Introduction to Witch Hat Halloween Cookies
There’s something wonderfully magical about Halloween, isn’t there? I’m always on the lookout for fun, festive treats that bring a sprinkle of joy to my family. That’s where these Witch Hat Halloween Cookies come into play! They’re not just cookies; they’re delightful little bites of whimsy that everyone can enjoy. With their rich peanut butter flavor and charming chocolate hugs, they’re the perfect quick fix for busy moms like me. Whether you’re hosting a Halloween gathering or looking to surprise your kids after school, these cookies will surely cast a sweet spell!
Why You’ll Love This Witch Hat Halloween Cookies
These Witch Hat Halloween Cookies are a revelation for any busy mom or professional. They come together in just a few simple steps, making baking stress-free. Plus, the combination of creamy peanut butter and melty chocolate hugs creates a flavor that’s utterly irresistible. You’ll love how your kitchen fills with enticing aromas, and the smiles on your loved ones’ faces will make every second worthwhile. Who knew Halloween treats could be this easy?
Ingredients for Witch Hat Halloween Cookies
Creating Witch Hat Halloween Cookies requires some delightful ingredients, each adding to the spooky charm. Here’s what you’ll need:
- All-purpose flour: The foundation of your cookies, giving them structure and a soft bite.
- Cornstarch: This little gem lightens the dough, making it extra chewy and tender.
- Baking powder & baking soda: They help these cookies puff up to the perfect shape, creating that lovely, cracked top.
- Salt: A pinch is essential! It enhances the sweetness, balancing the flavors beautifully.
- Unsalted butter: Softened for creaming, it gives the cookies richness and moisture.
- Granulated sugar: This sweetener not only adds sweetness but also contributes to the cookies’ crisp edges.
- Egg: It binds everything together, ensuring a soft and chewy interior.
- Vanilla extract: A splash is a must! It elevates the flavor profile, making each bite even more delicious.
- Creamy peanut butter: The star ingredient! Its rich, nutty taste brings joy to every mouthful.
- Purple gel food coloring: Optional but a fun way to achieve that spooky look. Get creative with colors!
- Hugs or chocolate kisses: These are the magical toppers, transforming your cookies into witch hats.
- Halloween sprinkles or purple sanding sugar: For a festive finish, adding a delightful crunch and color.
For specific amounts, check the bottom of the article where the recipe is available for printing. It’s a fun way to make Halloween special, and trust me, your loved ones will appreciate the witchy twist!
How to Make Witch Hat Halloween Cookies
Now that you have all the ingredients ready, let’s dive into the step-by-step process of making these delightful Witch Hat Halloween Cookies. You’ll find it’s easier than you think, and soon your kitchen will be filled with the delicious aroma of baking cookies!
Preparing the Dough
Mixing Dry Ingredients
Start by whisking together the all-purpose flour, cornstarch, baking powder, baking soda, and salt in a medium bowl. This blend is crucial; it creates the perfect cookie texture. I always find that whisking well ensures even distribution, and there’s something oddly satisfying about seeing everything come together in that bowl!
Creaming the Butter and Sugar
Next, grab your mixer. In a large bowl, cream the softened unsalted butter and granulated sugar together until it’s light and fluffy—about two minutes should do the trick. Don’t rush this step; it’s where the magic happens! Take a moment to scrape down the sides of the bowl to ensure everything is mixed evenly. You’ll want to inhale that buttery, sugary goodness!
Adding the Other Ingredients
Now, add the egg and vanilla extract to your butter-sugar mixture and mix until just combined. Then, toss in that creamy peanut butter, blending it in until you can’t see any streaks. The nutty scent will hit you, and trust me, it’s heavenly! Once that’s smooth, it’s time to bring in your dry ingredients. Gently mix those in on low speed until everything is just combined. We don’t want to over-mix, as that can make the cookies tough.
Chilling the Dough
Now for a little patience—cover your dough with plastic wrap and chill it for at least two hours. If you have time, overnight is even better! Chilling helps the dough firm up, making it easier to scoop. I often make the dough at night, so it’s ready for cookie-baking fun after a busy day!
Baking the Cookies
When you’re ready to bake, preheat your oven to 350°F. Line two large baking sheets with silicone mats or parchment paper—this will prevent sticking. Using a small cookie scoop or spoon, portion the chilled dough into balls, about a tablespoon each, rolling them in Halloween sprinkles or purple sanding sugar for a festive touch! Place them about two inches apart on the baking sheet. Bake for 8 to 10 minutes, or until they start to puff and crack but aren’t browning. You want that perfect chewy center!
Decorating the Cookies
As soon as your cookies come out of the oven, gently press a Hugs or chocolate kiss into the center of each. This step is always a hit with the kids! They look just like witch hats already. Pop the baking sheets in the freezer for about 10 minutes to let the chocolate set without melting. Once that’s done, transfer your masterpieces to a wire cooling rack. They’re now ready to be enjoyed, and trust me, the anticipation makes them even tastier!
Tips for Success
- For chewier cookies, bake for a minute or two less.
- Experiment with other flavors of gel food coloring to match your Halloween theme.
- Use a cookie scoop for uniform sizes, ensuring even baking.
- Keep your butter at room temperature for better creaming.
- Store cookies in an airtight container to keep them fresh for longer.
Equipment Needed
- Baking sheets – Silicone mats or parchment paper work as great alternatives!
- Mixing bowls – Use any size, but I love having a large one for easier mixing.
- Hand mixer or stand mixer – A whisk can work too, but it takes longer.
- Cookie scoop – A tablespoon can substitute if you don’t have one.
- Wire cooling rack – A plate can do the trick in a pinch!
Variations
- For a gluten-free option, substitute all-purpose flour with a 1:1 gluten-free blend.
- Try using almond or cashew butter instead of peanut butter for a nutty twist.
- Add a pinch of cinnamon or nutmeg for an extra layer of warmth and spice.
- Make them vegan by using flax eggs and coconut oil in place of egg and butter.
- Swap out chocolate Hugs for caramel-filled candies for a unique surprise!
Serving Suggestions
- Pair these cookies with a glass of cold milk for a classic treat.
- Serve them alongside a fun Halloween punch for a festive flair.
- Display on a spooky platter decorated with cobwebs and plastic spiders.
- Offer as party favors in treat bags for a fun surprise!
FAQs about Witch Hat Halloween Cookies
When it comes to baking these delightful Witch Hat Halloween Cookies, you might have a few questions. Here are some of the most common inquiries I receive, along with handy hints to help you along the way!
Can I use a different nut butter?
Absolutely! You can swap peanut butter for almond, cashew, or even sunflower seed butter for a nut-free option. Keep in mind that it may alter the flavor a bit, but it’s a fun twist!
How long will these cookies stay fresh?
If stored in an airtight container, these cookies are good for about a week. However, I bet they won’t last that long in your house!
Can I freeze Witch Hat Halloween Cookies?
Yes! You can freeze the cookies before adding the chocolate kisses. Just store them in a single layer in an airtight container. When you want to enjoy them again, let them thaw, then top with chocolate and sprinkles.
What can I use instead of Hugs or chocolate kisses?
You can get creative! Try using caramel-filled candies, or even peanut butter cups for a sweeter surprise. You could also check out spooky chocolate eyeballs for a fun Halloween twist!
What’s the best way to decorate these cookies?
Besides adding chocolate Hugs, you can drizzle melted chocolate on top or use different colored sprinkles. Let your imagination run wild!
Final Thoughts
Making Witch Hat Halloween Cookies is more than just baking; it’s about creating sweet memories and sharing joy with loved ones. The thrill of sprinkling colored sugar and pressing those chocolate hugs onto warm cookies brings out the child in all of us. These treats are perfect for festive gatherings or a cozy evening at home. They’ll not only satisfy your sweet tooth but also ignite smiles around the table. So, let the aroma of these delightful cookies fill your kitchen, and enjoy the laughter and love that follows. Happy baking and happy Halloween!
Print
Witch Hat Halloween Cookies
- Total Time: 2 hours 30 minutes
- Yield: 30 cookies 1x
- Diet: Vegetarian
Description
Witch Hat Halloween Cookies are delightful and spooky treats made with peanut butter and topped with chocolate hugs, perfect for Halloween celebrations.
Ingredients
- 1 ½ cups all-purpose flour
- 2 teaspoons cornstarch
- ¼ teaspoon baking powder
- ½ teaspoon baking soda
- ¼ teaspoon salt
- ½ cup unsalted butter, softened
- 1 cup granulated sugar
- 1 egg, room temperature
- 1 teaspoon vanilla extract
- ¾ cup creamy peanut butter
- purple gel food coloring
- 30 Hugs or chocolate kisses, carefully unwrapped
- Halloween sprinkles or purple sanding sugar
Instructions
- In a medium bowl, whisk together the flour, baking powder, baking soda, cornstarch, and salt together. Set aside.
- Using a hand mixer or stand mixer, cream the butter and sugar together until creamy, about 2 minutes, scraping down the sides of the bowl as needed.
- Add the egg and vanilla extract and mix until combined.
- Add the peanut butter to the mixture and mix until combined, again scraping down the sides of the bowl as needed.
- Add the dry ingredients to the wet ingredients and mix on low just until combined.
- Add violet or purple gel food coloring to the dough until you reach the desired color, ensuring thorough incorporation.
- Cover and chill the dough for 2 hours or overnight. If chilling overnight, let it sit at room temperature for about 15 minutes before scooping.
- Preheat the oven to 350°F. Line two large baking sheets with silicone baking mats or parchment paper and set aside.
- Place colored sugar or sprinkles in a small bowl.
- Use a small cookie scoop or spoon to scoop about 1 tablespoon of cookie dough and roll into a ball. Roll the ball in the sugar and place on the prepared baking sheet about 2 inches apart.
- Bake for 8 to 10 minutes or until the cookies begin to puff up and show small cracks without browning. Remove from the oven and cool for 5 minutes on the baking sheet.
- Gently press a hug or kiss into the center of each cookie.
- Place the cookie sheet directly into the freezer for 10 minutes to prevent the chocolate from melting. Transfer to a wire cooling rack while baking the remaining cookies.
Notes
- For chewier cookies, under-bake slightly.
- Experiment with different colors of gel food coloring.
- Store cookies in an airtight container to maintain freshness.
- Prep Time: 20 minutes
- Cook Time: 10 minutes
- Category: Dessert
- Method: Baking
- Cuisine: American
Nutrition
- Serving Size: 1 cookie
- Calories: 120
- Sugar: 10g
- Sodium: 60mg
- Fat: 6g
- Saturated Fat: 3g
- Unsaturated Fat: 3g
- Trans Fat: 0g
- Carbohydrates: 15g
- Fiber: 1g
- Protein: 2g
- Cholesterol: 15mg


