Introduction to Pickled Radishes
Welcome, fellow food lovers! If you’re anything like me, your days are a delightful whirlwind of work, family, and a million other responsibilities. That’s why I’m excited to share this quick and easy recipe for pickled radishes. These vibrant, tangy bites can transform any ordinary meal into a flavor extravaganza. Whether you’re stacking them on a sandwich or tossing them into a salad, pickled radishes are your secret weapon for a burst of taste. Plus, they’re a breeze to make, adding a splash of color and zing to your busy life!
Why You’ll Love This Pickled Radishes
What makes pickled radishes so special? For starters, they’re quick and easy to whip up, perfect for the busiest of days. In just 25 minutes, you can create a tangy condiment that perks up any dish. The crunch, the tang, and the pop of color will impress your family and friends, making meals feel fancy without breaking a sweat. Honestly, these bright little bites are a tasty solution to your meal dilemmas!
Ingredients for Pickled Radishes
Let’s gather our ingredients to create these irresistible pickled radishes! Here’s what you’ll need:
- Radishes: A bunch (about 10-12) gives that lovely crunch. Look for firm, bright-colored ones.
- White vinegar: This tangy base enhances the flavor and preserves the radishes. You can substitute with apple cider vinegar for a sweeter twist.
- Water: Balances the acidity of the vinegar.
- Sugar: Just a tablespoon adds sweetness to the brine, helping the tang shine through.
- Salt: Essential for flavor and creating that satisfying crunch!
- Whole black peppercorns: These little balls pack big flavor. They infuse the brine with warmth and spice.
- Mustard seeds: Optional but highly recommended! They offer a burst of flavor that complements the radishes wonderfully.
- Bay leaf: This herb lends an aromatic touch to your pickles.
- Garlic: Smashed cloves add a punchy flavor that makes these radishes pop.
- Fresh dill or red pepper flakes (optional): If you fancy a herby or spicy kick, toss in some dill for freshness or a pinch of red pepper flakes for heat!
Be sure to check the exact quantities at the bottom of this post for printing. With these simple yet flavorful ingredients, you’re on your way to a delightful culinary adventure!
How to Make Pickled Radishes
Step 1: Clean and Slice the Radishes
First things first, let’s get those radishes ready! Rinse each radish under cold water, scrubbing gently to remove dirt. I like to pat them dry with a paper towel afterward. Once they’re clean, grab a trusty knife or a mandoline for uniform slices. Aim for thin, even pieces—about 1/8 inch thick works well. This way, every little bite is bursting with tangy flavor. Trust me, the presentation will be as appealing as the taste!
Step 2: Prepare the Brine
Now, let’s whip up that delicious brine! In a small saucepan, combine 1 cup of white vinegar, 1 cup of water, 1 tablespoon of sugar, and 1 ½ teaspoons of salt. Turn on the heat to medium and bring it to a gentle simmer. Stir the mixture until the sugar and salt dissolve completely. This harmonious combination creates the foundation for our pickled radishes. As you simmer, the kitchen will fill with a delightful tangy aroma, making your mouth water!
Step 3: Combine Additional Flavors
Once your brine is ready, it’s time to add those bold flavors! Remove the saucepan from the heat and toss in the black peppercorns, mustard seeds, bay leaf, and smashed garlic cloves. If you crave something extra, this is the moment to add fresh dill or a pinch of red pepper flakes. Stir everything together, and let the spices mingle with the hot brine for a few moments. Your taste buds are in for a treat!
Step 4: Pack the Jar
Next, it’s time to pack our radishes into a jar. Carefully place the sliced radishes in a clean glass jar or heatproof container. Use a poking stick, or even a spoon, to help them fit snugly. It’s like giving them a cozy home! The more often they touch the spicy brine, the tastier they will be. Make sure to leave some space at the top for the brine. We want every slice to soak up the goodness!
Step 5: Pour and Cool
Now, we get to play the pouring game! Gently pour the hot brine over the packed radishes, ensuring they are fully submerged. You can tap the jar lightly on the counter to release any trapped air bubbles. Once done, let the mixture cool to room temperature. This cooling step allows the radishes to absorb all that tangy flavor from the brine. Just imagine how vibrant they will look when we’re all done!
Step 6: Refrigerate and Wait
Finally, we must exercise a little patience—hardest part, right? Seal the jar tight with a fitting lid and place it in the refrigerator. Allow the radishes to pickle for at least 24 hours before tasting. For even better flavor, let them sit for 48 hours. During this time, the flavors will entwine beautifully, transforming those radishes into a tangy delight. Trust me, it’ll be worth the wait!
Tips for Success
- For even more flavor, let the jar sit in the fridge for at least 48 hours before tasting.
- Use a mandoline for perfectly uniform slices that pickle evenly.
- Feel free to experiment with spices—coriander seeds or sliced jalapeños can add a fun twist!
- Always store pickled radishes in the fridge; they’ll keep for up to two weeks.
- Try different vinegar types for unique flavor profiles—like rice vinegar for a milder taste.
Equipment Needed for Pickled Radishes

- Sharp Knife or Mandoline: A knife will do, but a mandoline gives even slices.
- Small Saucepan: Needed for preparing the brine. Any saucepan will work!
- Glass Jar or Heatproof Container: Use any clean jar with a tight lid for storing.
- Measuring Cups and Spoons: Accurate measurements make all the difference!
- Spoon or Poking Stick: Handy for packing radishes snugly in the jar.
Variations of Pickled Radishes
- Spicy Radishes: Add sliced jalapeños or extra red pepper flakes for a fiery kick that’ll wake up your taste buds!
- Herbed Radishes: Incorporate fresh herbs like rosemary or cilantro for a unique flavor twist that brightens up your pickles.
- Sweet and Sour: Swap in apple cider vinegar and a touch more sugar for a balanced sweet-tart flavor that pairs beautifully with grilled meats.
- Carrot and Radish Mix: Combine sliced radishes with julienned carrots for a colorful and crunchy pickle medley.
- Garlic Lovers: If you adore garlic, toss in extra cloves whole, then let them infuse their bold flavor into the mix.
Serving Suggestions for Pickled Radishes
- Top tacos with pickled radishes for a crunchy, tangy twist that enhances every bite.
- Add them to grain salads or couscous for a pop of color and zest.
- Pair pickled radishes with grilled meats to cut through richness.
- Serve as a vibrant appetizer alongside hummus or guacamole.
- Incorporate them into brunch, add to eggs or avocado toast for a refreshing punch.
FAQs about Pickled Radishes
Have questions about pickled radishes? You’re not alone! Here are some common queries I’ve gathered on this tangy topic:
How long do pickled radishes last in the fridge?
Pickled radishes can last up to two weeks when stored in the fridge. Just be sure to keep them sealed tightly in a glass jar to preserve their flavor and crunch!
Can I use other types of radishes for pickling?
Absolutely! While the classic red radish works beautifully, you can also experiment with other varieties like daikon or watermelon radishes. Each will bring its unique flavor and texture to the pickling party!
Can I adjust the sweetness of the brine?
Of course! If you want a sweeter bite, feel free to add a little more sugar to your brine. Conversely, if you prefer a tangier kick, reduce the sugar slightly to suit your taste!
Is it necessary to let the radishes pickle for 24 hours?
While you can technically eat them sooner, letting the radishes pickle for at least 24 hours allows the flavors to meld and develop. For the best taste experience, aim for a full 48 hours—trust me, it’s worth the wait!
Can I reuse the brine for another batch of pickled radishes?
You can! However, the brine may lose some potency after the first use. If you want great flavor in your next batch, consider making a fresh brine with the same ingredients.
Final Thoughts
Making pickled radishes has been a delightful adventure in my kitchen! The vibrant colors and tangy crunch brighten up meals and elevate simple dishes to something memorable. I love how these little gems can transform even the dullest of salads into something extraordinary. Plus, knowing that I can whip them up in just 25 minutes makes me feel like a culinary superhero! As you embark on this pickling journey, I hope these radishes bring you joy, flavor, and a sprinkle of sunshine on your plate. So go ahead, dive into making your own pickled radishes and savor the tangy magic!
Print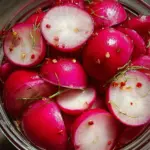
Pickled Radishes
- Total Time: 25 minutes plus at least 24 hours for pickling
- Yield: Approximately 2 cups 1x
- Diet: Vegetarian
Description
A quick and easy recipe for tangy pickled radishes that adds a burst of flavor to salads, sandwiches, and more.
Ingredients
- 1 bunch of radishes (about 10-12), washed and thinly sliced
- 1 cup of white vinegar
- 1 cup of water
- 1 tablespoon of sugar
- 1 1/2 teaspoons of salt
- 1 teaspoon of whole black peppercorns
- 1 teaspoon of mustard seeds
- 1 bay leaf
- 2 cloves of garlic, peeled and smashed
- Optional: a few sprigs of fresh dill or a pinch of red pepper flakes for added flavor
Instructions
- Start by cleaning the radishes: wash them thoroughly to remove any dirt and slice them thinly with a knife or mandoline for uniform slices.
- In a small saucepan, combine the white vinegar, water, sugar, and salt. Bring the mixture to a simmer over medium heat, stirring until the sugar and salt dissolve completely.
- Remove the saucepan from heat and add the black peppercorns, mustard seeds, bay leaf, and garlic cloves to the hot brine.
- If you’re using dill or red pepper flakes, add them to the brine as well for an enhanced flavor.
- Arrange the sliced radishes in a clean glass jar or a heatproof container that can hold at least 2 cups of liquid.
- Pour the hot vinegar brine over the radishes, ensuring that the radishes are fully submerged in the liquid.
- Let the mixture cool to room temperature, then seal the jar or container with a tight-fitting lid.
- Place the jar in the refrigerator and allow the radishes to pickle for at least 24 hours before tasting, although they will develop even better flavor with 48 hours of pickling.
- The pickled radishes can be stored in the refrigerator for up to 2 weeks.
Notes
- For a spicier kick, add more red pepper flakes or even sliced jalapeños.
- These pickled radishes make a great topping for tacos, rice bowls, or grain salads.
- Prep Time: 15 minutes
- Cook Time: 10 minutes
- Category: Condiment
- Method: Pickling
- Cuisine: American
Nutrition
- Serving Size: 1 tablespoon
- Calories: 10
- Sugar: 1g
- Sodium: 120mg
- Fat: 0g
- Saturated Fat: 0g
- Unsaturated Fat: 0g
- Trans Fat: 0g
- Carbohydrates: 2g
- Fiber: 0g
- Protein: 0g
- Cholesterol: 0mg