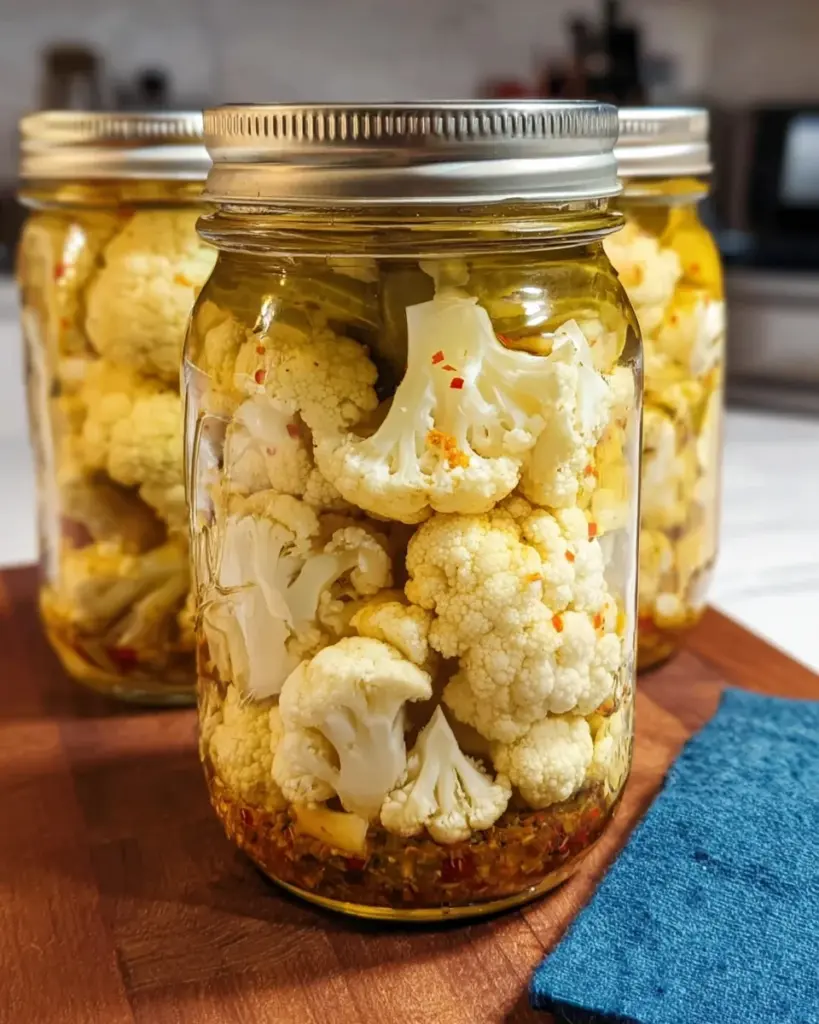
Introduction to Pickled Cauliflower
As a busy mom juggling countless tasks, I totally understand the need for quick solutions in the kitchen. That’s where my simple recipe for pickled cauliflower comes in! Not only is it a delightful way to preserve fresh flavors, but it also adds a vibrant pop of color and crunch to any meal. Imagine surprising your family with a tangy side dish that they’ve never tried before! This pickling adventure invites you to elevate everyday dinners with ease, leaving you time to bask in the joyous moments with your loved ones.
Why You’ll Love This Pickled Cauliflower
This pickled cauliflower recipe is a busy cook’s dream! Not only is it incredibly easy to make, but it also packs a punch of flavor that will make your taste buds dance. In just over an hour of prep and cooling time, you’ll have a zesty, crunchy treat ready to brighten up any meal. Plus, it’s a fantastic way to use leftover cauliflower, minimizing food waste while maximizing deliciousness!
Ingredients for Pickled Cauliflower
Gathering the right ingredients is the first step in our pickling journey. Here’s what you’ll need:
- Cauliflower: A large head, which forms the base of our dish. It’s full of vitamins and adds crunch.
- Pickling spice blend: This mix brings warmth and depth to the brine, enhancing the flavor of the cauliflower. You can find store-bought blends or make your own at home.
- Apple cider vinegar: I love using this tangy vinegar for its bright flavor and health benefits. It’s perfect for creating that signature pickling taste.
- Filtered water: Purity matters! Using filtered water yields the best results for crispness and flavor.
- Pickling salt: This helps preserve the integrity of the cauliflower. Fine sea salt can work as a substitute, but avoid table salt with anti-caking agents.
- Granulated sugar: Just a touch adds balance, softening the vinegar’s sharpness. It makes the pickled cauliflower even more delightful!
For those who love a kick, consider adding slices of jalapeño or a sprinkle of red pepper flakes to your jars. These additions can bring a delightful heat, perfect for spice enthusiasts!
You’ll find the exact measurements for each ingredient handy at the bottom of the article, ready for you to print out and keep for easy access. Happy cooking!
How to Make Pickled Cauliflower
Prepare Your Ingredients
First things first, let’s get organized. Start by washing your cauliflower under cool water. Remove any leaves and cut the head into bite-sized florets. The more uniform they are, the better they’ll pickle. Now, grab your pickling spice blend. If you’re feeling adventurous, you might even want to create your own blend at home using spices like mustard seeds, coriander, or bay leaves!
Make sure that you have clean, sterilized jars ready to go. Nothing ruins a pickling moment like wondering if your jars are ready. Trust me; you want to avoid any mishaps when you’re trying to preserve your precious cauliflower. Once everything’s prepped, it’s time to whip up that pickling brine!
Make the Brine
Now, let’s create the magic—our pickling brine! Grab a saucepan and pour in the apple cider vinegar, filtered water, pickling salt, and granulated sugar. Heat it over medium heat, stirring gently until the salt and sugar dissolve completely. As the mixture heats up, take a deep breath and let the aroma fill your kitchen. The scent is heavenly!
Once it reaches a boil, lower the heat and let it simmer for about 2–3 minutes. This isn’t just about combining flavors; it’s about developing that tangy profile that our pickled cauliflower will soak up. Once done, remove the saucepan from the heat and prepare to fill those jars!
Pack the Jars
Now comes the fun part—packing your jars! Start by placing a spoonful or two of your pickling spice blend at the bottom of each jar. Then, tightly pack those cauliflower florets into the jar. Leave about half an inch of headspace at the top. This space is crucial because it allows the florets to soak up all the glorious brine without overflowing!
If adding jalapeños for a spicy kick, slide them in among the florets. They’ll infuse an extra layer of flavor! Once the jars are packed almost full with the florets, we’re ready for the brine to work its magic.
Pour the Brine
Carefully take your pot of hot brine and pour it over the packed cauliflower in each jar. Remember to leave about a quarter of an inch of headspace! This will help prevent any spills or messy overflows. Made a little mess? No worries, just wipe down the rims of your jars using a clean cloth. We want to keep things tidy!
Seal and Store
After pouring the brine, it’s time to seal those jars. Place the lids on securely and leave them out to cool at room temperature—trust me, it’s worth the wait. Once they’ve cooled down, pop them into the refrigerator. Your pickled cauliflower is ready to become a delightful addition to your meals after at least 48 hours of pickling time!
Tips for Success
- Always use clean, sterilized jars to prevent spoilage.
- Don’t rush the cooling process; it helps flavors meld together.
- For best results, allow pickled cauliflower to sit in the fridge for at least 48 hours.
- Experiment with different spices to find your perfect flavor profile.
- Store jars in the fridge and consume within a month for optimal freshness.
Equipment Needed
- Glass jars with lids: Use mason jars if available, but any clean glass jar will do!
- Saucepan: A medium-sized pot for making the brine.

- Measuring cups: For accurate liquid measurements, grab a set of measuring cups.
- Spoon: A standard kitchen spoon works well for packing the jars.
- Chopstick or skewer: Use these to remove air bubbles from the jars.
Variations of Pickled Cauliflower
- Curried Cauliflower: Add curry powder to the brine for a vibrant, exotic twist.
- Garlic Lovers: Toss in a few crushed cloves of garlic for rich flavor with every bite.
- Herb-Infused: Experiment with fresh dill, thyme, or rosemary mixed in for a fragrant touch.
- Beet Pickled: Add cooked beet juice to the brine for stunning color and an earthier flavor.
- Honey-Sweetened: Substitute granulated sugar with honey for a natural sweetness and unique taste.
Serving Suggestions for Pickled Cauliflower
- Serve as a vibrant side dish alongside grilled meats or fish for a refreshing crunch.
- Top salads with pickled cauliflower for an unexpected zing and extra texture.
- Pair with charcuterie boards for a delightful contrast to rich cheeses.
- Enjoy with tacos to add a tangy twist!
FAQs about Pickled Cauliflower
How long does pickled cauliflower last?
If stored properly in the fridge, your homemade pickled cauliflower will stay fresh for about a month. Just remember, the longer it sits, the more tangy it becomes!
Can I use other vegetables for pickling?
Absolutely! While this recipe focuses on cauliflower, you can experiment with carrots, green beans, or even small zucchini. Just adjust the time needed for each veggie to soak up that delicious brine.
Can I recycle pickling brine?
You can reuse the brine, but it’s best to use it with the same vegetable type. However, it may lose its potency after the first use, so consider making a fresh batch for the best flavor.
What other recipes can I use pickled cauliflower in?
Pickled cauliflower isn’t just a standalone dish! It makes a fantastic topping for sandwiches, adds flair to grain bowls, or complements a slightly sweet dish like roasted pork.
Is this recipe suitable for canning?
This pickling recipe is designed for refrigeration, not as a traditional canning method. For safe canning, you’d need to follow proper canning procedures, ensuring long-term preservation.
Final Thoughts
Creating your own pickled cauliflower is more than just a cooking task; it’s an experience filled with love and creativity. Each jar tells a story of vibrant flavors and cozy family dinners. The joy of serving a homemade side dish that not only enhances meals but also delights your loved ones makes all the prep worthwhile. Plus, with easy variations to try, you’ll never grow tired of this delightful recipe. Embrace the pickling adventure, and soon you’ll find that your kitchen has become a haven of flavor and tradition!
Print
Pickled Cauliflower
- Total Time: 48 hours (plus cooling time)
- Yield: 3-4 jars 1x
- Diet: Vegetarian
Description
A simple and delightful recipe for pickled cauliflower that enhances flavor and preserves the vegetable.
Ingredients
- 1 large head cauliflower (about 2–3 pounds)
- 1 tablespoon pickling spice blend
- 1 cup apple cider vinegar
- 1 cup filtered water
- 1 teaspoon pickling salt (or fine sea salt)
- 1/2 teaspoon granulated sugar
Instructions
- Add pickling spice to clean jars.
- Cut cauliflower into bite-sized florets.
- Pack florets tightly into jars, leaving 1/2 inch of headspace.
- In a saucepan, bring vinegar, water, salt, and sugar to a boil.
- Pour hot brine over cauliflower, leaving 1/4 inch of headspace.
- Remove air bubbles using a chopstick or skewer.
- Seal jars and let cool to room temperature.
- Refrigerate and let pickle for at least 48 hours before serving.
Notes
- Ensure jars are properly cleaned and sterilized before use.
- For a spicier kick, add slices of jalapeño or red pepper flakes to the jars.
- Best stored in the refrigerator and consumed within a month for optimal freshness.
- Prep Time: 20 minutes
- Cook Time: 10 minutes
- Category: Preserved Vegetable
- Method: Pickling
- Cuisine: American
Nutrition
- Serving Size: 1 jar (about 1 cup)
- Calories: 25
- Sugar: 1g
- Sodium: 312mg
- Fat: 0g
- Saturated Fat: 0g
- Unsaturated Fat: 0g
- Trans Fat: 0g
- Carbohydrates: 4g
- Fiber: 2g
- Protein: 1g
- Cholesterol: 0mg