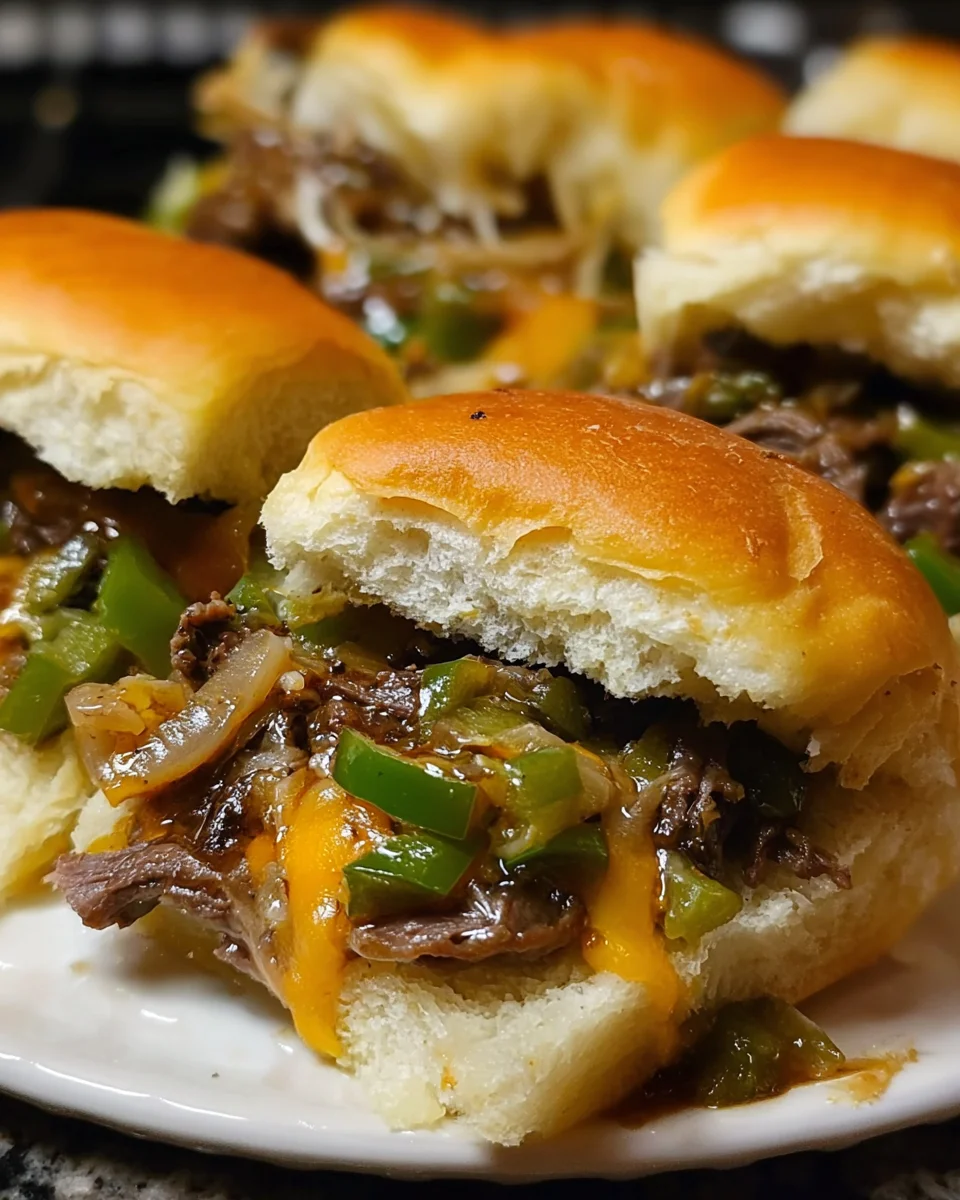
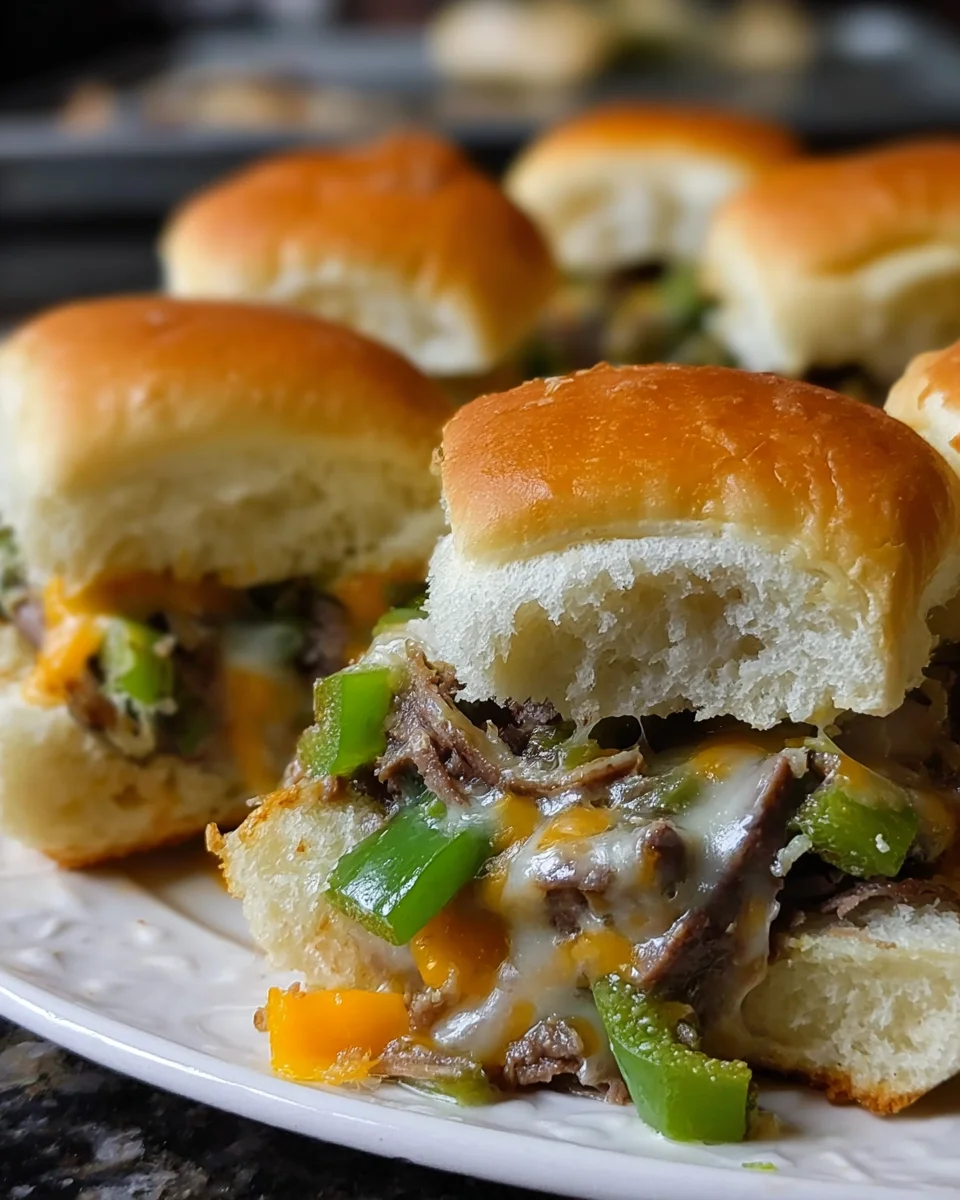
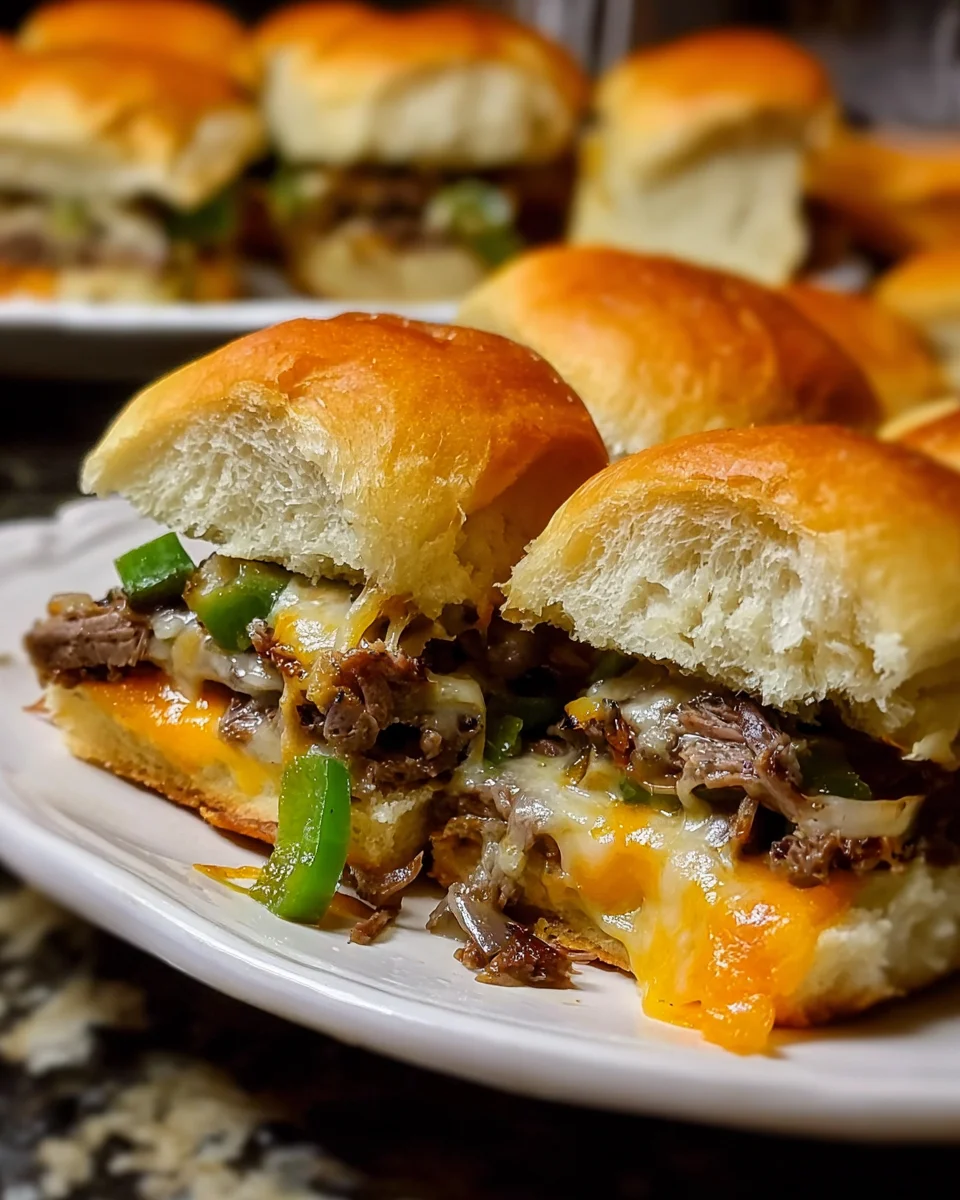
Introduction to Philly Cheese Steak Sliders
Let me share a little secret: there’s something wonderfully comforting about Philly Cheese Steak Sliders. Imagine cozying up with your loved ones, indulging in these delicious bites that burst with flavor. As a busy mom, I understand the need for quick, mouthwatering meals that impress without the fuss. These sliders blend tender roast beef, sautéed peppers, and gooey cheese, cradled in soft dinner rolls, making them the perfect solution for a hectic weeknight dinner or game day feast. Trust me, you’ll want to have this recipe in your back pocket!
Why You’ll Love This Philly Cheese Steak Sliders
These Philly Cheese Steak Sliders are not just a treat; they’re a lifesaver in the kitchen! They come together in about 35 minutes, making them perfect for busy nights. The blend of savory roast beef, melted cheese, and sautéed veggies is nothing short of heavenly. Plus, they’re flexible enough to customize for picky eaters. Whether you’re feeding a crowd or enjoying a quiet night in, these sliders are sure to delight!
Ingredients for Philly Cheese Steak Sliders
Gathering your ingredients is the first step to whipping up these irresistible Philly Cheese Steak Sliders! Below, I’ve listed everything you’ll need, along with a little insight into each component. Trust me; these flavors work in perfect harmony!
- Diced Green Peppers: These bring a pop of color and a sweet crunch to your sliders. I like using bell peppers, but you can mix it up with others!
- Diced Yellow Onions: A must for that aromatic base. They caramelize beautifully, adding richness and depth of flavor to your dish.
- Deli Sliced Roast Beef: The star of the show! Freshly sliced beef from the deli yields the best taste. You could also opt for different cuts like flank steak.
- Water: This will help create a luscious sauce when combined with the gravy mix.
- Brown Gravy Mix: A quick and effortless way to add that unmistakable umami flavor. Feel free to make your own if you’re feeling ambitious!
- Pepper: Just a sprinkle adds a nice touch of heat. You can always adjust according to your sensitivity!
- Dinner Rolls: Soft rolls are the perfect vessel for this savory filling. Pot for slider-sized rolls or use homemade rolls for an extra special touch.
- Mayo: This adds creaminess, balancing the flavors. You can experiment with flavored mayo for a twist!
- Shredded Mozzarella and Cheddar Cheese Blend: This creamy combo melts beautifully and enhances that ooey-gooey factor. Swap it for provolone or pepper jack for more zing!
- Melted Butter: Adds a finishing touch of richness when brushed on top, making your sliders visually appealing and extra delicious.
- Garlic Powder: A little goes a long way to infuse that irresistible aroma. Fresh minced garlic could work as well!
- Onion Powder: Enhances the overall flavor without overwhelming the dish. Another way to sneak in more taste!
For exact measurements, check the bottom of the article where they’re neatly laid out for you, all ready for printing. Happy cooking!

How to Make Philly Cheese Steak Sliders
Now that we have our ingredients ready, let’s dive into the exciting part: making these delightful Philly Cheese Steak Sliders! I promise, the steps are simple and satisfying. Follow along, and soon you’ll have a dish that’ll leave everyone craving more!
Step 1: Preheat Your Oven
First things first, preheat your oven to 350°F. This makes sure your sliders bake evenly and come out golden and delicious. Trust me, your kitchen will smell divine as they cook!
Step 2: Sauté the Vegetables
Next, let’s add some color and flavor! In a large sauté pan over medium-high heat, toss in the diced green peppers and yellow onions. Stir them together, letting them cook until they soften and start turning golden brown. This little step enhances their sweetness, creating a beautiful base for our sliders.
Step 3: Prepare the Roast Beef
While the veggies are cooking, chop your deli-sliced roast beef into small squares. I find this ideal for even distribution in the sliders. It also allows every bite to have a delicious mix of beef and greens. Remember, we want all those flavors working together in harmony!
Step 4: Combine Ingredients
Now that everything’s prepped, it’s time to unite the ingredients! Add the chopped roast beef to your pan with the veggies. Pour in the water, sprinkle the brown gravy mix, and add a dash of pepper. Stir everything together and cook until the liquid reduces. You want it nice and thick to avoid soggy sliders—no one likes that!
Step 5: Assemble the Sliders
Grab those soft dinner rolls we prepared earlier! Place the bottoms of the rolls on a non-stick baking sheet. Slather on 2 tablespoons of mayo on each bottom roll. This creaminess adds a wonderful flavor and helps keep everything in place. Now spoon the savory roast beef mixture evenly over the mayo-coated rolls. Just imagine how wonderful this will taste!
Step 6: Add the Cheese
It’s time for the star ingredient! Generously sprinkle the shredded mozzarella and cheddar cheese blend over the beef mixture. Don’t hold back! This cheesy goodness is what makes the sliders scrumptious. Finally, place the tops of the rolls back on, sealing all that flavor in.
Step 7: Bake
Cover your baking sheet with aluminum foil and slide it into the oven. Bake for about 12 minutes, allowing flavors to meld perfectly. After that, remove the foil and let these masterpieces bake for an additional 8-10 minutes until the tops are beautifully browned. Isn’t it exciting to watch them transform in the oven?
Step 8: Finish and Serve
As they come out of the oven, stir together the melted butter with garlic powder and onion powder. Brush this heavenly mixture over the tops of the buns. Let your sliders cool for a couple of minutes before diving in. This simple touch elevates your sliders to a whole new level of tasty, making them even more irresistible!
Tips for Success
- Chop vegetables evenly for consistent cooking. This way, they’ll soften perfectly!
- Don’t rush the sautéing process; let those onions caramelize!
- Experiment with different cheeses for unique flavors. Pepper jack adds a nice kick!
- Make the beef mixture ahead of time and store it in the fridge. That way, dinner comes together quickly!
- Use a pizza cutter to slice sliders easily. It’s a game-changer!
Equipment Needed
- Large Sauté Pan: A non-stick option works wonders, but any frying pan will do!
- Non-Stick Baking Sheet: Perfect for easy cleanup; consider using parchment paper for an even easier experience.
- Aluminum Foil: Essential for covering sliders while they bake.
- Knife and Cutting Board: For chopping veggies and meat. A simple set will do!
- Brush: For spreading the butter mixture on top for that finishing touch.
Variations
- Vegetarian Option: Substitute roast beef with sautéed mushrooms and spinach for a hearty, meatless twist!
- Spicy Sliders: Add jalapeños or use pepper jack cheese for a kick that spice lovers will adore.
- Gluten-Free Rolls: Pot for gluten-free slider rolls to accommodate dietary restrictions while still enjoying these delicious morsels.
- Italian Style: Incorporate Italian seasoning and swap the cheese for provolone to create an Italian-inspired flavor.
- BBQ Twist: Mix in some barbecue sauce with the beef mixture for a tangy, smoky flavor that pairs perfectly with the cheese.
Serving Suggestions for Philly Cheese Steak Sliders
- Side Salads: Pair the sliders with a fresh garden salad or coleslaw for a crunchy balance.
- Chips: Serve with crispy potato chips or sweet potato fries for the ultimate snack platter.
- Drinks: Complement with iced tea, lemonade, or a light lager for a refreshing combo.
- Presentation: Arrange on a rustic wooden platter or a fun themed board for a festive touch.
FAQs about Philly Cheese Steak Sliders
Can I make Philly Cheese Steak Sliders ahead of time?
Absolutely! You can prepare the beef mixture and store it in the fridge for a day or two. When you’re ready, just assemble and bake the sliders for a quick meal!
What can I use instead of roast beef?
If you’re looking for alternatives, consider using turkey, chicken, or even sautéed mushrooms for a delicious vegetarian option. Each will bring a unique flavor profile!
How do I store leftovers?
Store any leftover Philly Cheese Steak Sliders in an airtight container in the fridge for up to three days. Just reheat them in the oven or microwave before enjoying them again!
Can I freeze the sliders?
Yes! Assemble the sliders without baking them, wrap tightly, and freeze for up to three months. When you’re ready to eat, bake directly from the freezer, adding a few extra minutes to the cooking time.
What other cheeses work well in these sliders?
There are plenty of tasty cheese options! Provolone, gouda, or even blue cheese can add a wonderful twist to your sliders. Get creative!
Final Thoughts
Making Philly Cheese Steak Sliders has become a cherished tradition in my home. Every time I pull them out of the oven, I’m reminded of the happiness they bring to my family. The warm smell of melting cheese and sautéed veggies scents the air, creating an inviting atmosphere. They’re perfect for cozy family dinners or casual gatherings with friends. Plus, the joy of seeing my loved ones savor each bite is what cooking is all about! I hope this recipe becomes a favorite in your kitchen, spreading smiles and delicious memories for years to come.
Print
Philly Cheese Steak Sliders
- Total Time: 35 minutes
- Yield: 12 sliders 1x
- Diet: Gluten Free
Description
Philly Cheese Steak Sliders are a mouthwatering snack, featuring a delicious blend of roast beef, sautéed peppers, onions, and gooey cheese, all tucked inside soft dinner rolls.
Ingredients
- 1 cup diced green peppers
- 1 cup diced yellow onions
- 10 oz deli sliced roast beef
- ⅓ cup water
- 0.87 oz brown gravy mix
- ¼ teaspoon pepper
- 12 dinner rolls
- 4 tablespoons mayo
- 1 ½ cups shredded mozzarella and cheddar cheese blend
- 2 tablespoons butter, melted
- ½ teaspoon garlic powder
- ½ teaspoon onion powder
Instructions
- Preheat oven to 350F.
- Dump diced green peppers and yellow onions into a large saute pan over medium-high heat.
- Stir the green peppers and onions together well and leave them to cook.
- Chop the sliced roast beef into small squares.
- Once the onions are starting to brown, add the chopped roast beef to the pan and stir well.
- Add the water, gravy mix, and pepper to the pan.
- Stir well and cook until no liquid remains in the pan.
- Remove the pan from the heat.
- Slice the dinner rolls in half.
- Place the bottoms of the rolls on a non-stick baking sheet.
- Spread 2 tablespoons of mayo on the bottom rolls.
- Then spread the remaining 2 tablespoons of mayo on the cut side of the tops of the rolls.
- Spoon the roast beef mixture evenly over the bottom rolls.
- Sprinkle the shredded cheese on top of the roast beef mixture.
- Place the tops of the rolls over the cheese.
- Cover the sliders with aluminum foil and place the baking sheet in the oven.
- Bake the sliders, covered for 12 minutes.
- While they are in the oven, stir together the melted butter, garlic powder, and onion powder.
- After 12 minutes, remove the sliders from the oven, take off the foil and brush the tops of the buns with the seasoned melted butter.
- Return the sliders to the oven to continue baking uncovered, until nicely browned on top (8-10 minutes).
- Remove the sliders from the oven and allow them to cool for a couple of minutes.
- Serve and enjoy!
Notes
- Feel free to add more spices to the beef mixture for extra flavor.
- These sliders can be made ahead of time and reheated before serving.
- Switch up the cheese for different flavors, such as pepper jack for a spicy kick.
- Prep Time: 15 minutes
- Cook Time: 20 minutes
- Category: Appetizer
- Method: Baking
- Cuisine: American
Nutrition
- Serving Size: 1 slider
- Calories: 250
- Sugar: 2g
- Sodium: 500mg
- Fat: 12g
- Saturated Fat: 6g
- Unsaturated Fat: 6g
- Trans Fat: 0g
- Carbohydrates: 23g
- Fiber: 1g
- Protein: 13g
- Cholesterol: 35mg