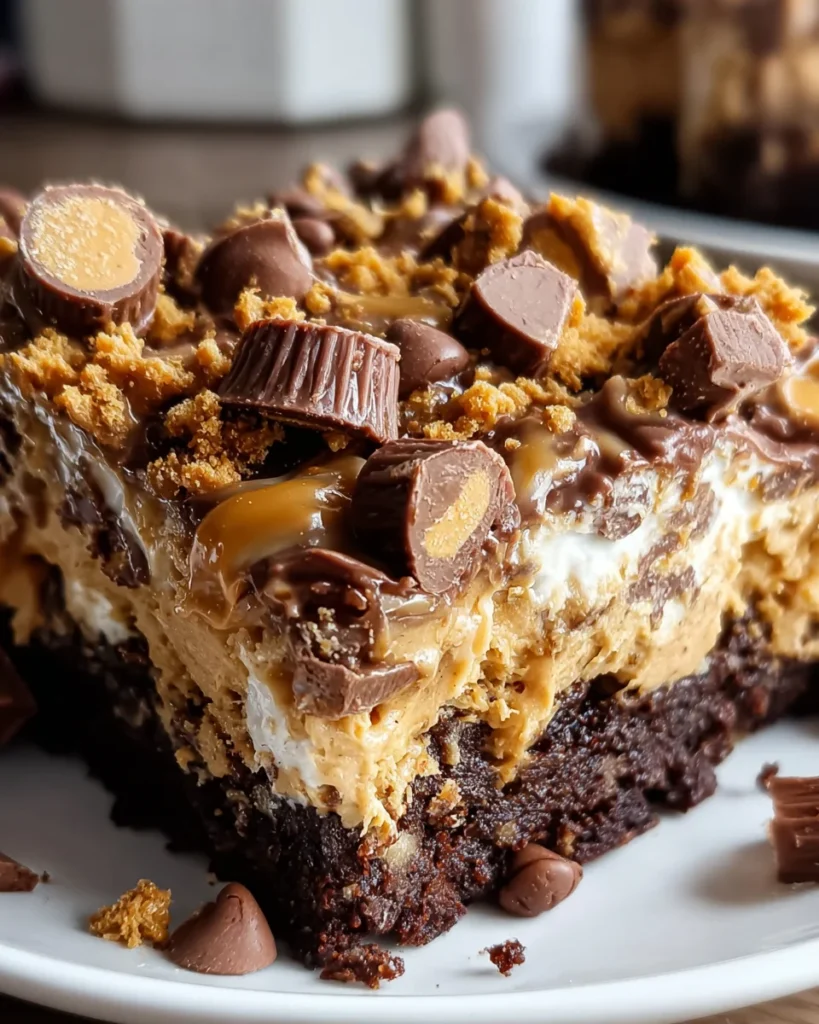
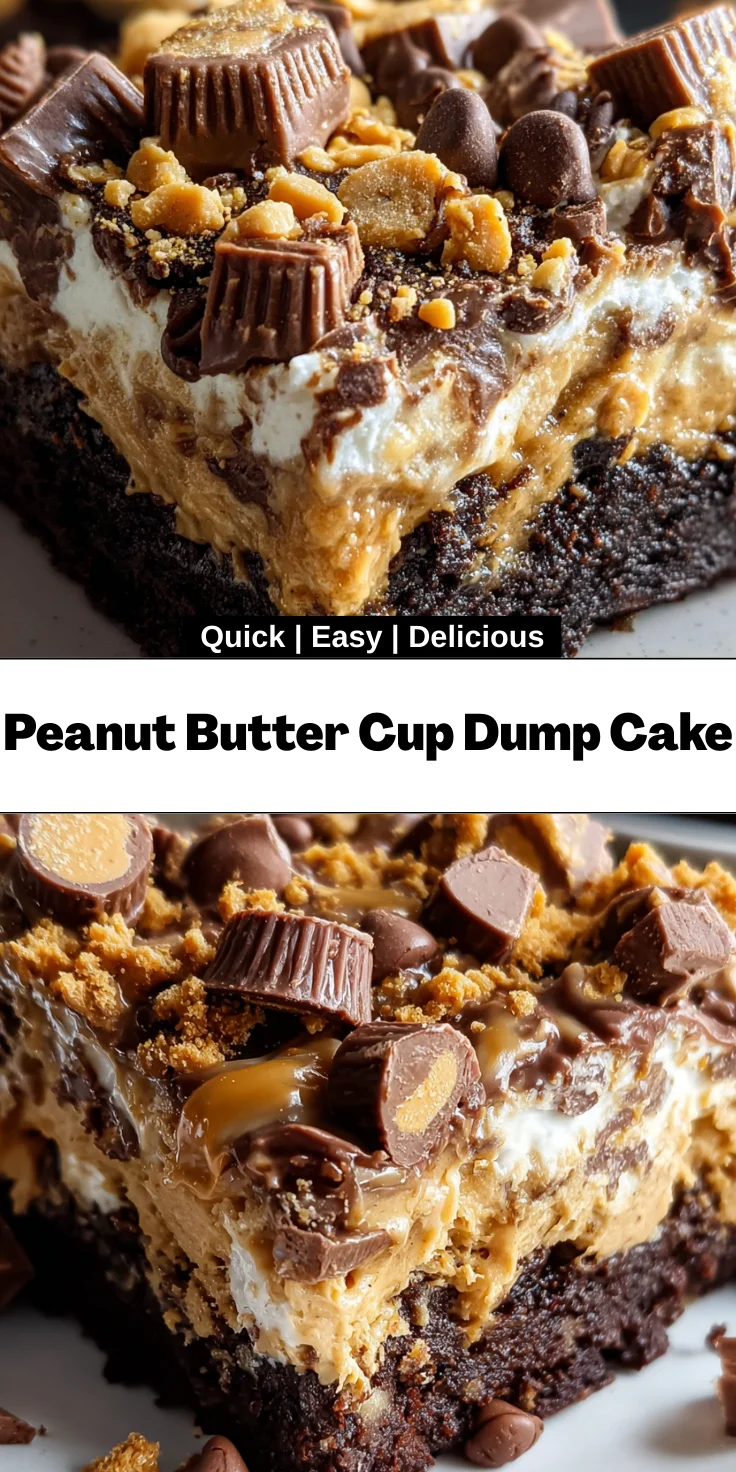
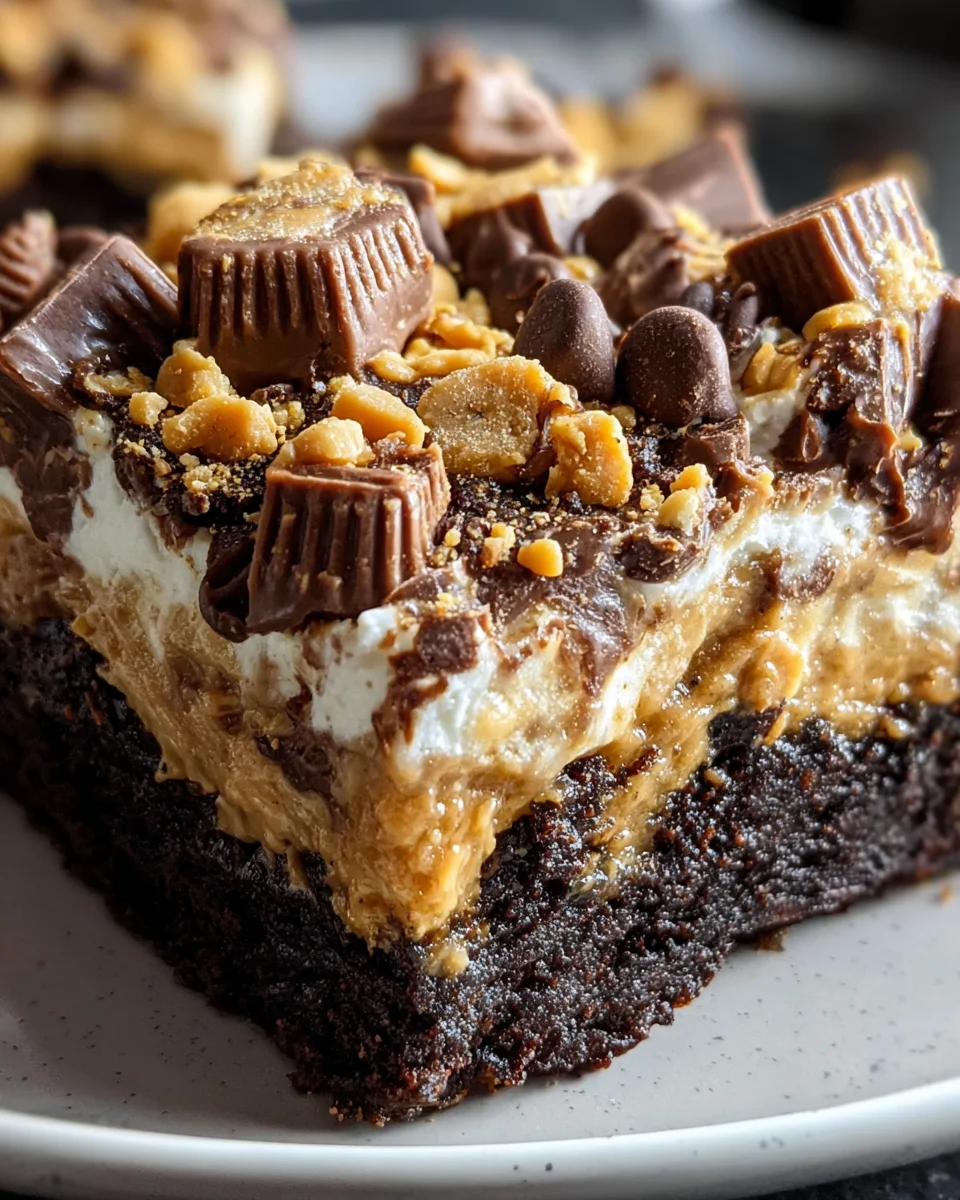
Introduction to Peanut Butter Cup Dump Cake
Hey there, fellow peanut butter lovers! If you’re like me, you know that life can get pretty hectic. That’s where this delightful Peanut Butter Cup Dump Cake comes in—it’s the perfect quick solution for busy days when you want to whip up something delicious without spending hours in the kitchen. Imagine layers of creamy peanut butter, sweet chocolate, and decadent candy all melting together in one gooey dish. Whether you’re looking to impress loved ones or treat yourself after a long day, this recipe is sure to bring smiles and satisfied taste buds!
Why You’ll Love This Peanut Butter Cup Dump Cake
This Peanut Butter Cup Dump Cake is not just a dessert; it’s an experience wrapped in layers of flavor. You’ll adore how quick it is—prep takes only 15 minutes! The taste? Oh, it’s a dreamy combination of chocolate and nutty goodness that hits all the right notes. Plus, it’s a crowd-pleaser, so whether you’re hosting or just indulging, this recipe will surely satisfy everyone’s cravings. Easy, fast, and tasty—what more could you want?
Ingredients for Peanut Butter Cup Dump Cake
Let’s gather the delightful ingredients for our Peanut Butter Cup Dump Cake! Each element plays a crucial role in creating that heavenly blend of flavors and textures. Here’s what you’ll need:
- Creamy peanut butter: This is the star of the show! It gives our cake a rich, nutty base and adds depth to every bite.
- Chopped peanut butter cups: These sweet pieces are the delightful surprise within the cake, offering bursts of chocolate and peanut butter flavor that everyone loves.
- Sweetened condensed milk: This ingredients add a layer of moisture and sweetness, enriching the cake’s texture, making it fabulously gooey.
- Chocolate cake mix: A quick and easy way to ensure a moist cake, it creates a soft, chocolatey base that balances perfectly with the peanut butter.
- Unsalted butter: Melted butter adds a beautiful richness, helping to merge all layers while also providing a slight crisp on top.
- Milk chocolate chips: These little morsels bring extra chocolatey goodness to the cake, melting to create delightful pockets of flavor.
- Optional ingredients: Consider whipped cream or vanilla ice cream for serving, adding a refreshing touch to the warm cake.
For exact quantities, just scroll down to the bottom of the article to find everything you need—printable and ready for your baking adventure!
How to Make Peanut Butter Cup Dump Cake
Now, let’s dive into creating this delightful Peanut Butter Cup Dump Cake. It’s simple and straightforward, even for the busiest of hands. Follow these easy steps to create a dessert that will leave everyone wanting more!
Step 1: Preheat the Oven
First things first, we need to preheat our oven to 350°F (175°C). This step is crucial! Preheating allows the cake to rise evenly and bake beautifully. You want that perfect fluff with every slice, and starting off with a properly heated oven sets the stage for success.
Step 2: Prepare the Baking Dish
Next, grab your trusty 9×13-inch baking dish. Grease it generously with butter or a non-stick spray. This ensures our cake doesn’t cling to the dish, making serving a whole lot easier. Trust me, you want every gooey bit to come out cleanly!
Step 3: Spread Peanut Butter
Time to get hands-on! Spread that creamy peanut butter evenly over the bottom of your prepared baking dish. This layer is the heart of our cake, creating a brilliant base that mixes beautifully with the other ingredients. Make sure it reaches the corners for maximum flavor!
Step 4: Add Peanut Butter Cups
Now, sprinkle half of those chopped peanut butter cups over the peanut butter layer. Distributing them evenly is key! Each bite should be a delightful explosion of peanut butter and chocolate. Who doesn’t want that?
Step 5: Pour Sweetened Condensed Milk
This is when the magic begins! Pour the sweetened condensed milk evenly over the candy layer. This luscious ingredient adds richness and moisture, giving our cake that gooey texture. It’s like a warm hug for your taste buds!
Step 6: Add Chocolate Cake Mix
Next, grab your box of chocolate cake mix. Sprinkle it evenly over the entire dish—but hold on! Do not mix it! Keeping the layers separate is crucial for achieving that famous dump cake texture. Each bite should be a delightful surprise.
Step 7: Drizzle with Butter
Here’s where it gets indulgent. Drizzle the melted butter over the cake mix. Try to cover as much of the surface as possible. This buttery goodness will melt down into the cake mix as it bakes, enriching the flavor of our dessert.
Step 8: Sprinkle Remaining Ingredients
Sprinkle the remaining chopped peanut butter cups and milk chocolate chips on top. This final layering adds texture and elevates the chocolatey goodness. You want those chunks to melt perfectly, making every forkful a heavenly experience.
Step 9: Bake and Cool
Now, it’s time to pop that masterpiece into the oven! Bake for about 35 to 40 minutes, or until the top is bubbly and slightly crisp. To check for doneness, gently shake the dish. If it jiggly in the center, it’s not quite ready. Let it cool for about 10–15 minutes before serving. This cooling time allows the layers to settle beautifully, preparing it for the grand reveal!
Tips for Success
- Use creamy peanut butter for a smooth texture—chunky can add bits, but the creaminess makes it dreamy.
- Let the cake cool before serving so the flavors meld together beautifully.
- For a complete treat, serve with a scoop of vanilla ice cream or a dollop of whipped cream.
- Keep extra peanut butter cups on hand for extra sprinkles on top!
- Store leftovers in the fridge for up to three days—if there are any left!
Equipment Needed
- 9×13-inch baking dish (a glass or metal dish works well)
- Patching tool for greasing (use a paper towel or pastry brush for butter)
- Mixing bowl for melted butter
- Spatula for spreading peanut butter
- Measuring cups for ingredients
Variations
- Nut Allergies: Substitute the creamy peanut butter with sunflower seed butter for a nut-free option that still offers creaminess.
- Dark Chocolate Lovers: Swap milk chocolate chips for dark chocolate chips to add a richer, more intense flavor.
- Gluten-Free Version: Use a gluten-free chocolate cake mix to cater to gluten-sensitive eaters.
- Fruit Additions: Enhance your dump cake with sliced bananas or a layer of raspberries for a fruity twist.
- Loaded Toppings: Top the baked cake with crushed nuts, caramel drizzle, or extra chocolate sauce for that extra layer of indulgence.
Serving Suggestions
- Pair your warm Peanut Butter Cup Dump Cake with a scoop of vanilla ice cream for a delightful contrast of temperatures.
- Serve with a dollop of whipped cream and a sprinkle of chopped peanuts for added crunch.
- For a cozy touch, enjoy it with a cup of hot cocoa or a strong coffee to enhance the chocolate flavor.
FAQs about Peanut Butter Cup Dump Cake
Do you have questions about this delicious Peanut Butter Cup Dump Cake? You’re not alone! Here are some frequently asked questions that can help you navigate your baking adventure:
Can I make this cake ahead of time?
Absolutely! You can prepare the cake a day in advance and store it in the fridge. Just rewarm it in the oven for a few minutes before serving to restore that melty goodness.
What can I use instead of sweetened condensed milk?
If you’re looking for alternatives, evaporated milk mixed with a touch of sugar can work. Some have even tried coconut cream for a unique twist!
Can I freeze leftover dump cake?
Yes, you can freeze this cake! Just cover it tightly with plastic wrap and foil. It can stay fresh for up to three months. Simply thaw in the fridge before serving.
Can I customize the candy used in this cake?
Definitely! Try substituting with other types of candy that you love, such as chocolate bars, or even cookie pieces. The world is your candy oyster!
How do I know when the cake is done baking?
Look for a bubbly top with slight crispness. Gently shake the baking dish—if it jiggles in the center, it needs more time. A gentle golden-brown hue is also a good sign!
Final Thoughts
Oh, the joy of creating a Peanut Butter Cup Dump Cake! This dessert is more than just a treat; it’s an experience brimming with warmth, comfort, and nostalgia. With just a few simple ingredients and some love, you transform an ordinary day into something special. Watching family and friends indulge in this gooey delight is absolutely priceless. Each slice holds a little bit of happiness, offering that perfect blend of flavors that make life sweeter. So, gather your loved ones, whip up this cake, and create your own delicious memories—it’s time to indulge and celebrate together!
Print
Peanut Butter Cup Dump Cake
- Total Time: 50-55 minutes
- Yield: 12 servings 1x
- Diet: Vegetarian
Description
Indulge in this easy Peanut Butter Cup Dump Cake that’s rich and delicious with layers of peanut butter, chocolate cake mix, and candy.
Ingredients
- 1 cup creamy peanut butter
- 1.5 cups chopped peanut butter cups, plus extra for garnish
- 1 can (400 g) sweetened condensed milk
- 1 box (432 g) chocolate cake mix, dry
- 115 g unsalted butter, melted
- 175 g milk chocolate chips
- Optional: whipped cream or vanilla ice cream, for serving
Instructions
- Preheat your oven to 175°C (350°F). Grease a 23×33 cm (9×13-inch) baking dish with butter or non-stick spray.
- Spread the creamy peanut butter evenly over the bottom of the prepared baking dish.
- Sprinkle half of the chopped peanut butter cups over the peanut butter layer.
- Pour the sweetened condensed milk evenly over the candy layer.
- Sprinkle the dry chocolate cake mix evenly over the top. Do not mix.
- Drizzle the melted butter over the cake mix, covering as much surface as possible.
- Sprinkle the milk chocolate chips and the remaining chopped peanut butter cups over the top.
- Bake for 35–40 minutes, or until the top is bubbly and slightly crisp.
- Allow the cake to cool for 10–15 minutes before serving. Serve warm, topped with whipped cream or vanilla ice cream if desired.
Notes
- For a richer flavor, consider using dark chocolate chips instead of milk chocolate.
- Make sure not to mix the cake mix with the other ingredients for the best texture.
- Prep Time: 15 minutes
- Cook Time: 35-40 minutes
- Category: Dessert
- Method: Baking
- Cuisine: American
Nutrition
- Serving Size: 1 slice
- Calories: 400
- Sugar: 32g
- Sodium: 180mg
- Fat: 20g
- Saturated Fat: 10g
- Unsaturated Fat: 8g
- Trans Fat: 0g
- Carbohydrates: 47g
- Fiber: 2g
- Protein: 6g
- Cholesterol: 30mg


