Introduction to Oreo Chocolate Mousse Pie
Ah, the sweet chaos of life! Well, I know how busy your average home cook’s day can be, with work, family or ‘chosen family,’ and to-do lists a mile or so long. Somewhere amid all that, time simply must be carved out for fun. And that’s where the Oreo Chocolate Mousse Pie comes into play—it’s my secret weapon to make any old day a special occasion! This dessert is not a feast provided on the palate alone, but is a meal that brings smiles and satisfaction. Imagine cutting into this creamy, chocolatey delight and hearing the delighted ‘oohs’ and ‘aahs’ from those who matter to you most. Quick. Easy. Oh so decadent.
Why You’ll Love This Oreo Chocolate Mousse Pie
This Oreo Chocolate Mousse Pie is a game changer for busy moms and professionals alike! It takes only 15 minutes to prepare, leaving you time for other tasks. The rich chocolate flavor satisfies sweet cravings without complicated steps. Plus, it’s a crowd-pleaser—everyone will be asking for seconds! With this pie, you can effortlessly impress guests or treat your family to a special dessert that feels indulgent yet simple.
Ingredients for Oreo Chocolate Mousse Pie
Let’s gather our ingredients and dive into this chocolatey wonder! Here’s what you’ll need for your Oreo Chocolate Mousse Pie:
- Chocolate instant pudding mix: This forms the luscious base of your mousse, giving it that rich chocolate flavor.
- Whole milk: Use it to blend perfectly with the pudding, creating a creamy consistency that’s simply irresistible.
- Heavy whipping cream: Whipping cream adds a luxurious, velvety texture that makes this dessert truly divine.
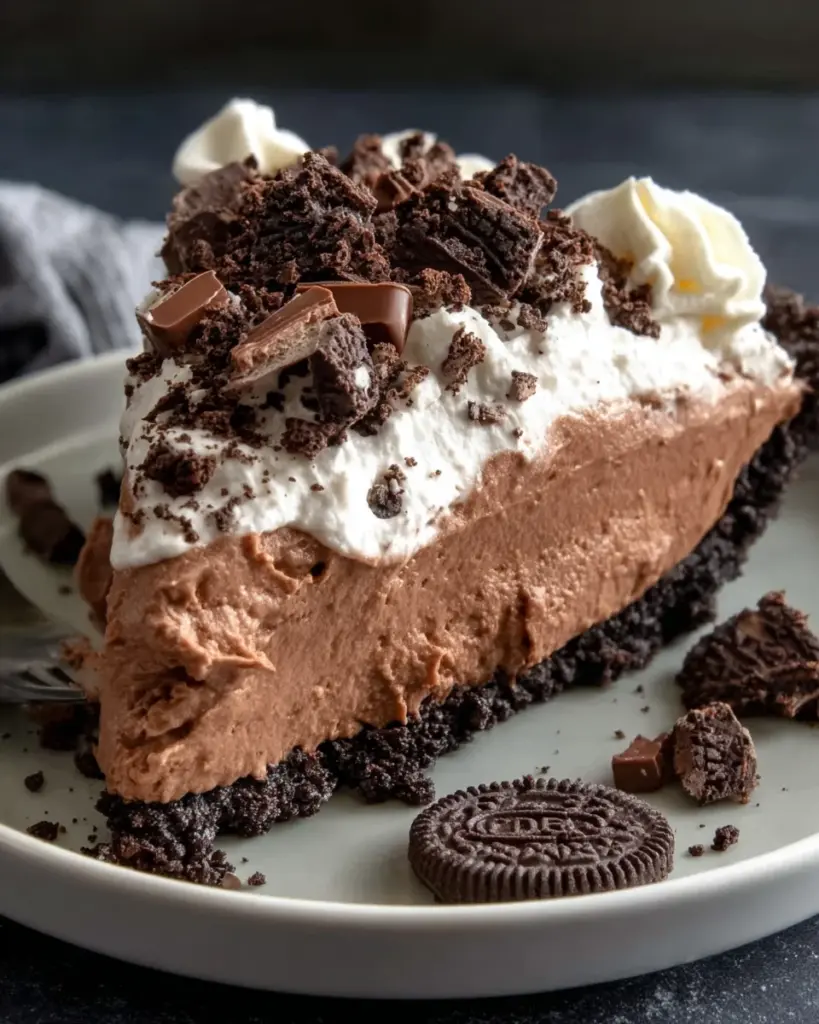
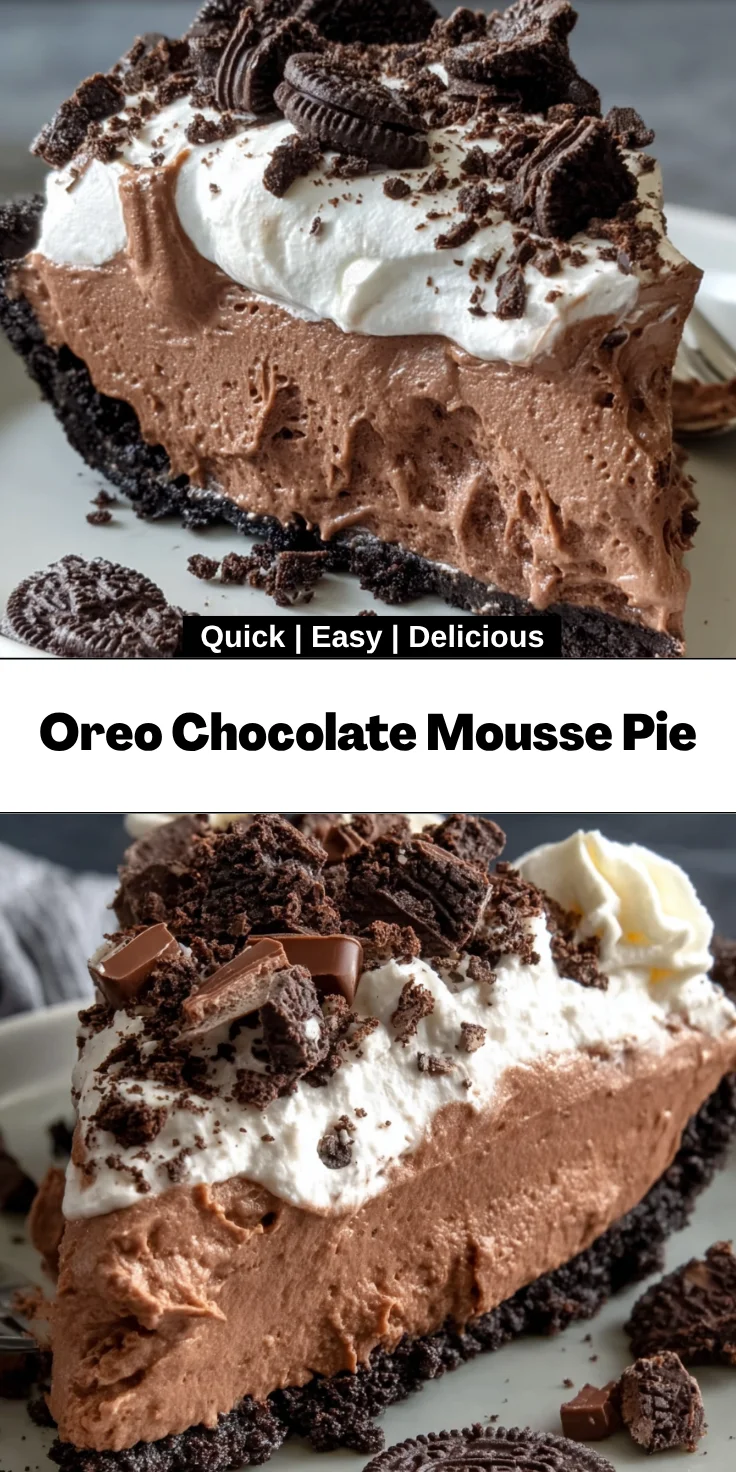
- Oreo cookies: Of course, these classic cookies add depth and a delightful crunch to the mousse. They also get crushed into the filling to enhance the flavor.
- Pre-made chocolate pie crust: For convenience, a store-bought crust saves time. But feel free to use a homemade crust if you’re feeling adventurous!
- Cool Whip: This fluffy topping adds sweetness and lightness, balancing out the richness of the mousse.
- Hershey’s chocolate bar: Shaved chocolate is the ultimate garnish! It elevates the presentation and adds extra chocolatey goodness on top.
Remember, precise quantities are located at the bottom of the article for your convenience. Enjoy gathering these delicious ingredients, and get ready to create a dessert that will make your kitchen feel like a five-star restaurant!
How to Make Oreo Chocolate Mousse Pie
Let’s get our hands dirty and bring this Oreo Chocolate Mousse Pie to life! Follow my simple steps to achieve chocolate perfection that your whole family will love.
Step 1: Prepare the Filling
In a large mixing bowl, combine the chocolate pudding mix with the milk and heavy whipping cream. I like to use a hand mixer because it’s quick and effective. Beat everything together until it thickens up nicely. Feel free to sneak a taste—because who can resist that chocolatey goodness?
Now, don’t forget to reserve some of those crushed Oreos for garnish. Fold the rest of the crushed Oreos into the mousse mixture. This will give your pie that magical crunch that complements the creamy filling so well!
Step 2: Assemble the Pie
Carefully pour the mousse mixture into your pre-made chocolate pie crust. Make sure to spread it evenly for that picture-perfect look. Use a spatula to smooth the surface—this not only makes it pretty but also ensures that every bite is deliciously uniform!
Step 3: Add the Toppings
Next comes the fun part—toppings! Grab your tub of Cool Whip and spread it evenly over the mousse layer. It’s like a fluffy cloud of sweet goodness that’ll get your mouth watering.
Now, sprinkle the reserved crushed Oreos and shaved chocolate on top. This adds visual appeal and gives an extra kick of flavor. It’s impossible to resist!
Step 4: Chill the Pie
Time to let the magic happen! Place the pie in the refrigerator for about 3-4 hours. This chilling time allows everything to set properly. Trust me, patience is key here. The longer you let it chill, the better the texture will be!
Step 5: Serve and Enjoy
Once your pie is set, it’s time to slice and serve! Imagine the joy on your family’s faces as they dive into this chocolate dream. Pair it with a scoop of vanilla ice cream if you want to level up the indulgence. Enjoy every delicious bite!
Tips for Success
- Chill the pie thoroughly for a creamy texture and better flavor.
- For a fun twist, try using different flavored instant pudding mixes.
- Use a sharp knife for clean slices, ensuring each piece looks gorgeous.
- Keep the pie covered in the fridge to maintain freshness.
- Feel free to mix in extra crushed Oreos for added crunch throughout!
Equipment Needed
- Large mixing bowl: Essential for combining the pudding and cream; a mixing pitcher works in a pinch.
- Hand mixer: Ideal for quick mixing; you can use a whisk or spoon but it’ll require more elbow grease!
- Spatula: Perfect for spreading and smoothing; a butter knife can also do the trick.
- Refrigerator: Key for chilling the pie; an icebox is a great alternative if the fridge is full.
Variations of Oreo Chocolate Mousse Pie
- Mint Oreo Mousse Pie: Swap regular Oreos for mint-flavored ones to add a refreshing twist!
- Peanut Butter Delight: Fold in some creamy peanut butter into the mousse for a rich, nutty flavor that pairs beautifully with chocolate.
- Dairy-Free Option: Substitute almond milk and coconut whipped cream for a dairy-free treat that everyone can enjoy.
- Lower Sugar Version: Replace regular pudding mix with sugar-free chocolate pudding for a lighter option.
- Fruit Layer: Add a layer of fresh raspberries or strawberries on top of the mousse for a burst of fruity flavor and color.
Serving Suggestions for Oreo Chocolate Mousse Pie
- Pair with fresh berries: Serve alongside strawberries or raspberries for a burst of freshness.
- Ice cream delight: A scoop of vanilla or cookies and cream ice cream complements the pie perfectly.
- Elegant presentation: Garnish individual slices with mint sprigs for a pop of color.
- Chocolate drizzle: A drizzle of chocolate sauce over the top enhances that indulgent look.
FAQs about Oreo Chocolate Mousse Pie
As I’ve chatted with many enthusiastic bakers, a few questions always pop up when it comes to making an Oreo Chocolate Mousse Pie. Here are some answers to help you out!
Can I make this pie in advance?
Absolutely! This pie can be made up to a day ahead. Just make sure it’s well-covered in the fridge to stay fresh.
How do I store leftovers?
Leftovers can be stored in an airtight container in the refrigerator. They should be enjoyed within 3 days to savor the delightful texture.
Can I freeze Oreo Chocolate Mousse Pie?
I wouldn’t recommend freezing it, as the cream may change texture once thawed. It’s best enjoyed fresh after chilling.
What can I substitute for Cool Whip?
If you prefer homemade, whipped heavy cream works beautifully! Just whip it until soft peaks form, and you’ll have a delicious topping.
Is there a gluten-free version of this pie?
You can easily make a gluten-free version by using gluten-free Oreos and a gluten-free crust. It’ll be just as delightful!
Final Thoughts
There’s something incredibly rewarding about creating an Oreo Chocolate Mousse Pie in your own kitchen. It’s more than just a dessert; it’s a canvas for your creativity and love. The smiles and satisfied sighs from family and friends make every moment of preparation worthwhile. This pie allows you to share joy and sweetness on a busy weekday or special occasion. So grab those Oreos, stir up some magic, and let this pie bring happiness and a delightful end to your day. Enjoy every slice and remember—the best moments are often the sweetest!
Print
Oreo Chocolate Mousse Pie
- Total Time: 3-4 hours (chilling time)
- Yield: 8 servings 1x
- Diet: Vegetarian
Description
A rich and creamy Oreo Chocolate Mousse Pie that combines chocolate pudding with crushed Oreo cookies for a decadent dessert experience.
Ingredients
- 2 boxes (3.4 oz each) chocolate instant pudding mix
- 2 cups whole milk
- 2 cups heavy whipping cream
- 15 Oreo cookies, crushed
- 1 pre-made 9-inch chocolate pie crust
- 1 tub (8 oz) cool whip (for topping)
- 1 Hershey’s chocolate bar, shaved (for topping)
Instructions
- In a large mixing bowl, combine both packets of instant chocolate pudding mix, milk, and heavy whipping cream. Use a hand mixer to beat the ingredients until the mixture thickens. Reserve some crushed Oreos for garnish, then fold the remaining Oreos into the mousse mixture.
- Pour the mousse mixture into the pre-made chocolate pie crust and spread evenly.
- Top with cool whip, spreading it out in an even layer.
- Garnish with the reserved crushed Oreos and shaved chocolate.
- Place the pie in the refrigerator for 3-4 hours to set before serving.
- Slice and enjoy!
Notes
- Make sure to chill the pie adequately for the best texture.
- Can substitute homemade crust if preferred.
- For a chocolate lover’s variation, add more shaved chocolate on top.
- Prep Time: 15 minutes
- Cook Time: 0 minutes
- Category: Dessert
- Method: Refrigeration
- Cuisine: American
Nutrition
- Serving Size: 1 slice
- Calories: 450
- Sugar: 30g
- Sodium: 250mg
- Fat: 30g
- Saturated Fat: 15g
- Unsaturated Fat: 5g
- Trans Fat: 0g
- Carbohydrates: 45g
- Fiber: 2g
- Protein: 6g
- Cholesterol: 50mg


