Introduction to Mini Cannoli Cups Delight
Are you looking for an easy yet impressive dessert? Look no further than these Mini Cannoli Cups Delight! As a busy mom myself, I know that finding the perfect treat can be a challenge. With their crispy shells and creamy filling, these little wonders are sure to delight your family and impress your guests. Whether you’re celebrating a special occasion or just indulging on a regular Tuesday, these mini cannolis are the perfect solution. They offer a taste of Italy without the stress of complicated baking techniques. Let me take you on this delicious journey!
Why You’ll Love This Mini Cannoli Cups Delight
These Mini Cannoli Cups Delight aren’t just adorable; they’re incredibly easy to make! Perfect for busy weeks, they come together in no time. The combination of a crispy shell and a rich, creamy filling creates a burst of flavor that dances on your palate. Plus, they’re versatile! You can customize them to fit any occasion, making them an instant crowd-pleaser at family gatherings or casual get-togethers. Who could resist that?
Ingredients for Mini Cannoli Cups Delight
Gathering quality ingredients is half the fun of creating these delightful treats. Here’s what you’ll need:
- Whole-milk ricotta cheese: This creamy base is what gives the filling its rich texture. Make sure to drain it well to avoid any watery surprises.
- Powdered sugar: This adds sweetness and helps achieve that smooth texture in the filling.
- Granulated sugar: A touch of this sugar enhances the overall sweetness without being overwhelming.
- Citrus zest (orange or lemon): Just a teaspoon adds a refreshing brightness, elevating the flavor profile of your filling.
- Vanilla extract: A classic flavor enhancer that adds warmth and complexity to your cannoli cups.
- Refrigerated pie crusts: These save you time while providing that flaky, golden shell. Feel free to make your own if you’re feeling adventurous.
- Turbinado sugar: This coarse sugar not only gives the crust a nice crunch but also a hint of caramelization during baking.
- Ground cinnamon: Adds a sweet and warm spice that makes these treats even more inviting.
- Miniature semisweet chocolate chips or chopped pistachios: For garnish, these toppings add texture and flavor, and you can choose whichever best suits your palate.
- Additional powdered sugar: A light dusting on the finished cannoli cups gives them a polished and elegant look.
You can find the exact quantities of these delicious ingredients at the end of this article, ready for you to print. Happy cooking!
How to Make Mini Cannoli Cups Delight
Creating these Mini Cannoli Cups Delight is like painting a masterpiece, one tasty step at a time. Ready to roll? Let’s dive into the process, and I’ll guide you through every delicious detail!
Step 1: Preheat and Prepare Your Workspace
First, preheat your oven to 220°C. It’s important to get that heat just right for perfect baking.
Next, dust your work surface lightly with flour. This will help the dough from sticking. Trust me, this little step makes a big difference when you’re rolling out the crust!
Step 2: Prepare the Pie Crusts
Unroll those refrigerated pie crusts onto your floured surface. They should feel nice and soft.
Sprinkle them evenly with turbinado sugar and ground cinnamon. The sweet scent will already start to tickle your taste buds.
Now, gently roll over the crusts with a rolling pin to press that sugar mixture in. This simple act transforms your crust into something extra special.
Step 3: Cut Our Cannoli Cups
Using a 6.5 cm round cookie cutter, cut circles out of the prepared dough. Don’t be afraid to re-roll any scraps to get around 48 circles. Your mini cannoli cups will thank you!
Now, gently nestle each round into an ungreased mini muffin tin. Press down lightly to form that charming cup shape, ensuring enough space for our delectable filling.
Step 4: Bake the Cups
Pop the muffin tin into the preheated oven. Bake for about 10 minutes, or until golden brown.
Keep an eye on them; we want that perfect golden hue. Let them cool in the pan for 15 minutes. Then, transfer them to a wire rack and cool completely. Patience is key here!
Step 5: Make the Creamy Filling
In a large mixing bowl, combine the drained ricotta, powdered sugar, granulated sugar, citrus zest, and vanilla extract. Beat on medium speed until your filling becomes creamy and smooth.
Transfer this luscious mixture into a large zip-top bag. Seal it tightly and refrigerate until you’re ready to pipe it into the cups. The chilling helps set the flavors and makes it easier to fill.
Step 6: Assemble and Garnish
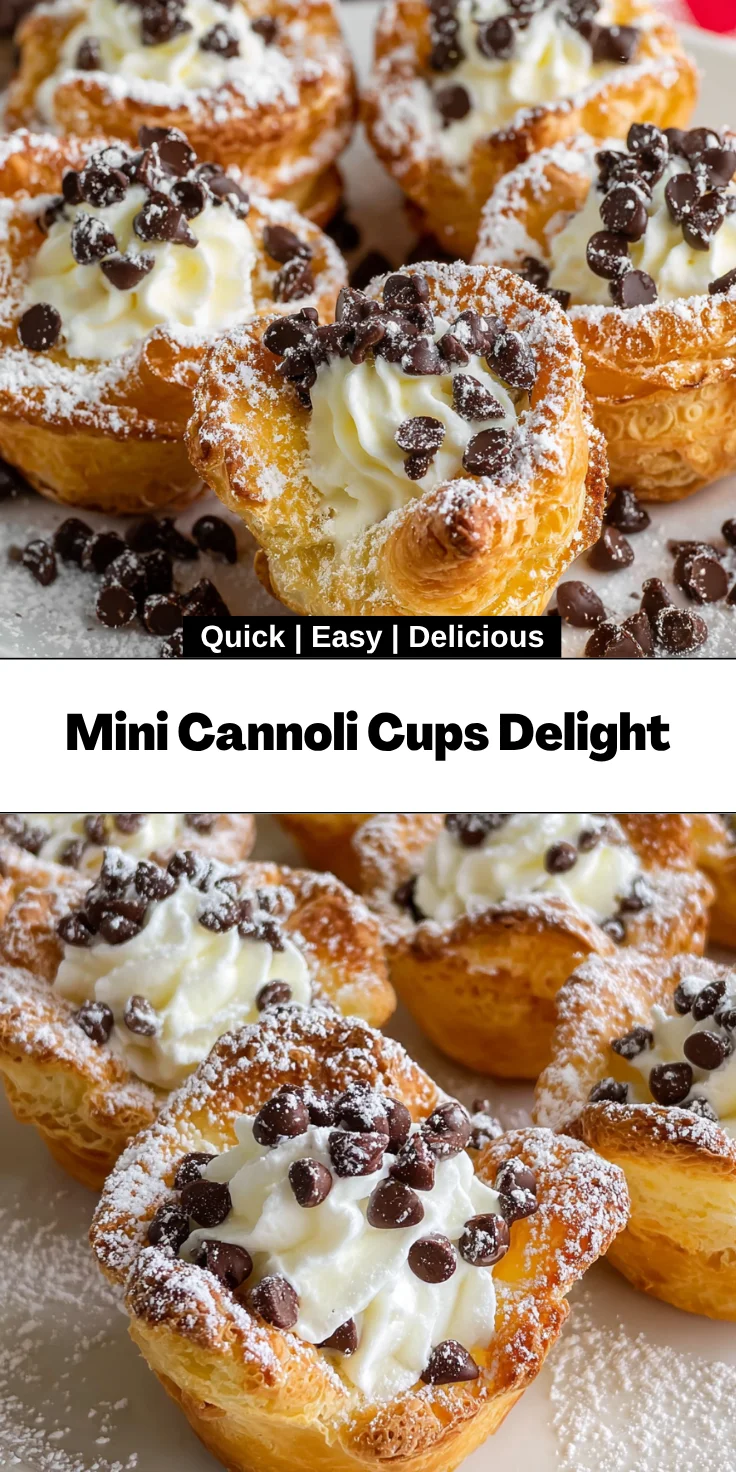
When it’s time to serve, snip one corner off the zip-top bag. Pipe about 1 tablespoon of that heavenly filling into each cooled pastry cup.
To finish, sprinkle them with miniature chocolate chips or chopped pistachios for that added crunch. A light dusting of powdered sugar on top gives the finished product a beautiful look.
Serve these mini cannoli cups immediately for optimal texture, and watch as everyone smiles in delight!
Tips for Success
- Ensure your ricotta is well-drained to avoid a soggy filling.
- Prepare the pastry cups in advance, but fill them just before serving for maximum crunch.
- Experiment with different citrus zests for a unique twist.
- Cover any leftover filling for up to two days in the fridge, perfect for snacking!
- Use your favorite toppings to make your Cannoli Cups uniquely yours.
Equipment Needed
- Mini muffin tin: Essential for shaping your cannoli cups. A standard muffin tin works too, just adjust the baking time.
- Rolling pin: Helps to roll out the pie crusts smoothly. A wine bottle can serve as a fun alternative!
- Cookie cutter: Necessary for cutting dough circles. A glass or jar can work in a pinch!
- Mixing bowl: Use a large one for your filling. Any bowl will do if it’s big enough to hold everything!
- Zip-top bag: Perfect for piping your filling. A pastry bag can be used if you have one handy!
Variations of Mini Cannoli Cups Delight
- Chocolate Hazelnut Filling: Swap out the ricotta for hazelnut spread for a rich and indulgent twist.
- Fruit-Infused Filling: Incorporate mashed ripe bananas or pureed strawberries into the ricotta mixture for a fresh fruity flavor.
- Dairy-Free Option: Use coconut cream or a dairy-free ricotta substitute to create a delicious version suitable for lactose intolerant guests.
- Nut-Free Version: Leave out the pistachios and use mini chocolate chips or crushed graham crackers as a topping.
- Spiced Filling: Add a pinch of nutmeg or cardamom to the filling for an aromatic touch that will surprise your taste buds.
Serving Suggestions for Mini Cannoli Cups Delight
- Pair these delightful cannoli cups with a rich espresso or creamy cappuccino for the perfect coffee break.
- Serve alongside a fresh fruit platter for a beautiful contrast of flavors.
- Arrange on a decorative cake stand to elevate their elegance during gatherings.
- Drizzle a chocolate sauce or raspberry coulis on the plate for a stunning presentation.
- Consider a dusting of edible glitter for a festive touch at celebrations!
FAQs about Mini Cannoli Cups Delight
Can I make Mini Cannoli Cups Delight ahead of time? Absolutely! You can bake the pastry cups in advance and store them in an airtight container. Just fill them with the creamy ricotta filling right before serving to ensure crispiness.
What type of ricotta cheese should I use? I recommend using whole-milk ricotta for the best flavor and creaminess. Just make sure it’s well-drained for a smooth filling, avoiding any watery texture.
Can I customize the toppings on my Mini Cannoli Cups? Yes! Feel free to switch things up. Use mini chocolate chips, chopped pistachios, or even a dusting of crushed graham crackers to make them uniquely yours.
Is there a gluten-free option for the pie crusts? Definitely! You can use gluten-free pie crusts available at most grocery stores, or make your own using gluten-free flour blends. Your mini cannoli cups will still turn out delightful!
Can I freeze the Mini Cannoli Cups Delight? I wouldn’t recommend freezing the filled cannoli cups since the pastry can become soggy. However, you can freeze the baked cups. Just thaw and fill them fresh when ready to serve!
Final Thoughts
Bringing these Mini Cannoli Cups Delight to life in your kitchen is more than just baking; it’s creating cherished memories and spreading joy. With every crispy shell filled with that luscious, creamy goodness, you’ll feel a wave of satisfaction as your loved ones scoop them up with glee.
Not only do they look beautiful on any table, but they taste heavenly too. So, whether it’s a family gathering or a simple weeknight treat, these mini desserts will surely earn a special place in your heart and on your dessert table.
Print
Mini Cannoli Cups Delight
- Total Time: 50 minutes
- Yield: 48 mini cannoli cups 1x
- Diet: Vegetarian
Description
A delightful mini dessert that features a creamy filling in a crispy shell, perfect for impressing your guests.
Ingredients
- 425 g whole-milk ricotta cheese, drained
- 60 g powdered sugar
- 25 g granulated sugar
- 1 teaspoon finely grated orange or lemon zest
- 0.5 teaspoon vanilla extract
- 2 pieces refrigerated pie crusts, softened
- 36 g turbinado sugar
- 1 teaspoon ground cinnamon
- 32 g miniature semisweet chocolate chips or finely chopped pistachios
- Additional powdered sugar, for dusting
Instructions
- Preheat the oven to 220°C. Dust a work surface lightly with flour.
- Unroll the pie crusts and sprinkle evenly with turbinado sugar and ground cinnamon. Roll gently with a rolling pin to adhere the sugar mixture to the dough.
- Using a 6.5 cm round cookie or biscuit cutter, cut circles from the prepared dough. Re-roll dough scraps as needed to yield approximately 48 circles.
- Nestle each round into an ungreased mini muffin tin, pressing gently to form a cup shape.
- Bake in the preheated oven for 10 minutes, or until golden brown. Let the pastry cups cool in the pan for 15 minutes, then remove to a wire rack to cool completely.
- In a large mixing bowl, beat drained ricotta, powdered sugar, granulated sugar, citrus zest, and vanilla extract on medium speed until creamy and smooth.
- Transfer the filling to a large zip-top bag, seal, and refrigerate until required.
- When ready to serve, snip one corner of the bag and pipe about 1 tablespoon of filling into each cooled pastry cup.
- Sprinkle with mini chocolate chips or chopped pistachios and dust lightly with additional powdered sugar.
- Serve mini cannoli cups immediately for optimal texture.
Notes
- Make sure the ricotta is well-drained to avoid a watery filling.
- These can be prepared ahead of time, just fill them right before serving to maintain the crispiness of the cups.
- Feel free to customize the garnish with your favorite toppings.
- Prep Time: 40 minutes
- Cook Time: 10 minutes
- Category: Dessert
- Method: Baking
- Cuisine: Italian
Nutrition
- Serving Size: 1 cannoli cup
- Calories: 90
- Sugar: 6 g
- Sodium: 30 mg
- Fat: 3 g
- Saturated Fat: 1 g
- Unsaturated Fat: 2 g
- Trans Fat: 0 g
- Carbohydrates: 13 g
- Fiber: 0 g
- Protein: 2 g
- Cholesterol: 8 mg