Introduction to Halloween Oreo Roll
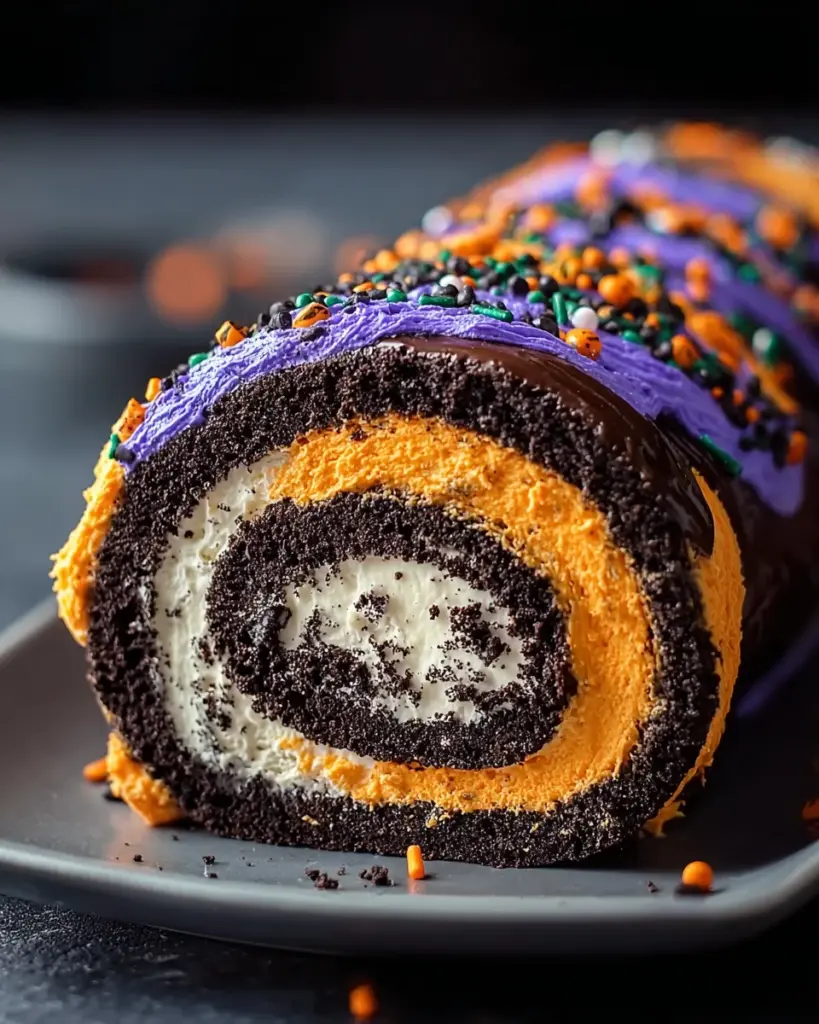
With the changing leaves and cool, crisp air, it’s time to fully embrace all things spooky. And what better way than with a Halloween Oreo Roll? The fun flavors of Halloween Oreos and the cream filling surely do not disappoint whoever your audience may be – be it family members or friends. I mean, as a mom – or mom professional – I know how crazy life can get so sometimes you need something fast but really cute when you want to bring a little holiday spirit to your day but don’t want to spend hours in the kitchen.
Why You’ll Love This Halloween Oreo Roll
This Halloween Oreo Roll is not just a dessert; it’s a celebration of flavors that combines nostalgia and ease. You’ll adore how quickly it comes together, thanks to its no-bake method. The rich, creamy filling perfectly complements the iconic crunchy Oreos, making each bite a delightful surprise. Plus, it’s easy to customize, so the whole family can join in on the fun while you turn a busy day into a festive treat.
Ingredients for Halloween Oreo Roll
To whip up your spooky Halloween Oreo Roll, you’ll need a few simple ingredients that bring festivity and fun straight to your kitchen. Let’s take a look at what you’ll be gathering:
- Halloween Oreos: Opt for the orange crème variety for that festive flair. These cookies will be the star of the show!
- Cream Cheese: Use full-fat for a richer, creamier texture. It blends beautifully with the Oreos, creating a smooth filling.
- Vanilla Extract: A teaspoon adds a warm flavor. Don’t hesitate to swap it with almond extract for a delightful twist!
- Halloween-Colored Frosting: Choose shades like purple, green, or orange. This adds a vibrant touch to your roll, making it visually appealing.
- Sprinkles: Go with Halloween-themed sprinkles for that fun crunch and festive look. They’ll make your dessert pop!
- Candy Eyes: These playful decorations bring a spooky element. They’re perfect for surprising your guests!
- Chocolate Drizzle: A rich drizzle elevates the dessert. It adds a touch of decadence, making each slice even more indulgent.
While these ingredients come together to create a magical treat, you can always check the exact quantities at the bottom of the article for easy printing. Let’s get ready to bake up some fun!
How to Make Halloween Oreo Roll
Creating your own Halloween Oreo Roll is a delightful adventure that’s easier than you might think. It’s all about those simple steps, and before you know it, you’ll have a festive dessert ready to impress! Let’s dive right in:
Step 1: Crush the Oreos
Start by placing your Halloween Oreos in a zip-top bag. Use a rolling pin or your hands to crush them into a fine powder. Not only is this fun, but it sets the base for our delightful dessert. The smell of crushed Oreos will fill your kitchen, blending nostalgia and excitement!
Step 2: Mix the Ingredients
In a mixing bowl, combine the crushed Oreos with cream cheese and vanilla extract. Use a spatula or mixer to blend until smooth. This creamy mixture is the heart of your roll, and trust me, you’ll want to taste it! It should be well combined, so no bits of cream cheese remain.
Step 3: Shape into a Rectangle
Next, lay a piece of parchment paper on a flat surface. Spoon the Oreo mixture onto the paper and shape it into a rectangle, about 10×14 inches. This is where the magic starts, as you visualize rolling up your festive creation. Don’t worry if it’s not perfect—it will still taste divine!
Step 4: Spread Frosting
Grab your Halloween-colored frosting and spread it evenly over the Oreo mixture. Make sure to cover all corners to create a beautiful layer of color. This is your chance to get creative! Use a knife to create swirls or patterns if you like.
Step 5: Roll into a Log
Carefully, using the parchment paper, start rolling the mixture into a log shape, egg roll style. Tightly roll it up to keep the filling from spilling out. Once you reach the end, press the edges to seal and add a bit of extra frosting if it helps. It’s like wrapping a cozy Halloween gift!
Step 6: Chill the Roll
Now, it’s time to chill! Place the wrapped roll in the refrigerator for at least an hour or freeze it for about 20 minutes. This step helps the roll firm up, making slicing so much easier. While you wait, why not whip up some matching Halloween treats to go with it?
Step 7: Slice the Roll
Once chilled, take your roll out and grab a warm knife. Slice it into 1-inch rounds for delicious, bite-sized pieces. The contrast of the dark Oreos and bright frosting will be visual magic! Each slice reveals a spooky surprise, perfect for any Halloween gathering.
Step 8: Decorate Before Serving
Finally, it’s decoration time! Sprinkle optional Halloween-themed sprinkles over the top. Add candy eyes for a playful touch or drizzle chocolate for that added decadence. This final flourish makes your Halloween Oreo Roll not only tasty but also an eye-catching centerpiece.
Tips for Success
- Use a food processor to crush Oreos quickly and evenly.
- Let cream cheese soften at room temperature for smoother mixing.
- Feel free to customize the frosting colors based on your party theme!
- When rolling, use the parchment paper as a guide to keep it even.
- Slice with a warm knife to avoid any crumbling.

Equipment Needed
- Mixing Bowl: A standard bowl works, but use a glass bowl for easy viewing.
- Spatula or Mixer: A spatula works fine, but an electric mixer saves time.
- Parchment Paper: Wax paper will do, but parchment is best for sticking.
- Sharp Knife: A serrated knife slices cleanly without crumbling.
Variations
- Gluten-Free Option: Swap Halloween Oreos with gluten-free cookies for a delicious alternative that everyone can enjoy.
- Dairy-Free Option: Use vegan cream cheese and dairy-free frosting to make this dessert suitable for those avoiding dairy.
- Nutty Twist: Add crushed nuts, like pecans or walnuts, to the Oreo mixture for added crunch and flavor.
- Fruit Flavor: Mix in some chopped strawberries or raspberries for a fruity twist in the creamy filling.
- Chocolate Lovers: Incorporate chocolate chips into the mixture for an extra chocolatey delight!
Serving Suggestions
- Pair your Halloween Oreo Roll with a glass of cold milk or a cup of hot cocoa for a comforting treat.
- Serve it alongside spooky-shaped cookies or pumpkin pie for a delightful dessert spread.
- Present slices on a colorful Halloween platter, garnished with themed decorations for extra flair!
FAQs about Halloween Oreo Roll
Can I prepare the Halloween Oreo Roll in advance?
Absolutely! You can prepare the roll up to two days ahead. Just make sure to store it in an airtight container in the refrigerator. This allows the flavors to meld beautifully!
What can I do if I don’t have Halloween Oreos?
No worries if Halloween Oreos aren’t available! You can substitute them with regular Oreos or any chocolate sandwich cookies you have on hand. The festive touch might change, but the taste will still be delicious!
How should I store the leftovers?
To keep your Halloween Oreo Roll fresh, store any leftovers in an airtight container in the fridge. It should stay tasty for up to three days, but let’s be honest—leftovers might be hard to come by!
Can I freeze the Halloween Oreo Roll?
Yes, you can freeze the roll! Just wrap it tightly in plastic wrap followed by foil. When you’re ready to enjoy it, simply thaw it in the refrigerator overnight before serving.
What other decorations can I use?
Get creative! Besides sprinkles and candy eyes, you could use themed chocolate shapes, colored whipped cream, or even edible glitter to elevate your Halloween Oreo Roll. It’s all about having fun!
Final Thoughts
Making a Halloween Oreo Roll is not just about crafting a dessert; it’s about creating joyful moments with family and friends. The anticipation of a chilling roll and the happiness of slicing into a vibrant treat can brighten any spooky gathering. Whether enjoyed at a cozy family dinner or a lively Halloween party, this dessert brings smiles and excitement. Plus, it serves as a perfect canvas for creativity. So, as the night darkens and the pumpkins glow, let your Halloween Oreo Roll be the star, enchanting all with its delightful taste and festive charm!
Print
Halloween Oreo Roll
- Total Time: 1 hour 20 minutes
- Yield: 12 servings 1x
- Diet: Vegetarian
Description
A delightful Halloween dessert roll made with Halloween Oreos and cream cheese, perfect for celebrating the spooky season.
Ingredients
- 24 cookies Halloween Oreos (opt for the orange crème version)
- 8 ounces Cream Cheese (full-fat cream cheese is ideal)
- 1 teaspoon Vanilla Extract (almond extract can be a delightful swap)
- 1 cup Halloween-Colored Frosting (choose shades like purple, green, or orange)
- 1 cup Sprinkles (Halloween-themed sprinkles)
- 1 cup Candy Eyes (for a playful, spooky effect)
- 1/2 cup Chocolate Drizzle (for a touch of decadence)
Instructions
- Crush the Oreos until they resemble a fine powder.
- Mix the crushed Oreos with cream cheese and vanilla extract until combined.
- Shape the mixture into a rectangle approximately 10×14 inches on parchment paper.
- Spread the Halloween-colored frosting evenly over the Oreo mixture.
- Roll the mixture tightly from one end into a log shape using parchment paper.
- Seal the roll and chill in the refrigerator for at least 1 hour or freeze for 20 minutes.
- Slice the roll into 1-inch rounds using a warm knife.
- Decorate with optional sprinkles, candy eyes, or chocolate drizzle before serving.
Notes
- Using full-fat cream cheese yields a creamier texture.
- Feel free to customize the frosting colors and decorations to your liking.
- Keep leftovers in an airtight container in the refrigerator for up to 3 days.
- Prep Time: 20 minutes
- Cook Time: 0 minutes
- Category: Dessert
- Method: No-bake
- Cuisine: American
Nutrition
- Serving Size: 1 slice
- Calories: 150
- Sugar: 12g
- Sodium: 90mg
- Fat: 7g
- Saturated Fat: 4g
- Unsaturated Fat: 2g
- Trans Fat: 0g
- Carbohydrates: 20g
- Fiber: 1g
- Protein: 2g
- Cholesterol: 30mg


