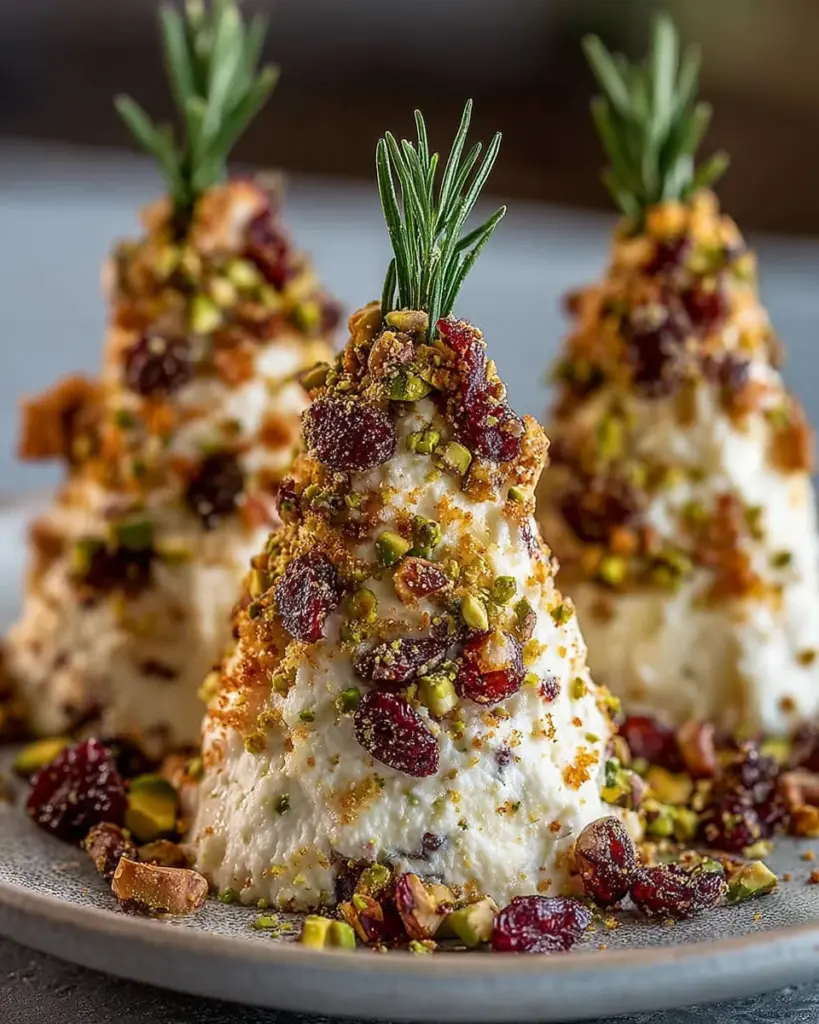
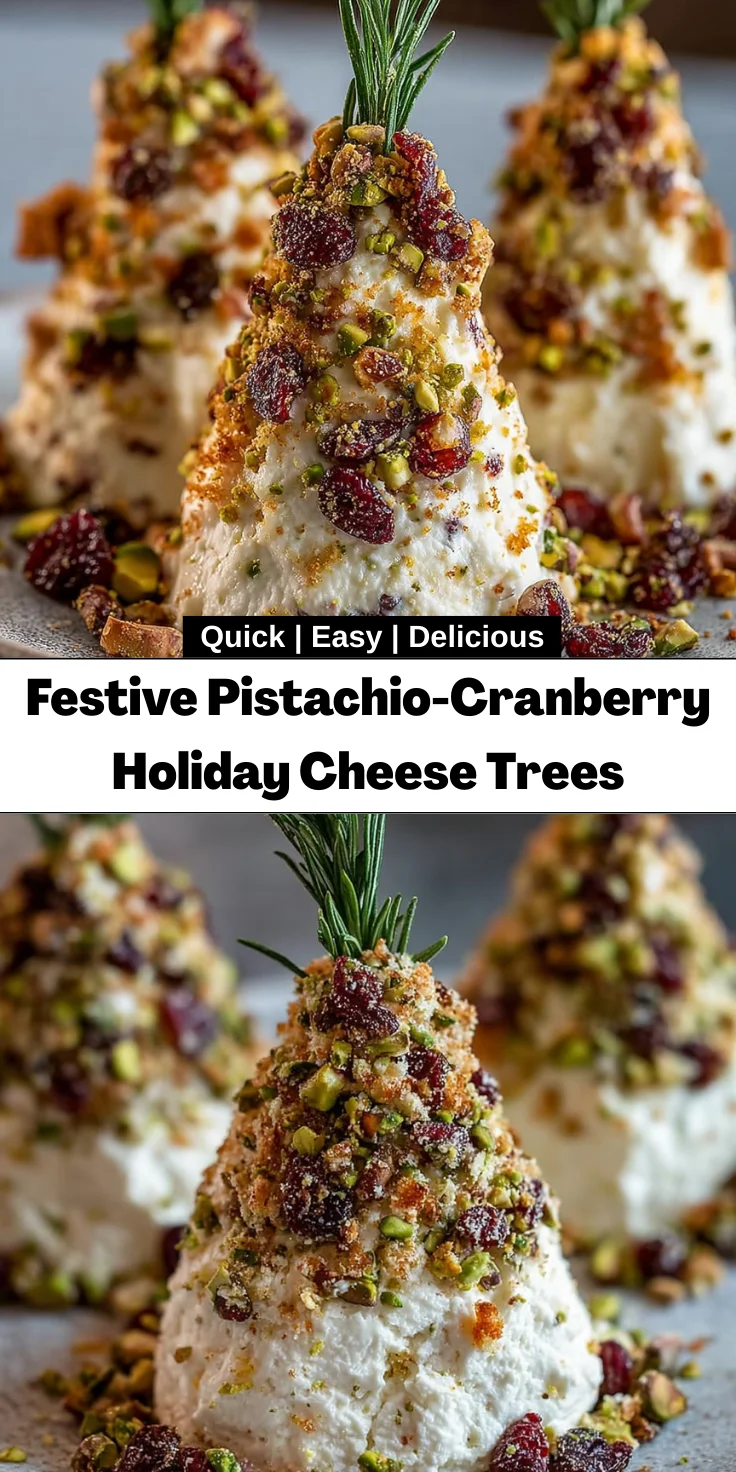
Introduction to Festive Pistachio-Cranberry Holiday Cheese Trees
As the holiday season approaches, I often find myself juggling a flurry of activities, from shopping to family gatherings. That’s why I adore making these Festive Pistachio-Cranberry Holiday Cheese Trees. They are not just visually striking; they also deliver on flavor without demanding hours in the kitchen. In just 30 minutes, you can whip up this charming appetizer that brings smiles to everyone around the table. Whether you’re hosting a cocktail party or just looking for a quick solution for a busy day, these delightful trees are bound to impress your loved ones!
Why You’ll Love This Festive Pistachio-Cranberry Holiday Cheese Trees
These Festive Pistachio-Cranberry Holiday Cheese Trees are the perfect blend of flavor and flair. They come together quickly, making them a lifesaver on those hectic days. The creamy, tangy cheese contrasted with the crunch of pistachios and sweetness of cranberries creates a delightful taste experience. Plus, they look stunning on any table, so you can elevate your holiday gatherings without breaking a sweat. It’s a win-win!
Ingredients for Festive Pistachio-Cranberry Holiday Cheese Trees
To craft these charming Festive Pistachio-Cranberry Holiday Cheese Trees, you’ll need a few key ingredients that come together like a well-rehearsed holiday choir. Let’s break them down:
- Cream cheese: The rich, creamy base that gives these cheese trees their deliciously smooth texture. Be sure to let it soften for easy mixing.
- Shredded sharp cheddar cheese: This adds a flavorful punch and a beautiful golden color, making your cheese trees pop with flavor.
- Finely chopped pistachios: These provide a lovely crunch and a nutty flavor. Feel free to use roasted pistachios for an added depth of taste.
- Finely chopped dried cranberries: Sweet and tart, they add a burst of color and a delightful contrast that perfectly balances the cheese.
- Honey: This helps to bind everything together while adding a touch of natural sweetness that rounds out the flavor profile.
- Garlic powder: A pinch of this adds depth and warmth without overwhelming the other flavors.
- Black pepper: Just a hint provides a nice undertone of spice, enhancing the cheese mix.
- Fresh rosemary sprigs: These are not only a beautiful garnish but also offer a fragrant herbal touch, perfect for holiday presentation.
If you want a bit more color, consider adding finely chopped red bell pepper for some extra crunch and radiance. You can find all the exact measurements for these ingredients at the bottom of the article, and of course, they are available for printing!
How to Make Festive Pistachio-Cranberry Holiday Cheese Trees
Creating these Festive Pistachio-Cranberry Holiday Cheese Trees is easier than you might think! With just a few simple steps, you can present a beautiful and tasty appetizer that will leave your guests raving. Let’s dive into the steps, and I promise, you’ll savor every moment of this joyful process.
Step 1: Prepare the Cheese Mixture
Start by grabbing a mixing bowl and adding the softened cream cheese, shredded sharp cheddar, honey, garlic powder, and black pepper. Using a fork or a hand mixer, blend everything together until the mixture is smooth and creamy. The goal is to achieve a light, airy texture that’s easy to mold. Take your time to ensure all the ingredients are well incorporated, which will create a delicious base for your cheese trees.
Step 2: Shape the Cheese Trees
Next, it’s time to shape your cheese mixture into adorable little trees! Divide the mixture into four equal portions and take one piece at a time. Roll it into a cone shape, ensuring the bottom is wider than the top for that classic Christmas tree look. Don’t worry if they’re not perfectly shaped; a little imperfection adds to the charm! Smooth the surface with your hands to create an appealing finish.
Step 3: Coat the Trees
Bring on the fun by rolling each cheese tree in your mixture of finely chopped pistachios and dried cranberries! Spread the mixture on a plate and gently roll each tree, pressing slightly to help the toppings stick. Make sure to cover all sides for a colorful, festive appearance. The crunchy texture of the pistachios combined with the sweet cranberries is a match made in holiday heaven!
Step 4: Garnish and Present
Now comes the finishing touch! Place your coated cheese trees on a beautiful serving platter. Insert a small sprig of fresh rosemary into the top of each tree; they resemble elegant tree toppers, don’t you think? This little detail transforms your appetizer into a festive centerpiece, setting the mood for an enchanting holiday gathering.
Step 5: Chill and Serve
Before serving, it’s best to chill your cheese trees in the refrigerator for about 30 minutes. This helps them firm up and keeps them looking great on your table. Once they’re chilled, they’re ready for all your holiday celebrations!
Tips for Success
- Ensure your cream cheese is fully softened for easy mixing; it makes a world of difference!
- Use fresh ingredients for the best flavor. Quality cheese and herbs are key!
- Don’t stress about making perfect shapes—rustic trees are charming and add character!
- Chill well before serving; it helps maintain their shape and enhances the flavors.
- Experiment with toppings! Try adding chopped nuts or colorful bell peppers for variation.
Equipment Needed
- Mixing bowl: A medium-sized bowl works well. If you don’t have one, a large plate can suffice for mixing.
- Fork or hand mixer: A fork is perfectly fine for blending. A hand mixer can make it easier for smoothness.
- Serving platter: Any flat dish will do! Use a festive plate to elevate the presentation.
- Measuring cups: Handy for ensuring you get your ingredient quantities right, but eyeballing works too!
Variations
- Cheese Selection: Swap out the sharp cheddar for goat cheese or feta for a tangy twist. This will give your trees a completely different flavor profile!
- Nuts Galore: If pistachios aren’t your favorite, try using chopped walnuts or almonds for a new crunch and taste. Each nut brings a unique crunch.
- Fruit Medley: Add some finely diced fresh apples or pears alongside the cranberries for a juicy bite. This creates a refreshing contrast in flavors.
- Herbal Infusion: Mix in chopped fresh herbs like chives or thyme to the cheese mixture for an aromatic twist that will elevate the dish.
- Spicy Kick: Introduce a pinch of cayenne pepper or red pepper flakes to the cheese mixture for those who enjoy a little heat in their appetizers.
Serving Suggestions
- Pair your cheese trees with an assortment of crackers for a delightful crunch.
- Add some sliced fresh fruits like apples or pears for a refreshing contrast.
- Serve alongside a glass of sparkling wine or holiday punch for a festive touch.
- Mix in seasonal greens like arugula for a pop of color and freshness.
- Display on a decorated serving board with twinkling lights for added charm!
FAQs about Festive Pistachio-Cranberry Holiday Cheese Trees
Let’s tackle some of the questions you might have about these delightful Festive Pistachio-Cranberry Holiday Cheese Trees. I’m here to help you navigate this cheese-filled adventure!
Can I make these cheese trees in advance?
Absolutely! You can prepare your cheese trees a day ahead of your gathering. Just store them in the refrigerator, and they’ll be ready to dazzle your guests when it’s time to serve. This makes for less stress on the actual day!
What can I serve with these cheese trees?
Serving these cheese trees with various accompaniments is a fantastic idea! Consider an assortment of crunchy crackers, fresh fruits, or even a simple green salad to balance out the richness. This variety allows your guests to mix and match for the perfect bite!
How can I store leftovers?
If you happen to have any leftovers (which is always a pleasant surprise), wrap them in plastic wrap or transfer them to an airtight container. They can be stored in the fridge for up to three days. Just know that the earlier you consume them, the fresher they’ll taste!
Can I use different nuts or dried fruits?
Definitely! Feel free to get creative with your toppings. Almonds, walnuts, or pecans could add a lovely twist. For the dried fruits, try apricots or cherries; they’ll lend a different flavor experience while maintaining that delightful crunch.
Are these cheese trees suitable for gluten-free diets?
Yes, indeed! The cheese trees themselves are gluten-free, but be cautious with what you serve alongside them. Select gluten-free crackers or fresh veggies for dipping to ensure everyone can enjoy this festive treat!
Final Thoughts
Creating these Festive Pistachio-Cranberry Holiday Cheese Trees is more than just making an appetizer; it’s about sharing joy, love, and a festive spirit with those you cherish. The smiles on your family’s faces as they dive into these delightful creations are priceless. Plus, it’s a great way to engage the kids in the kitchen—watching them roll the cheese trees and decorate them can be a fun bonding experience. So this holiday season, let your inner artist shine and impress your loved ones with these charming cheese trees. Enjoy every bite, and savor the moments together!
Print
Festive Pistachio-Cranberry Holiday Cheese Trees
- Total Time: 30 minutes
- Yield: 4 cheese trees 1x
- Diet: Vegetarian
Description
A delightful and festive cheese appetizer shaped like Christmas trees, combining rich cream cheese, sharp cheddar, crunchy pistachios, and sweet cranberries.
Ingredients
- 8 oz cream cheese, softened
- 1/2 cup shredded sharp cheddar cheese
- 1/4 cup shelled pistachios, finely chopped
- 1/4 cup dried cranberries, finely chopped
- 1 tbsp honey
- 1/2 tsp garlic powder
- 1/4 tsp black pepper
- Fresh rosemary sprigs for garnish
Instructions
- In a mixing bowl, combine softened cream cheese, shredded cheddar, honey, garlic powder, and black pepper. Mix until well blended and smooth.
- Divide the cheese mixture into 4 equal portions. Shape each portion into a cone to form a tree shape, smoothing the surface with your hands.
- Combine chopped pistachios and dried cranberries on a plate. Roll each cheese tree in the mixture, pressing gently to coat evenly.
- Place the coated cheese trees on a serving platter. Insert a small rosemary sprig at the top of each tree to resemble a tree topper.
- Chill in the refrigerator for at least 30 minutes before serving to firm up the shape.
Notes
- For a more colorful display, you can add some finely chopped red bell pepper along with cranberries.
- The cheese trees can be made a day ahead and stored in the refrigerator.
- Prep Time: 20 minutes
- Cook Time: 0 minutes
- Category: Appetizer
- Method: No-cook
- Cuisine: American
Nutrition
- Serving Size: 1 cheese tree
- Calories: 180
- Sugar: 2g
- Sodium: 300mg
- Fat: 14g
- Saturated Fat: 8g
- Unsaturated Fat: 5g
- Trans Fat: 0g
- Carbohydrates: 8g
- Fiber: 1g
- Protein: 6g
- Cholesterol: 30mg