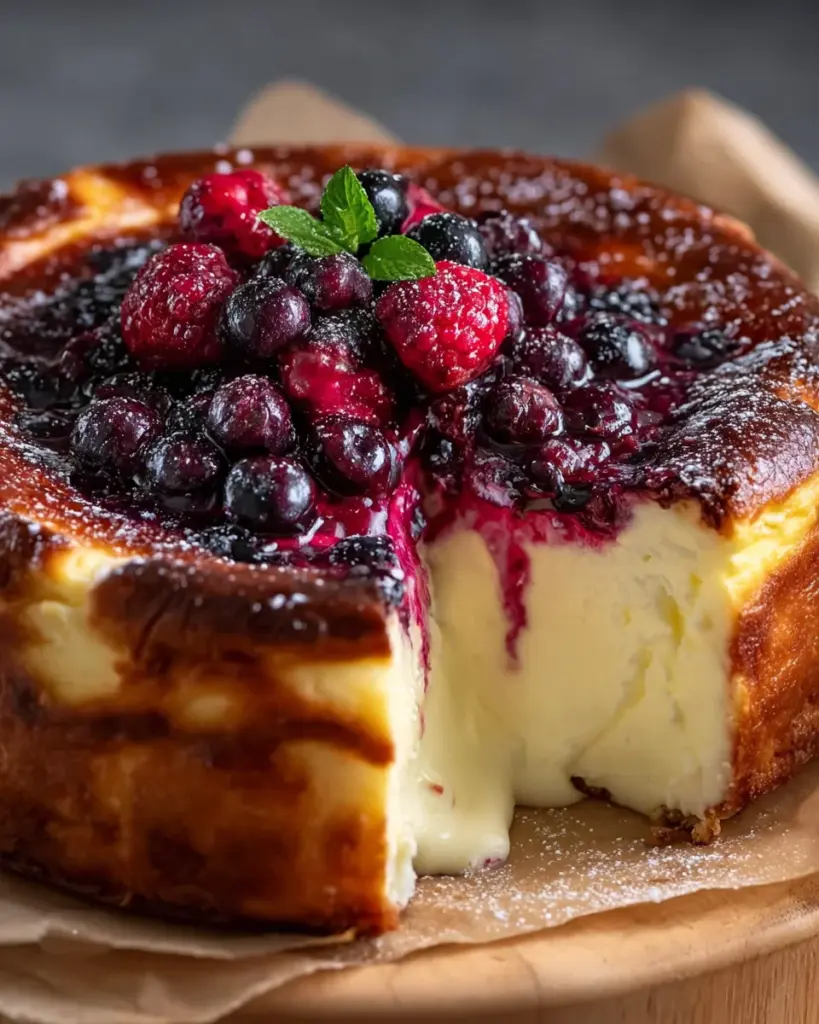
Introduction to Citrus Berry Burnt Cheesecake
There’s something magical about desserts that seem complicated but come together effortlessly. This Citrus Berry Burnt Cheesecake is just that—a stunning showstopper that will amaze your family and friends. Imagine the creamy, citrus-infused goodness contrasting beautifully with fresh berries on top. It’s the perfect treat for a busy day or a dinner party. With a little bit of prep, you can create a dessert that not only looks sophisticated but tastes heavenly. Trust me, this cheesecake will become a go-to recipe you whip out for any occasion!
Why You’ll Love This Citrus Berry Burnt Cheesecake
This Citrus Berry Burnt Cheesecake combines simplicity and flavor in the best way. You won’t need hours in the kitchen to impress your loved ones. With just a few steps, this rich, creamy dessert emerges from your oven looking beautifully charred and irresistible. Plus, the zesty citrus notes paired with sweet berries create a balanced taste that’s both refreshing and indulgent. It’s the perfect reward after a long day!
Ingredients for Citrus Berry Burnt Cheesecake
Gathering the ingredients for this Citrus Berry Burnt Cheesecake is like collecting treasures for a culinary adventure. Each component plays a vital role in creating that creamy, dreamy delight.
- Cream cheese: The star of the show! Softened cream cheese adds richness and the perfect texture.
- Granulated sugar: It sweetens the cheesecake just right, balancing the tanginess of the cream cheese.
- Vanilla extract: A splash of this aromatic essence enhances the sweet flavor profile.
- Pinch of salt: Just a touch helps elevate the overall flavors, preventing the cheesecake from tasting flat.
- Large eggs: Room temperature eggs provide stability and create a smooth custard-like texture.
- Citrus zest: Lemon or orange zest adds a burst of freshness, making each bite zingy and bright.
- Heavy cream: The secret to a luxuriously creamy consistency, giving the cheesecake its indulgent mouthfeel.
- All-purpose flour: This helps to bind the ingredients without making it overly dense.
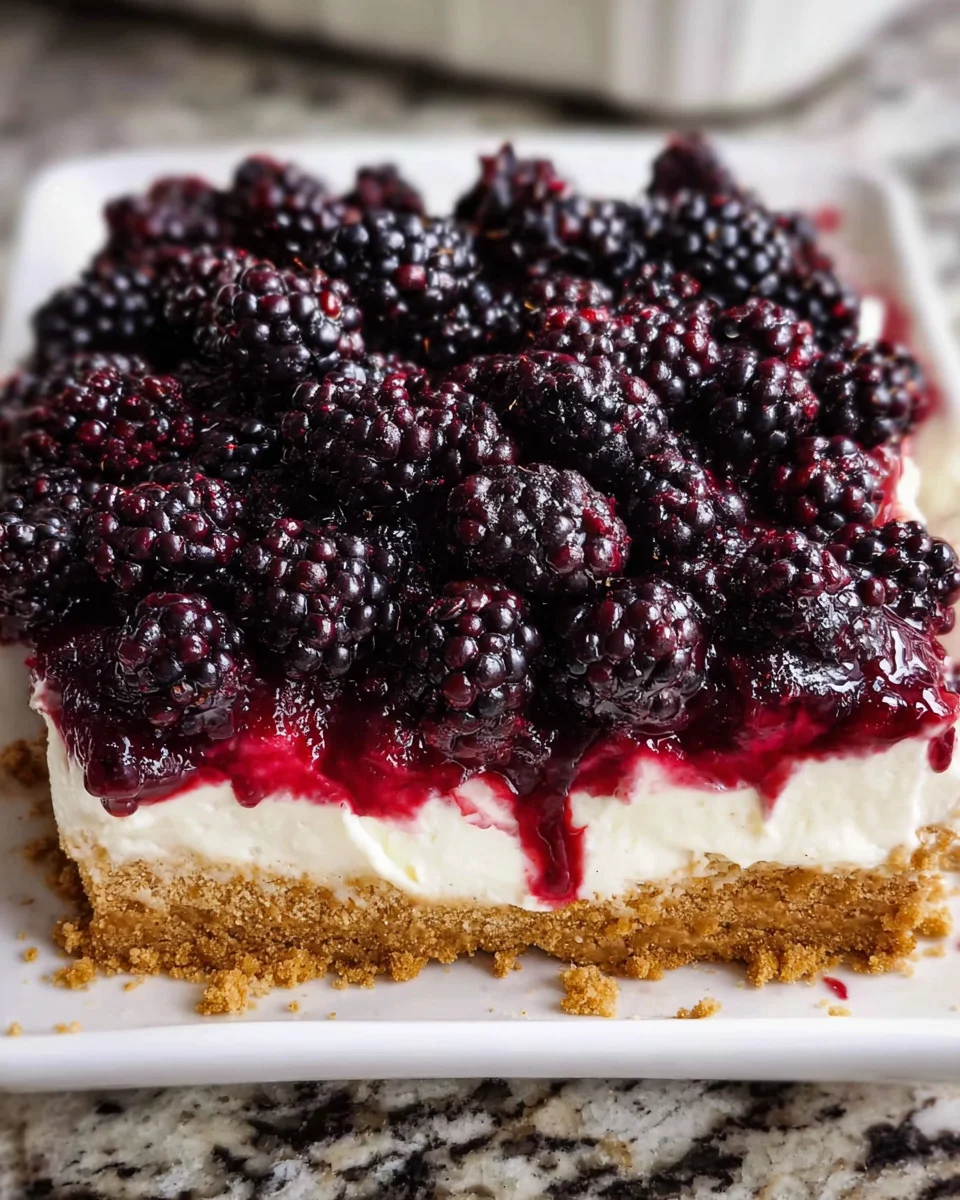
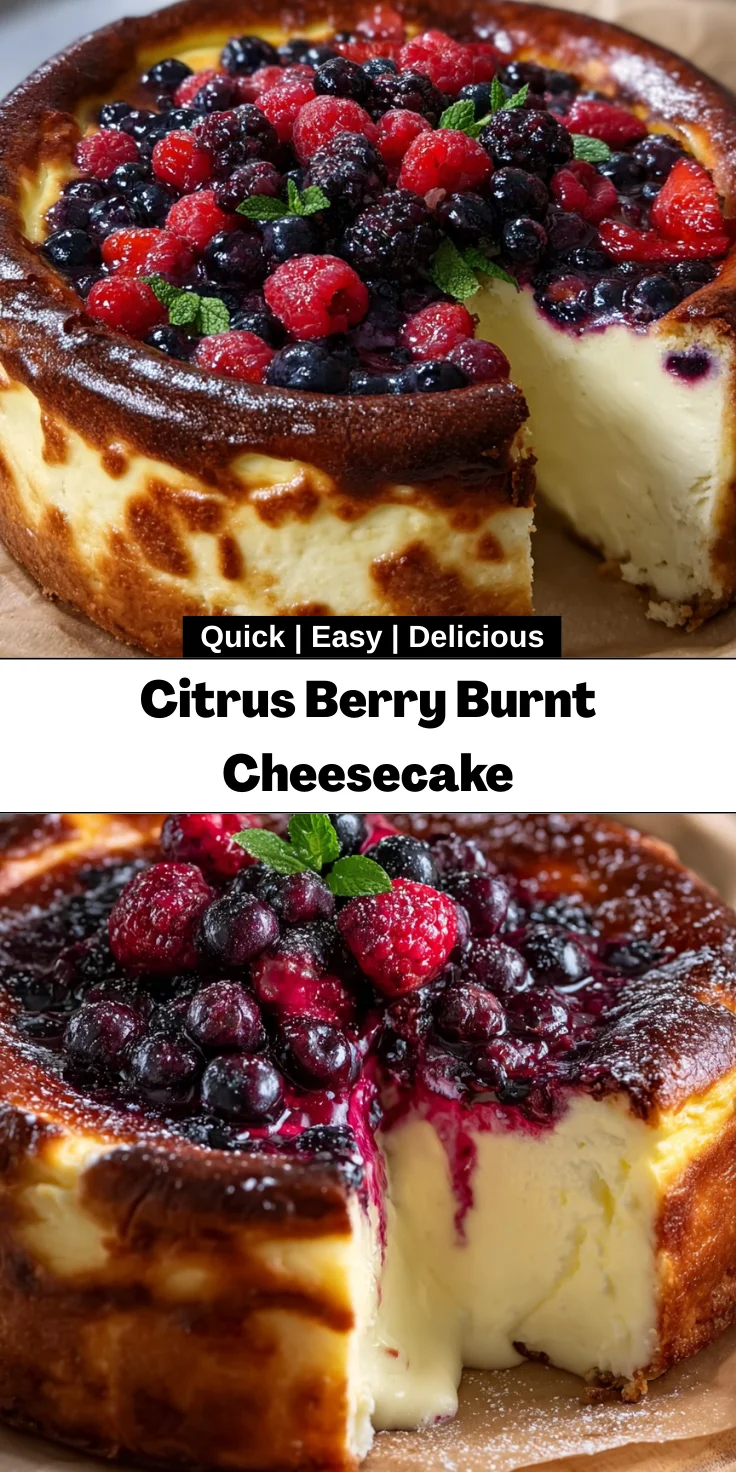
- Fresh berries: Raspberries or blackberries serve not just as a beautiful topping but also as a sweet-tart burst in every bite.
Feel free to mix things up! For a twist, try using different citrus fruits, like lime or even grapefruit zest. You can find all the exact quantities for these ingredients listed at the bottom of the article, perfect for easy printing!
How to Make Citrus Berry Burnt Cheesecake
Creating a Citrus Berry Burnt Cheesecake is a delightful adventure in the kitchen. It may seem intimidating at first, but I promise you, it’s more straightforward than it looks. Let’s dive into each step, so you can master this dessert like a pro!
Step 1: Prepare the Oven and Pan
Start by preheating your oven to 450°F. This high temperature is key to achieving that signature burnt top.
Next, grab a 7-inch springform pan. Line it completely with parchment paper, allowing the edges to rise above the rim. This’ll help prevent sticking and ensure an easy release later on.
Step 2: Mix the Cream Cheese and Sugar
In a large mixing bowl, add the softened cream cheese and granulated sugar. Beat them together for about 4-5 minutes. The goal is to achieve a super smooth and creamy texture.
Don’t rush this step! A well-mixed base is crucial for that perfect cheesecake consistency.
Step 3: Incorporate Flavors
Once you have a creamy mixture, it’s time to add flavor! Stir in the vanilla extract and your choice of citrus zest. This is where the magic happens; the zest wakes up the whole dish!
Step 4: Blend in the Cream
Now, pour in the heavy cream and mix just until smooth. This is the secret to that rich, creamy texture you crave in a cheesecake.
Remember, the heavy cream is what makes this dessert feel indulgent!
Step 5: Add Eggs Gradually
Next, it’s time for the eggs! Add them one at a time, mixing well after each addition. This step ensures that your cheesecake is evenly mixed.
Trust me, this makes a world of difference in texture!
Step 6: Incorporate Flour
Sprinkle the all-purpose flour over your creamy batter. Gently fold it in until just combined, being careful not to overmix. Overmixing can lead to a dense cheesecake. We want it airy and light!
Step 7: Fold in the Berries
Finally, it’s time to add those beautiful berries! Gently fold them into the batter. This step keeps the berries intact, creating delicious bursts of flavor throughout the cheesecake.
Step 8: Bake the Cheesecake
Pour the batter into your prepared pan and smooth the top. Then, bake for 20-25 minutes. The cheesecake should be a deep golden brown on top, but you want the center to have a slight jiggle—it’ll set as it cools!
Step 9: Cool and Refrigerate
Once baked, allow the cheesecake to cool completely at room temperature. Patience is key here! Not letting it cool completely can affect the texture.
For the best flavor, refrigerate it overnight before slicing. The wait is worth it—I promise!
Tips for Success
- Make sure all your ingredients are at room temperature. This helps create a smooth batter.
- When folding berries, stay gentle to keep them intact and bursting with flavor.
- Use a kitchen scale for accuracy in measurements, which can lead to perfection!
- Let the cheesecake cool completely before chilling. It ensures the best texture.
- Experiment with different citrus zests for a fun flavor twist!
Equipment Needed
- 7-inch springform pan: Ideal for easy removal. A regular cake pan can work, but be careful when serving.
- Mixer: A hand mixer is perfect, but a stand mixer saves time and effort.
- Mixing bowls: Choose large, sturdy bowls for easy mixing.
- Parchment paper: Essential for lining the pan. Wax paper isn’t a good substitute!
- Spatula: A silicone spatula helps with folding and scraping the bowl clean.
Variations of Citrus Berry Burnt Cheesecake
- Chocolate Citrus Cheesecake: Add cocoa powder to the batter for a rich chocolate twist. Pair it with orange zest for a harmonious balance.
- Gluten-Free Option: Substitute all-purpose flour with almond flour or a gluten-free baking blend to make this cheesecake gluten-free without sacrificing flavor.
- Fruit Medley: Instead of just raspberries or blackberries, try a mix of seasonal fruits like blueberries, strawberries, or sliced peaches. The more, the merrier!
- Coconut Infusion: Add shredded coconut to the batter and top with coconut cream for a tropical twist that’s utterly delicious.
- Vegan Version: Use vegan cream cheese and aquafaba (chickpea brine) whisked into stiff peaks instead of eggs for a plant-based adaptation.
- Lower Sugar Version: Replace granulated sugar with a natural sweetener like maple syrup or erythritol for a slightly healthier option.
Serving Suggestions for Citrus Berry Burnt Cheesecake
- Pair with a dollop of whipped cream for added lightness and creaminess.
- Serve with a scoop of vanilla ice cream for a heavenly combination.
- Garnish with mint leaves for a pop of color and freshness.
- Complement with a berry coulis drizzled on the plate for visual flair.
- Enjoy it with a cup of herbal tea or sparkling water for balance.
FAQs about Citrus Berry Burnt Cheesecake
Can I use different types of berries?
Absolutely! Feel free to mix and match with berries like blueberries, strawberries, or even cherries. Each brings its unique flavor!
What’s the best way to store leftovers?
Store any leftover Citrus Berry Burnt Cheesecake in an airtight container in the refrigerator. It should stay delicious for up to five days.
Can I freeze this cheesecake?
Yes! Wrap individual slices in plastic wrap and aluminum foil before freezing. They can last up to three months. Just thaw overnight in the fridge before enjoying!
What can I substitute for heavy cream?
If you’re looking for a lighter option, you can use half-and-half or full-fat coconut milk. Just remember, this will change the final flavor slightly.
Is it necessary to chill the cheesecake overnight?
While it’s tempting to dive in right away, chilling overnight helps the flavors meld and improves the texture. You won’t regret the wait!
Final Thoughts on Citrus Berry Burnt Cheesecake
There’s something truly special about sharing a homemade dessert that reflects your love and effort. This Citrus Berry Burnt Cheesecake isn’t just a treat; it’s a sweet hug for your taste buds. The combination of zesty citrus, rich creaminess, and fresh berries creates an experience that delights at every bite. Trust me, you’ll want to pull this recipe out for all occasions, from cozy family dinners to elegant gatherings. So roll up your sleeves, embrace the joy of baking, and create a little magic in your kitchen with this unforgettable dessert!
Print
Citrus Berry Burnt Cheesecake
- Total Time: 45 minutes + chilling time
- Yield: 8 servings 1x
- Diet: Vegetarian
Description
A delicious citrus-infused burnt cheesecake topped with fresh berries.
Ingredients
- 16 ounces cream cheese, softened
- 1/2 cup granulated sugar
- 1 teaspoon vanilla extract
- Pinch of salt
- 3 large eggs, room temperature
- 2 teaspoons lemon zest or orange zest
- 1 cup heavy cream
- 2 tablespoons all-purpose flour
- 2 cups fresh raspberries or blackberries
Instructions
- Preheat the oven to 450°F. Line a 7-inch springform pan completely with parchment paper, allowing the paper to extend above the rim.
- In a large mixing bowl, beat the cream cheese and sugar together for about 4–5 minutes until very smooth and creamy.
- Mix in the vanilla extract, citrus zest, and salt until evenly blended.
- Pour in the heavy cream and mix just until the batter is smooth.
- Add the eggs one at a time, mixing well after each addition until fully incorporated.
- Sprinkle the flour over the batter and gently mix until just combined, being careful not to overmix.
- Gently fold in the berries, keeping them as intact as possible.
- Pour the batter into the prepared pan and smooth the top.
- Bake for 20–25 minutes, until the top is deeply golden brown and the center still has a slight jiggle.
- Allow the cheesecake to cool completely at room temperature, then refrigerate overnight before slicing and serving.
Notes
- Ensure all ingredients are at room temperature for a smooth batter.
- Allow the cheesecake to cool completely for the best texture.
- Prep Time: 20 minutes
- Cook Time: 25 minutes
- Category: Dessert
- Method: Baking
- Cuisine: American
Nutrition
- Serving Size: 1 slice
- Calories: 350
- Sugar: 22g
- Sodium: 150mg
- Fat: 25g
- Saturated Fat: 15g
- Unsaturated Fat: 8g
- Trans Fat: 0g
- Carbohydrates: 30g
- Fiber: 2g
- Protein: 5g
- Cholesterol: 110mg