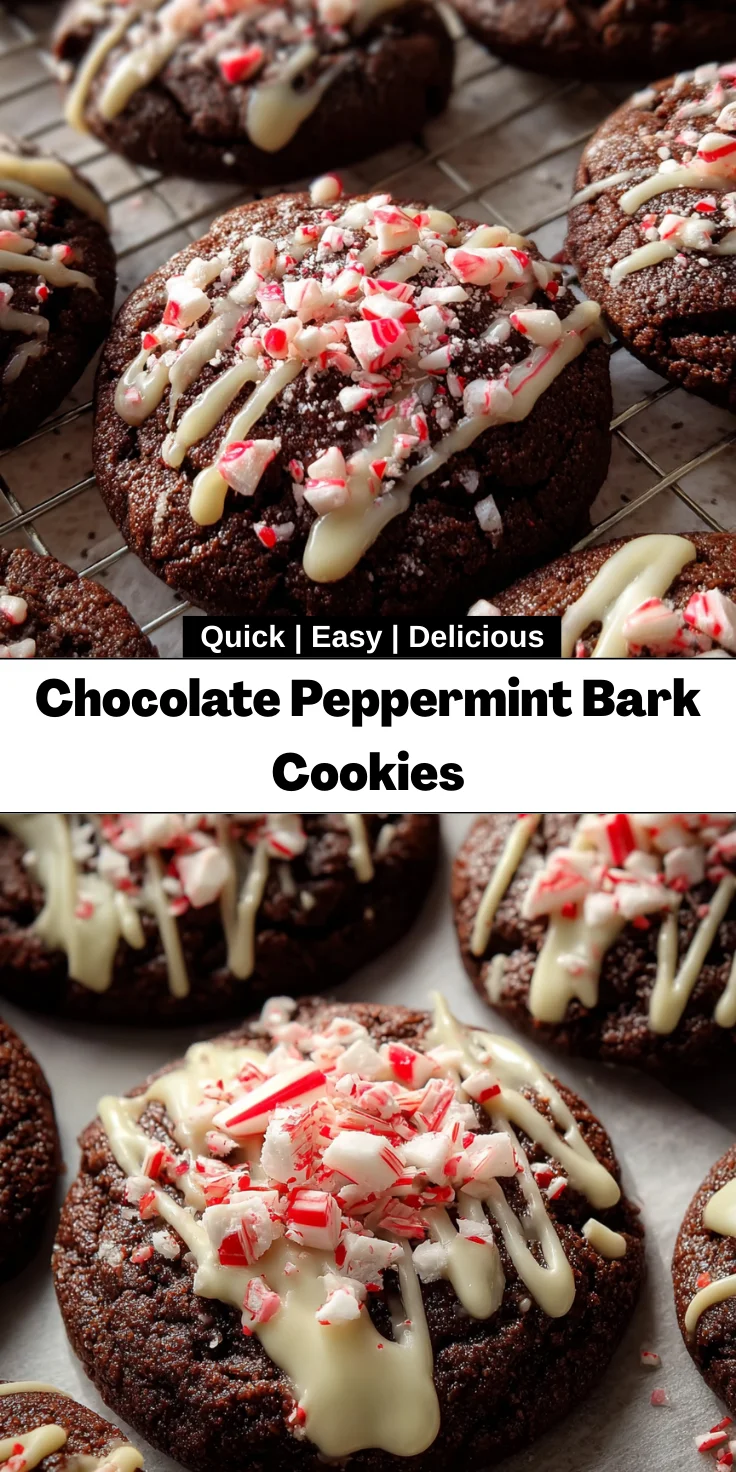
Introduction to Chocolate Peppermint Bark Cookies
Ah, the holiday season—no matter how busy life gets, there’s always time for a little sweetness. If you’re like me, Chocolate Peppermint Bark Cookies are a delightful way to add some joy to those hectic days. These cookies blend rich chocolate with a refreshing hint of peppermint, creating a festive treat that’ll surely impress family and friends. They’re incredibly simple to whip up, making them a go-to for busy moms and professionals alike. Let’s dive into making these delightful cookies that promise to bring a smile to your loved ones’ faces!
Why You’ll Love This Chocolate Peppermint Bark Cookies
These Chocolate Peppermint Bark Cookies are not just delicious; they’re a lifesaver! When time is tight, they come together in just 32 minutes. The combination of rich chocolate and zesty peppermint offers an irresistible flavor that’s perfect for any celebration. Plus, they’re a hit with everyone, including picky eaters. You’ll find joy in sharing these festive treats, creating sweet memories without hours in the kitchen.
Ingredients for Chocolate Peppermint Bark Cookies
Gathering the right ingredients can make all the difference, especially with Chocolate Peppermint Bark Cookies. Here’s what you’ll need:
- Unsalted butter: This creates a creamy texture. Always soften it first for smoother mixing.
- Granulated sugar: Sweetness is key! Sugar adds flavor and helps with cookie structure.
- Egg: It binds everything together and contributes to the cookie’s texture.
- Peppermint extract: The star of the show! A little goes a long way in delivering that festive flavor.
- All-purpose flour: Provides the base. It helps create that perfect chewy yet soft cookie.
- Cocoa powder: Cocoa gives these cookies a rich chocolate flavor. Look for unsweetened to balance the sweetness.
- Baking soda: A leavening agent to help the cookies rise and make them fluffy.
- Salt: Just a pinch enhances all the flavors. It’s a key ingredient in cookies.
- White chocolate: For drizzling on top, adding sweetness and a beautiful finish.
- Crushed peppermint candy canes: These add a fun crunch and that signature holiday look. Feel free to use store-bought or crush your own!
For exact measurements, check the bottom of the article, where you’ll find a printable version ready for your kitchen adventures.
How to Make Chocolate Peppermint Bark Cookies
Ready to spread some cheer? Let’s jump into how to make these Chocolate Peppermint Bark Cookies! With these simple steps, you’ll be enjoying the deliciousness in no time. Cooking doesn’t have to be complicated; I promise this process is as easy as pie!
Step 1: Prepare for Baking
First things first, preheat your oven to 350°F (175°C). While that’s warming up, line a baking sheet with parchment paper. This bit of preparation is key. It saves your cookies from sticking and makes cleanup a breeze!
Step 2: Cream Butter and Sugar
In a large mixing bowl, beat the softened butter with the granulated sugar until it’s light and fluffy. This step is crucial because it incorporates air into the mixture, giving you a tender cookie. Think of it like giving your dough a warm hug!
Step 3: Add Egg and Peppermint
Now, crack in the egg and add that enticing peppermint extract. Mix it well! The egg binds everything together, while peppermint brings in that festive essence. It’ll smell heavenly—trust me!
Step 4: Combine Dry Ingredients
In another bowl, whisk together the flour, cocoa powder, baking soda, and salt. Each of these components plays a role in making your cookies just right. The flour gives structure, cocoa adds richness, and baking soda helps them rise nicely.
Step 5: Form the Dough
Now slowly add your dry mixture to the wet ingredients. Stir until a soft dough forms. If you find it a tad sticky, don’t worry! That just means it’s going to produce a deliciously chewy cookie.
Step 6: Shape and Bake Cookies
Roll the dough into small balls—about 1 inch in diameter—and place them evenly on your prepared baking sheet. Gently press each ball to flatten it slightly. This little push ensures even baking, which is essential for that perfect cookie texture!
Step 7: Bake
Bake in the preheated oven for 10 to 12 minutes. As they bake, enjoy the delightful aroma wafting through your home. Once done, remove the cookies and let them cool completely on a wire rack. Cooling is vital; it keeps the cookies from becoming too soft when we decorate them!
Step 8: Decorate with Topping
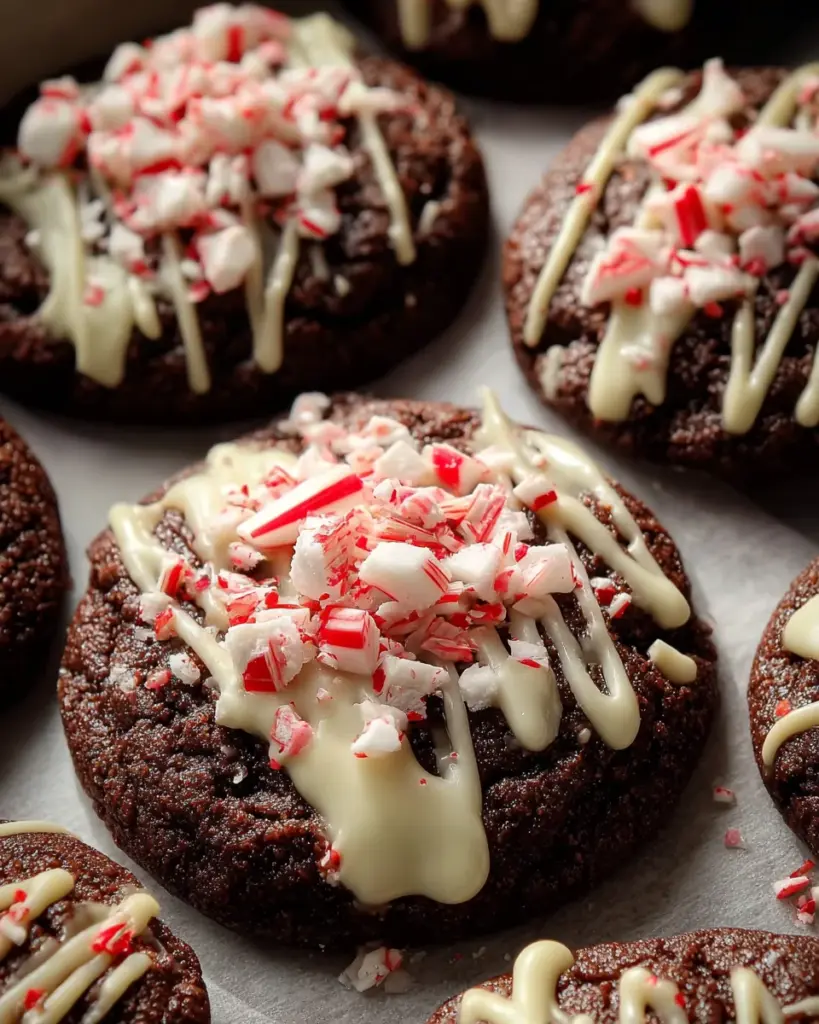
Finally, it’s time for the fun part! Drizzle the melted white chocolate over the cooled cookies. Then, sprinkle those crushed peppermint candy canes for that extra festive flair. These final touches make each cookie look so inviting!
Tips for Success
- Always use softened butter for easy mixing and a creamy texture.
- Use a cookie scoop for evenly sized cookies; it makes the job quicker!
- Don’t rush the cooling process, as it helps your cookies retain their shape.
- Experiment with the amount of peppermint extract for a stronger or milder flavor.
- Store leftovers in an airtight container to keep them fresh longer.
Equipment Needed
- Baking sheet: A standard one works well, but a silicone baking mat is a great alternative.
- Parchment paper: Essential for easy cleanup, you can use a reusable baking mat instead.
- Mixing bowls: Choose a large bowl for blending. Stainless steel or glass both work beautifully.
- Cookie scoop: An ice cream scoop works if you don’t have one handy!
- Wire rack: A cooling rack is best, but a plate may work in a pinch.
Variations
- Gluten-free version: Substitute all-purpose flour with a 1:1 gluten-free baking blend for a gluten-free treat.
- Dark chocolate twist: Use dark cocoa powder instead of regular cocoa for a richer chocolate flavor.
- Mint chocolate chips: Add a handful of mint chocolate chips to the dough for an extra burst of chocolate!
- Nutty delight: Incorporate chopped nuts like walnuts or almonds to add a delicious crunch.
- Vegan adaptation: Replace the butter with coconut oil and the egg with a flax egg for a vegan-friendly version.
Serving Suggestions
- Pair your cookies with a warm mug of hot cocoa topped with whipped cream for a cozy treat.
- Serve on a festive platter, garnished with extra crushed candy canes for a colorful display.
- These cookies also make a delightful gift when packaged in a decorative tin!
FAQs about Chocolate Peppermint Bark Cookies
What can I do if my dough is too sticky?
If your dough feels sticky, don’t worry! You can add a bit more flour, a tablespoon at a time, until it reaches a workable consistency. Just be careful not to add too much, as it might affect the texture of your cookies.
Can I make these cookies ahead of time?
Absolutely! You can prepare the dough and refrigerate it for up to three days. When you’re ready to bake, simply scoop out the dough and roll it into balls. They’ll make your kitchen smell heavenly in no time!
How do I store leftover cookies?
Store any leftover Chocolate Peppermint Bark Cookies in an airtight container at room temperature. They’ll stay delicious for about a week. If you want to keep them longer, freezing works well, too!
Can I use white chocolate chips instead of melting white chocolate?
Yes, you can use white chocolate chips! Just melt them as you would the white chocolate, and they’ll work beautifully as a topping. You might find them easier to handle!
Are these cookies suitable for gift-giving?
Definitely! Pack them in a cute tin or jar and add a festive ribbon. They make a delightful gift, sharing cheer, and love through every bite.
Final Thoughts
As the aroma of Chocolate Peppermint Bark Cookies fills your kitchen, it’s hard not to smile. These festive delights are more than just treats; they’re a way to spread cheer and create moments with loved ones. Picture family gathered around the table, laughter in the air as cookies are shared. Each bite wraps you in a warm embrace of chocolate and peppermint, reminding us of the beauty in simplicity. So, roll up your sleeves, savor the process, and enjoy the sweet joy these cookies bring during this magical season. Happy baking and even happier memories!
Print
Chocolate Peppermint Bark Cookies
- Total Time: 32 minutes
- Yield: 24 cookies 1x
- Diet: Vegetarian
Description
Delicious cookies infused with peppermint and topped with white chocolate and crushed candy canes, perfect for the festive season.
Ingredients
- 226 grams unsalted butter, softened
- 200 grams granulated sugar
- 1 large egg
- 1 teaspoon peppermint extract
- 250 grams all-purpose flour
- 42 grams cocoa powder
- 0.5 teaspoon baking soda
- 0.25 teaspoon salt
- 115 grams white chocolate, melted
- 65 grams crushed peppermint candy canes
Instructions
- Prepare for Baking: Preheat oven to 175°C. Line a baking sheet with parchment paper.
- Cream Butter and Sugar: In a large bowl, cream together softened butter and sugar until mixture is light and fluffy.
- Add Egg and Peppermint: Beat in the egg and peppermint extract until fully incorporated.
- Combine Dry Ingredients: In a separate bowl, whisk together flour, cocoa powder, baking soda, and salt.
- Form the Dough: Gradually add the dry mixture to the wet ingredients, mixing until a soft dough forms.
- Shape and Bake Cookies: Roll dough into 2.5 cm balls and arrange them evenly on the prepared baking sheet. Gently press each ball to flatten slightly.
- Bake: Bake for 10 to 12 minutes. Allow cookies to cool completely on a wire rack.
- Decorate with Topping: Once cookies are cooled, drizzle with melted white chocolate and immediately sprinkle crushed peppermint candy canes on top.
Notes
- Make sure the butter is softened for easier mixing.
- Allow the cookies to cool completely before decorating to prevent the white chocolate from melting.
- Store any leftover cookies in an airtight container.
- Prep Time: 20 minutes
- Cook Time: 12 minutes
- Category: Dessert
- Method: Baking
- Cuisine: American
Nutrition
- Serving Size: 1 cookie
- Calories: 150
- Sugar: 10g
- Sodium: 50mg
- Fat: 7g
- Saturated Fat: 4g
- Unsaturated Fat: 3g
- Trans Fat: 0g
- Carbohydrates: 20g
- Fiber: 1g
- Protein: 2g
- Cholesterol: 20mg